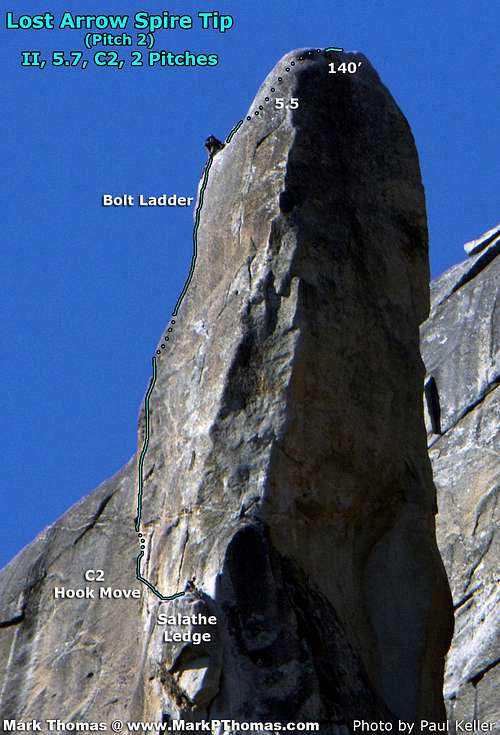
My History with Heights
I have a confession to make. I used to be deathly afraid of heights.
I still am, sort of, but I’ve learned to work with it.
My father believes it stems from my premature attempt at toddler free-soloing during a trip to Lake Powell, which left me perched on a ledge well below the top of the sandstone escarpment but above a 50-100 ft clean drop into deep water. The exposure was bad enough that he was scared down climbing to me and he had nightmares for a while after the rescue. No one had any idea how I had gotten in such a precarious position, and if it hadn’t been for luck and a passing motorboat seeing me & reporting me to my parents, who knows what would have happened?
As a child I would freak out and cry when we would be driving on a road alongside a steep drop (like the ones along roadsides in Great Basin National Park), though airplanes didn’t scare me unless we were taking off or landing. Technically it wasn’t heights that scared me – it was ‘exposure’. Airplanes were manageable, but nothing was more terrifying to me than the idea of being out on a big open face with a view straight down the fall line. No one would have expected me to get into mountaineering, rock climbing, or, especially, big wall climbing.
During a winter descent into a canyon in the San Rafael Swell as a Boy Scout, we had to rappel to get past cliffs and snow covered slabs. It was there that I first realized that when I was connected into a safety system, although I was still frightened, I could take that fear and ‘set it aside’, so to speak, and focus on the task at hand. This allowed me to get into rock climbing, though I still have moments atop some climbs when I’m unroped in exposed terrain where I act, as my late friend Brent Haick put it, “Like a cat stuck in a tree.”
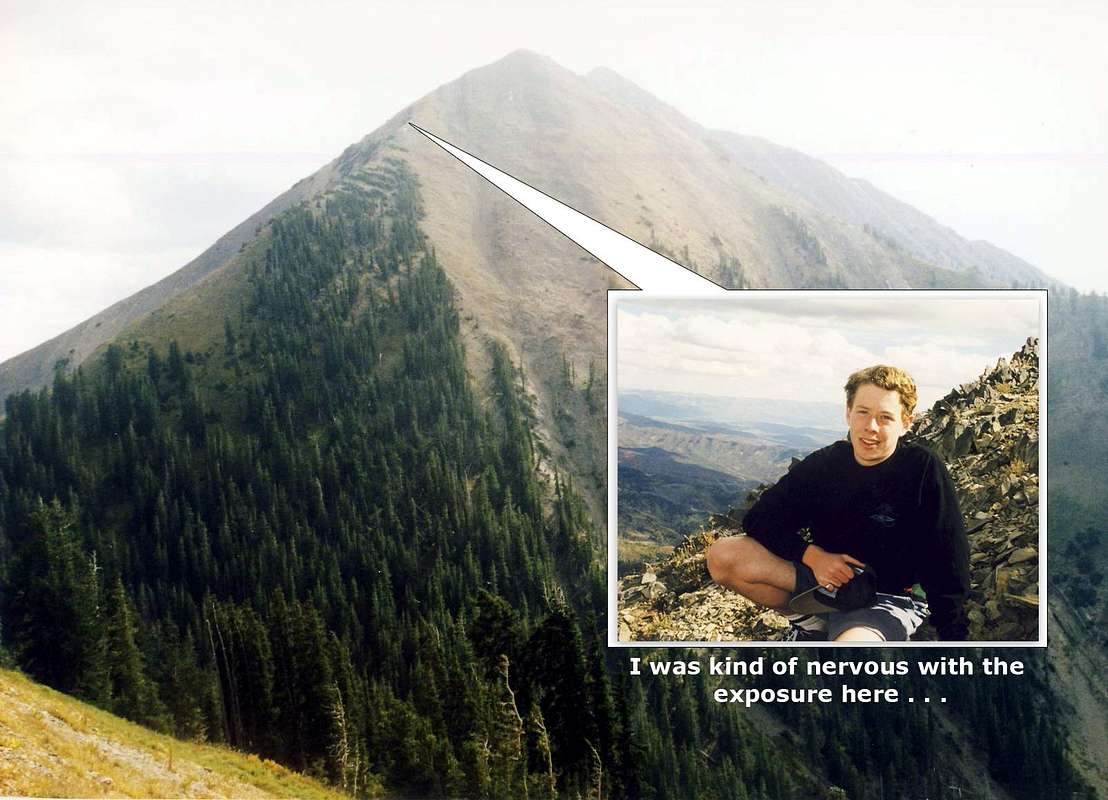
![]() |
| October, 1998 - I didn't summit Mt Nebo this time, but I returned a year later and succeeded in hiking to the top. |
In high school I started climbing outdoors and the summer of 2002 just before I left for college I followed my first multi-pitch trad climb on Outside Corner (5.7, 3P) on JHCOB Wall
[1] with my climbing partner, Gary. At that time I was aware of Lost Arrow Spire (LAS) and Gary was an old-timer from Yosemite who told me on this trad climb that he had done the LAS Tip in his younger years and that it was a stellar climb. It sounded like the last thing I would EVER want to do.
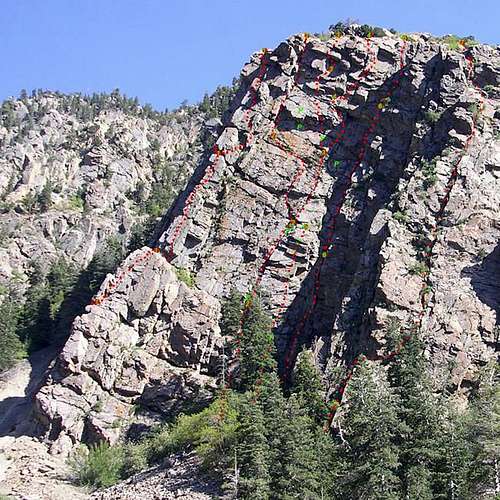
![]() |
JHCOB (Jesus H-Christ On a Bicycle) Wall seen
from the North. Only 3 Pitches Tall. |
|
![]() |
| Yosemite Falls & Lost Arrow Spire at Night. |
|
My experience on Outside Corner was similar to that when following multi-pitch climbs for years to come. I could will myself into action, but even with a nice ledge to sit on and a 3-piece equalized anchor built on bomber pro, if I felt exposed I could never relax. There was always an underlying feeling of terror that left me uneasy even as I tried to logically put such worries aside and enjoy myself. The idea of a hanging belay TERRIFIED ME. I made several weak attempts to get into lead climbing, but I never got beyond the point of leading 5.5 confidently and 5.6 only if I could see the pitch first. Oddly I was fine in corners and on ridges, but big open faces left me feeling very exposed.
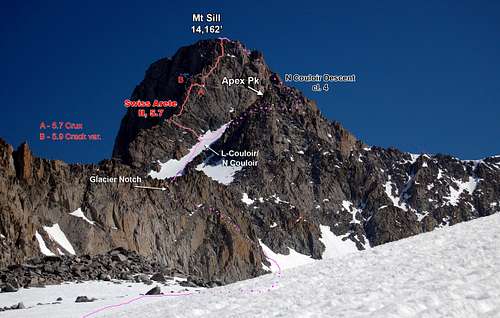
![]() |
| Mt Sill. When I Followed Dirk on the Swiss Arete in 2003, I Was Pretty Nervous with the Exposure |
In 2010 everything seemed to finally click.
[2] I was suddenly able to push myself to lead harder and more confidently. In exposed terrain or hard climbing I would become hyperfocused on the moves I made and would lose any real appreciation for the exposure (although not the true hazards). I could even enjoy hanging from the anchor. In prior years I had turned down several climbing partners who had tried to talk me into attempting a big wall because, frankly, that sounded like one of the scariest things I could do.
 |
| Leading Hand Jive (5.9), in Little Cottonwood Canyon |
|
 |
Looking Down the Most Exposed Part of
Traveler Buttress (5.9, 4P) |
|
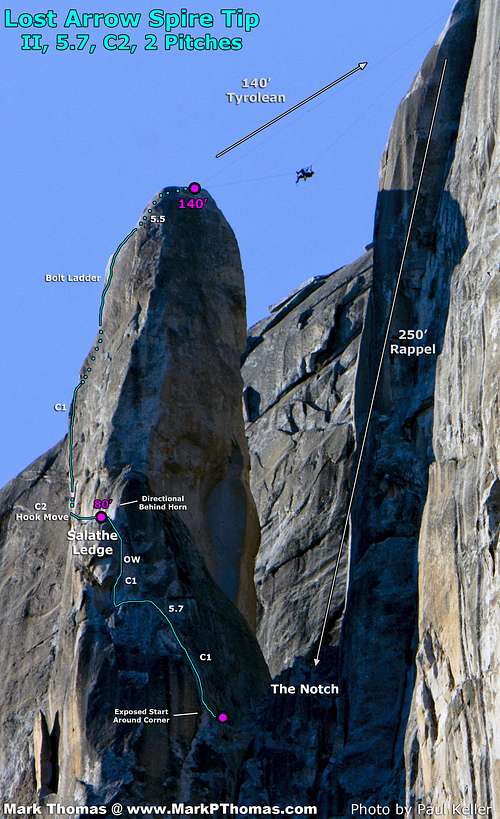
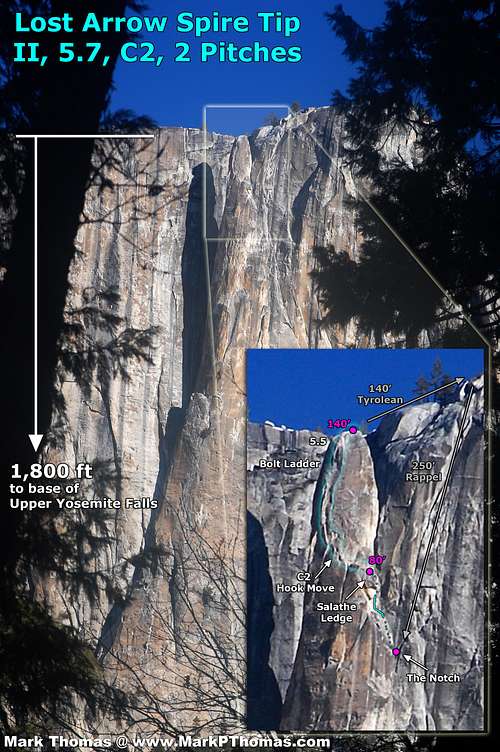
When Shane Rathbun started bugging me last year, I started getting interested. Theoretically I was interested. I still didn’t know if I could psychologically handle a big wall. LAS Tip, in my mind, represented the ultimate test in handling exposure, since not only was it VERY exposed, but that exposure comes on hard & fast as the climb is first approached by rappelling from the rim rather than gradually gaining height over pitches of climbing. I made it my goal to do the climb in Fall 2011, not only as a beginner aid climbing goal, but to truly see if I had what it took to be able to handle the exposure of and do some big wall routes.
Prep Climbs
As the trip came together, I planned to do the climb over the weekend of September 17-18 with my friend, Eddy Kim, who was also just starting out aid climbing. We had practiced some aid climbing together outside and at the gym, and had rehearsed the Tyrolean system
numerous times in the weeks leading up to the climb to make sure we really understood what we were doing.
 |
| Eddy doing a Tyrolean at Indian Rock Park in Berkeley |
|
 |
| More Playing on the Tyrolean |
|
Eddy was fine leading bolt ladders, but since he was not as comfortable in leading on gear placements, I offered to lead both pitches of LAS Tip. Fortunately I had gotten
plenty of practice hooking recently.
 |
You Have to be Creative to Make
Hooking Scary at These Heights |
|
 |
Mock Leading "The Crack" on Beaver Street Wall (5.10b R).
We Didn't Know if it Would Go, but it Did! C2-C2+? |
|
September 17 we chose to crag, do some practice aid, and hump our gear up to Yosemite Point so that we could get a fresh and early start the next day (I also wanted to do some night photography >:-) ).
We climbed at the SE base of El Cap. There was a French party occupying P2 of Pacific Ocean Wall, so while we waited on them we had a great time as I led Gollum, Right, an old school 5.8 that has a variety of interesting moves. With a few directionals I set up a TR on Gollum, Left, a great 5.10a OW with a memorable roof crux.
 |
| Stemming Wide on Gollum, Right (5.8) |
|
 |
| Climbing the Easy Lower Section on Gollum, Left. |
|
 |
| Climbing the Roof OW on Gollum, Left (5.10a). |
|
 |
| Climbing the Squeeze Above the Crux OW on Gollum, Left. |
|
Finally the French party finished and I tried my hand at leading the first pitch of Pacific Ocean Wall (C1). There I learned how to foolishly fall on a C1 aid climb to build my confidence for leading a C2 aid climb:
- Don’t clean the cute frog out of the pin scar you want to use. Be nice :-)
- Place crap gear in the short roof to temporarily exit the corner crack to avoid said cute frog. This requires top-stepping instead of placing another piece if you’re rushed like I was. It also requires reaching right and back since the next piece is in a roof.
- Test with hard tugs and clip aider to crap gear for a bounce test.
- Step high and out from wall into aider suspended from roof & crap gear to begin first bounce .
- Suddenly find yourself hanging up-side down from your last piece with one foot tangled in your last aider, wondering how you got there.
 |
| Pacific Ocean Wall (C1) |
|
 |
You Need Lots of Gear to Aid Climb!
(Or You Need to Back Clean More :-) ) |
|
Approach & Overnight
Just before sunset, Eddy and I began the slog up the Yosemite Falls trail with our friend, Owen Bailey, who was interested in camping on the Rim and seeing us off on our climb. He was also nice enough to carry the third rope that we would need. We did most of the hike in the dark so sadly I never saw Upper Yosemite Falls. We made good enough time up the trail with our heavy packs that both Eddy and I were on the verge of developing calf cramps by the time we reached the top of Upper Yosemite Falls.
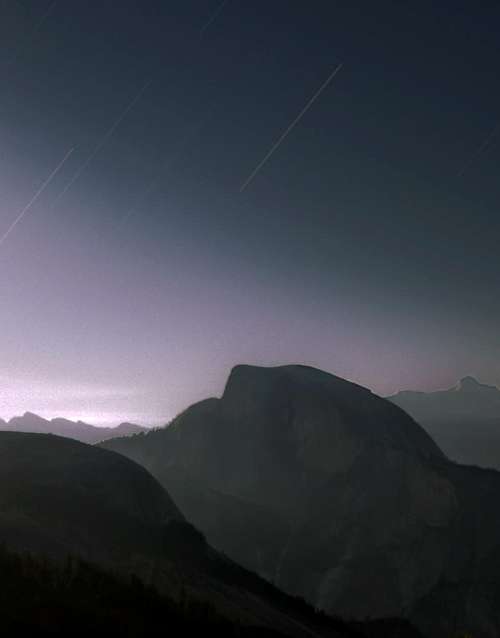
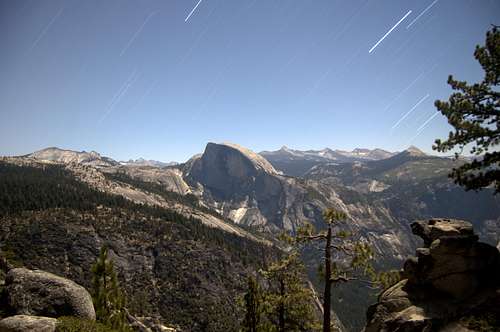
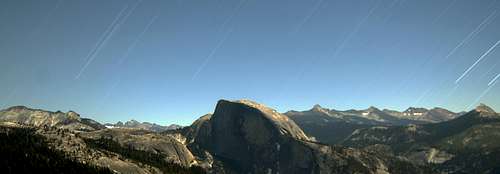
It was surprisingly cold & windy at Yosemite Point, but we found a nice camp on slab & sand sheltered by boulders, and as I resumed my obsession of setting up my camera for long exposures, we ate up and prepared for the next day.
![]() |
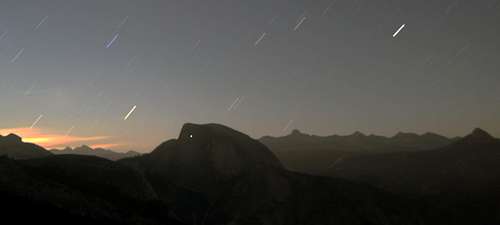
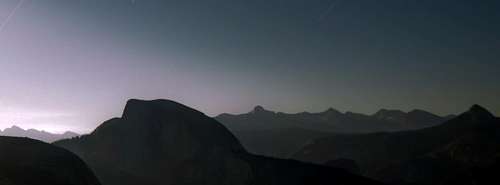
| Half Dome Under Moon Rise |
|
![]() |
| Half Dome Under Full Moon |
|
![]() |
| Half Dome At Night |
|
![]() |
| Half Dome Under Moon Rise |
|
![]() |
| Half Dome Under Full Moon |
|
Fooled
We woke up to cold temperatures and blustery winds. Eddy and Owen reported that they saw another party camping near us heading towards the climb with ropes.
“Oh well,” I said. “Let’s just take our time and head down later so that they are a ways ahead of us.”
I didn’t mind putting the climb off. Just thinking about it was beginning to leave me pretty uneasy, so I didn’t mind putting it off. Sadly once we made it to the Rim it was apparent that they were not climbing LAS that day as we were the only ones there. We could have started earlier as planned. Doh!
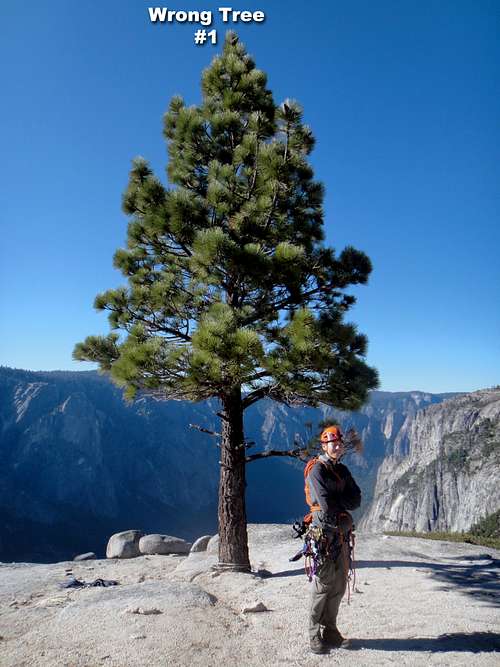
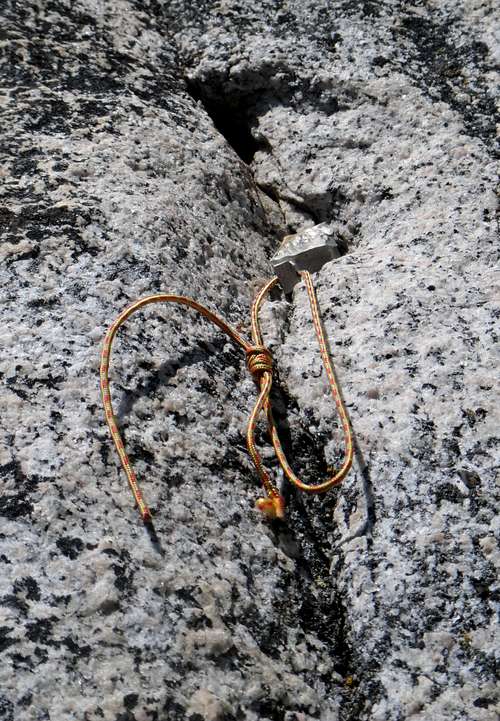
Crux of the Climb: Choosing the Right Tree for the Rappel
Based on my memory of the features I’d seen from climbers doing the Tyrolean from previous trip reports, I chose the wrong tree to rappel from. It was the correct height according to the SuperTopo topo, but the trunk diameter seemed a little thin compared to the dimensions given. We didn’t see any rope marks on the trunk, but we didn’t know how marked up of a tree to expect. We could barely see the tip of LAS, so we decided it must be the correct tree and built our anchor.
Nervously I started to rappel towards the edge. I began to roll back into total commitment over the edge and . . .
Bwaaaaa! . . .
. . . . Doh!
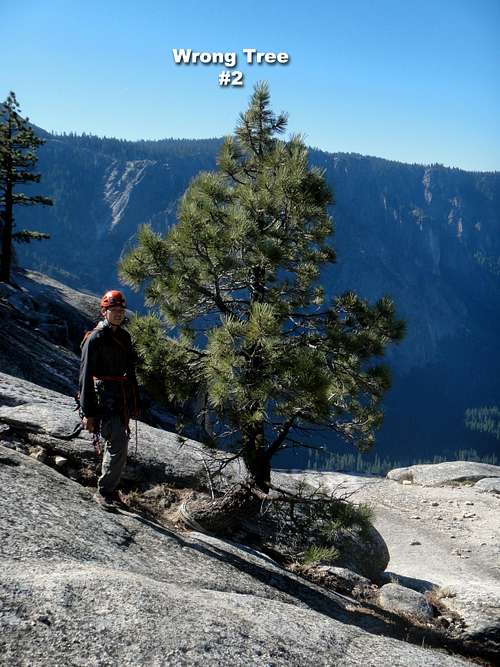
Just as I was teetering on the brink I could see that we were too far north. I hauled myself back up the line and we searched for another tree. We soon found one that seemed properly aligned with the top of LAS. However, while this one had a larger trunk, it was also shorter. Hmmm . . . There were no other reasonable contenders around so we set up a new anchor on this tree.
Nervously I started to rappel towards the edge. I began to roll back into total commitment over the edge and . . .
Bwaaaaa! . . .
. . . . Doh!
![]() |
| Don't Use This Tree |
|
![]() |
| Or This Tree |
|
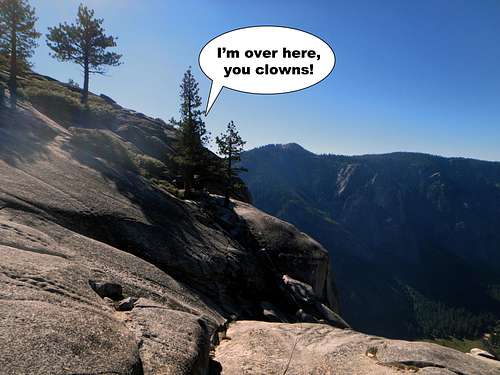
![]() |
| Use This Tree |
|
We were close, but not close enough. Once I rapped far enough to be hanging over the edge I could see that I would still be hanging in space
beside the notch that we had intended to rappel into. I put my jumars on the rope and began my sorry retreat.
I began to wonder if subconsciously I was trying to back out of this climb . . .
We looked around a bit more and wondered about the trees that were much more exposed and seemed too high compared to the height of the top of the LAS. I wandered over there and promptly found a tree with obvious rope marks on the bark.
I made 4 wraps on the tree with our 200’ static line for the anchor and began the rappel.
Bwaaaaa! . . .
Hmm. This isn’t so bad once you’ve gotten started.
The rappel is too long for one rope to reach, so two ropes are joined with a knot. This knot needs to be passed on rappel, which can be a major pain to do. Just by chance this knot was at a height just above a large flake on the wall, so both Eddy and I were each able to stand on the flake, let out rope tension, and pass the knot while standing on the rock before continuing our rappel. :-P
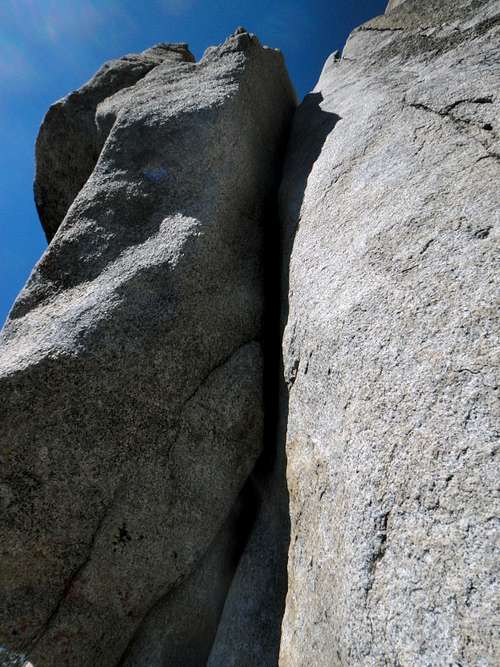
Considering its position, the notch was surprisingly not exposed. By now we were in the warm sun and the winds had stopped. Finally at the notch, with calm air and warm sunshine, we were ready to start the climb.
![]() |
| Rappelling Into the Notch |
|
![]() |
| Lost Arrow Spire from the Notch |
|
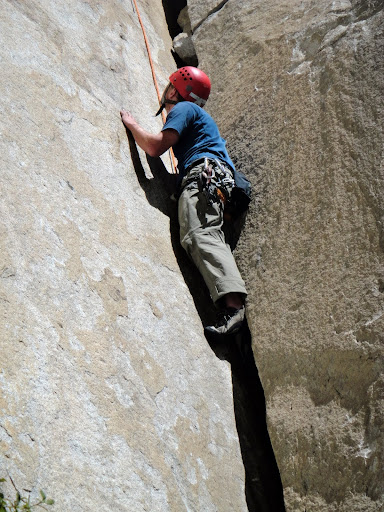
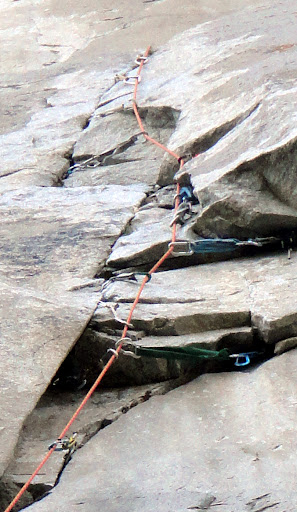
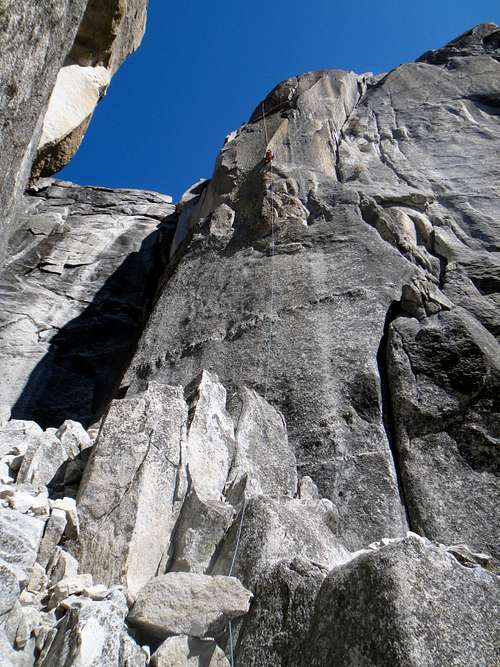
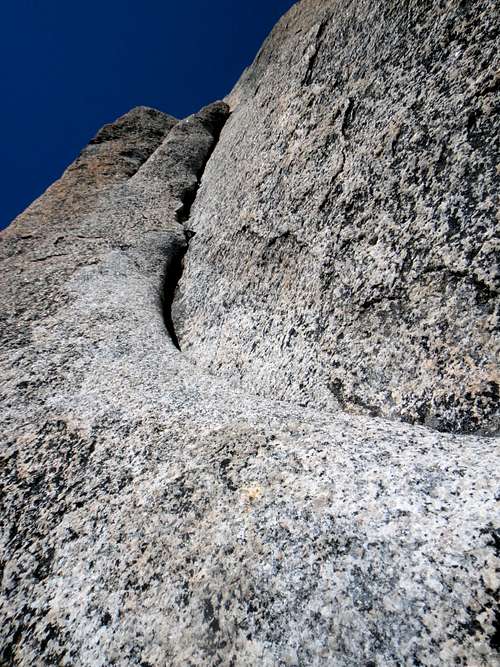
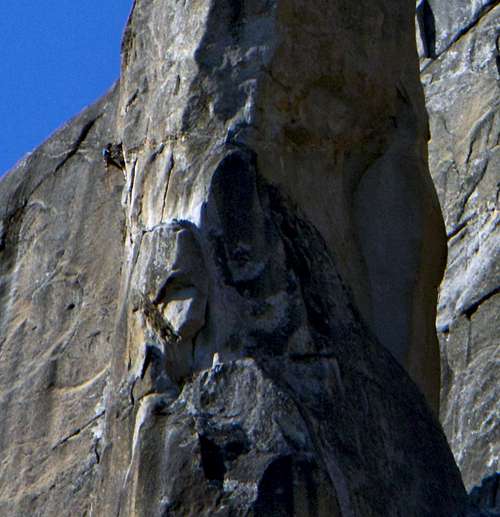
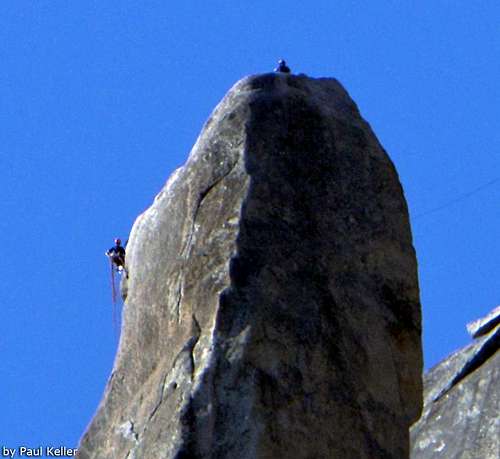
Pitch 1
I had heard that the first pitch starts out with sudden exposure as you reach around a corner. This was exactly the case. It doesn’t look too bad from the notch, but to be able to reach the first aid placement in the crack you have to stand atop a vibrating fin wedged in the corner (fortunately solid), and right from there you can look straight down the spire – and you’re off!
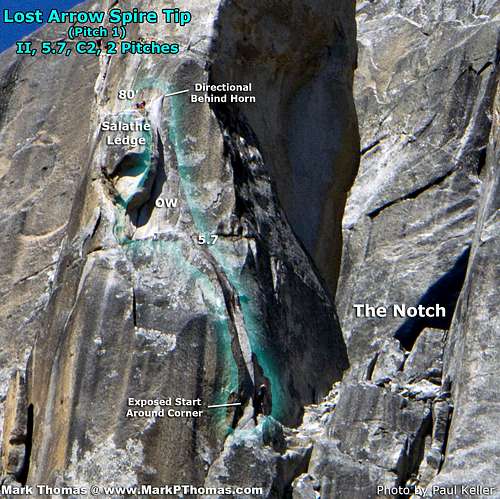
![]() |
| Pitch 1 Route |
|
![]() |
| Exposed Step Over |
|
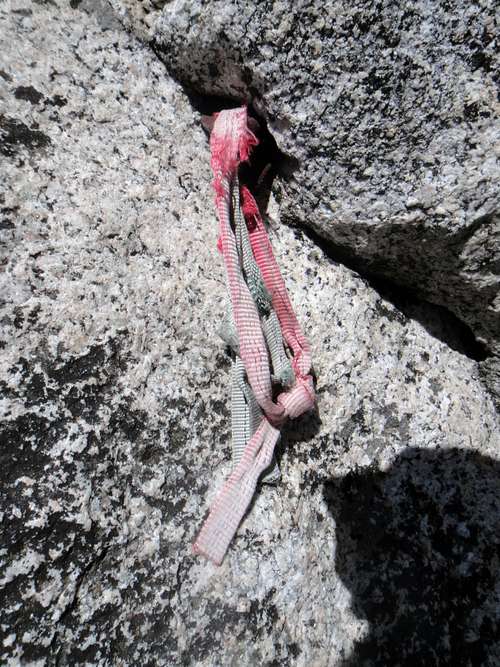
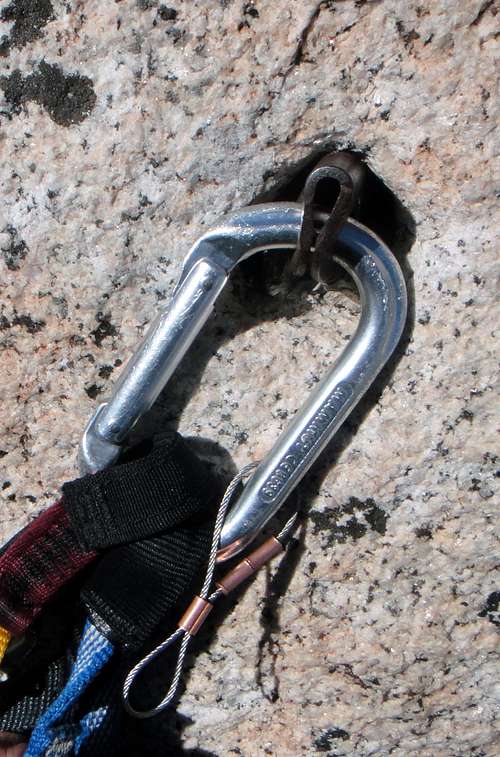
The aid is pretty straightforward: A few pieces in the crack, some bolts, an airy mantel in a dish, and two interesting ‘ratty tatties’ to clip into with faith that the piece wouldn’t pop out and UV battered nylon wouldn’t rip. You had to transition from aid to 5.7 free climbing, but the transition was easy and the free climbing even easier. I’d call it 5.5-5.6 really.
![]() |
| Ratty Tatty #1 |
|
![]() |
| Ratty Tatty #2 |
|
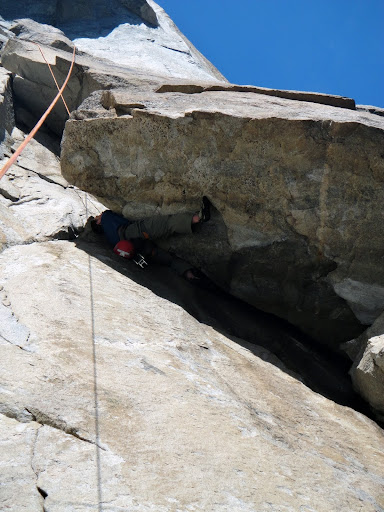
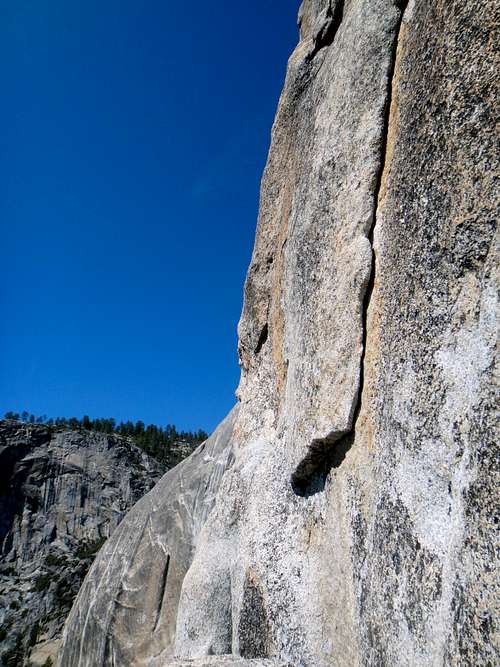
I had expected the OW to be pretty trivial as an aid climb, or even a fun thing to try and lead. So much for expectations. The offwidth section started out overhanging and traversing to the right in such a way that it was very awkward to climb the aiders and place gear around the corner. I placed a #3 4CU to get started, hurled a #4 4CU around the corner, and backcleaned the #3 after I finished wrestling my way onto my next piece. My sole #5 4CU went next, but the crack kept going and by this time I was too gassed to feel like spending time free climbing the offwidth. Apparently I hurled the #4 too quickly as it had become fixed, so for the next while I battled with getting it out before I could move on.
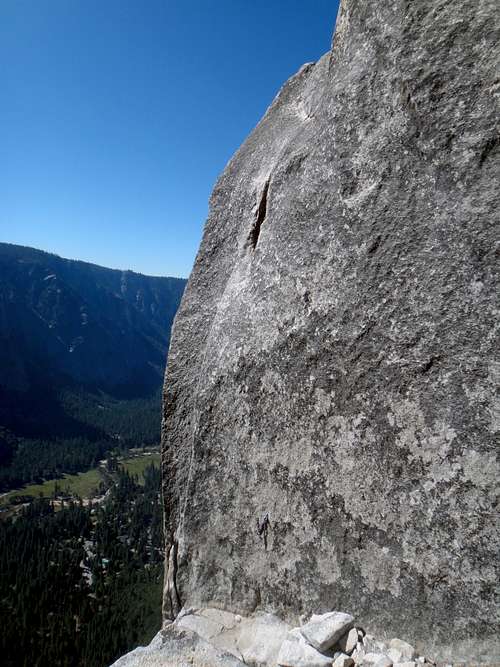
![]() |
| Offwidth on Pitch 1 |
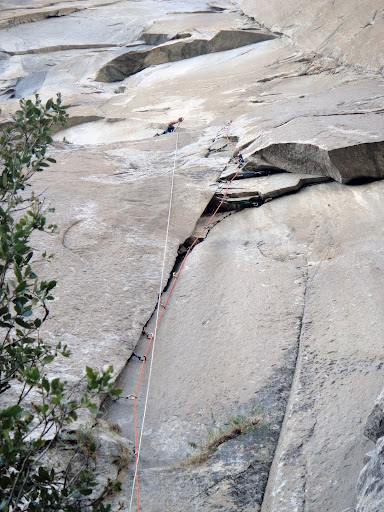
From there the offwidth was straightforward by probably barely less awkward as an aid climb than as a free climb. I was pretty beat up and my gloveless hands pretty battered after the fight was finally over (note to self – wear fingerless gloves). At Salathe Ledge I fixed the line and ran it between a rock horn and through a directional off the right bolt to hold the rope clear of the wide crack. This made it much easier for Eddy to follow and clean.
Doing aid pitches without hauling is a strange thing. As the lead climber, since you are not hauling, so once you fix the line there is nothing to do but wait until your partner finishes cleaning the pitch. I was eating some lunch and spacing out when my cell phone rang.
“This is Mark,” I answered. “Is this Sean?”
“Yeah. Give a wave.”
I waved.
“Yep, we can see you waving. What took you so long?”
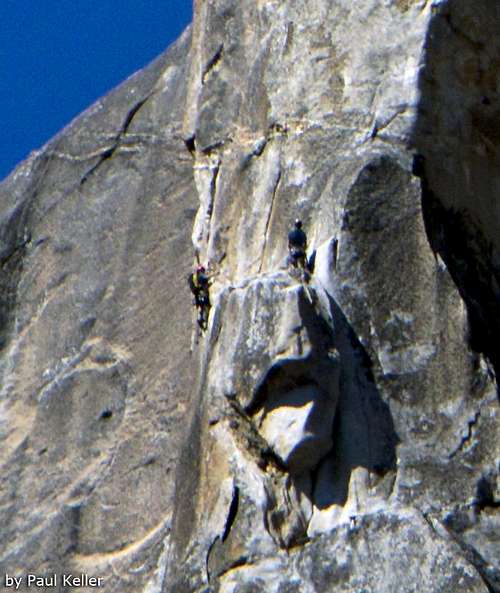
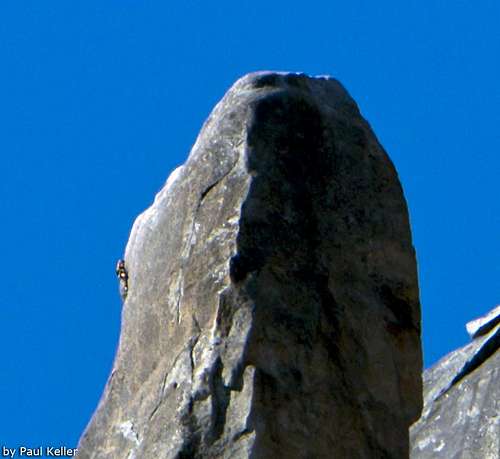
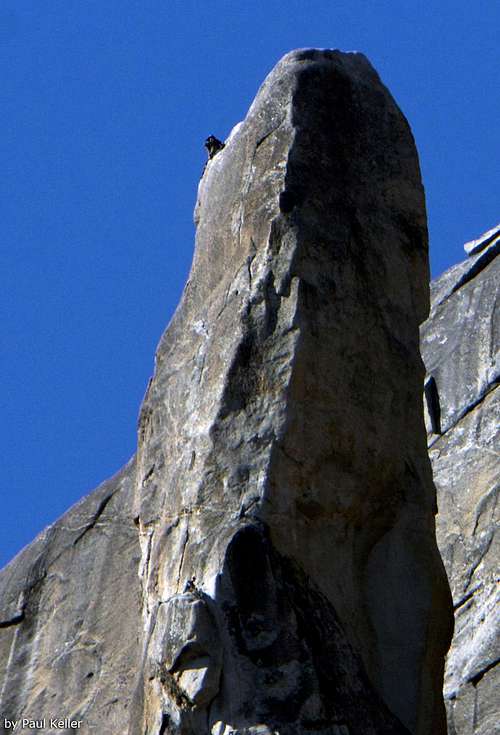
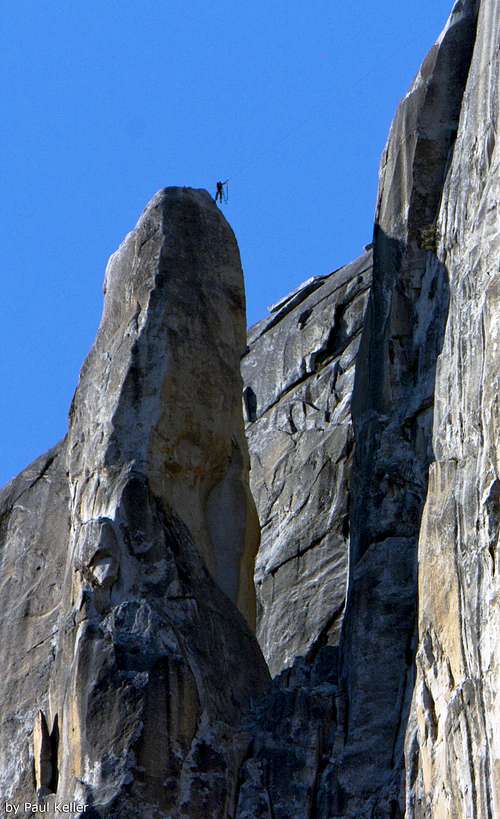
After being inspired by a lucky
photo that
Dirk (Diggler) Summers had taken of a Tyrolean return on LAS Tip a few years earlier, I had enlisted Sean Hermany and his photographer friend Paul Keller to hang out at the meadows by Yosemite Lodge and photograph our Tyrolean. Ideally they would also capture us climbing on the Spire.
![]() |
| Just Finishing P1 |
|
![]() |
| Me & Eddy at Salathe Ledge |
|
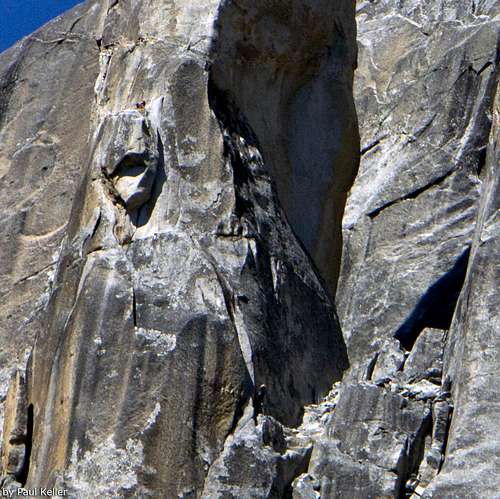
Pitch 2
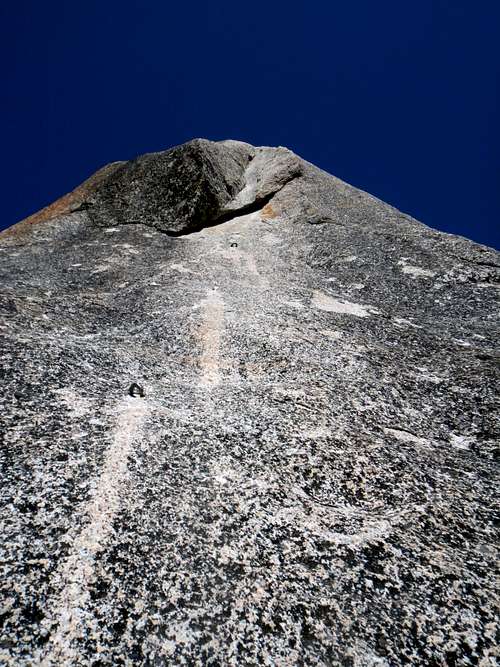
![]() |
| Pitch 2 Route |
After enjoying such a cush ledge, P2 comes on hard and strong. You traverse directly out over the most exposed part of the arête and climb through the crux on mostly fixed gear and some big reaches (I ended up back cleaning almost all of my pro and relied on the fixed gear as backup). The hook move is pretty thrilling and committing as you use it to round a corner and can’t see very well what is above and to the other side.
![]() |
| P2 seen from Salathe Ledge |
|
![]() |
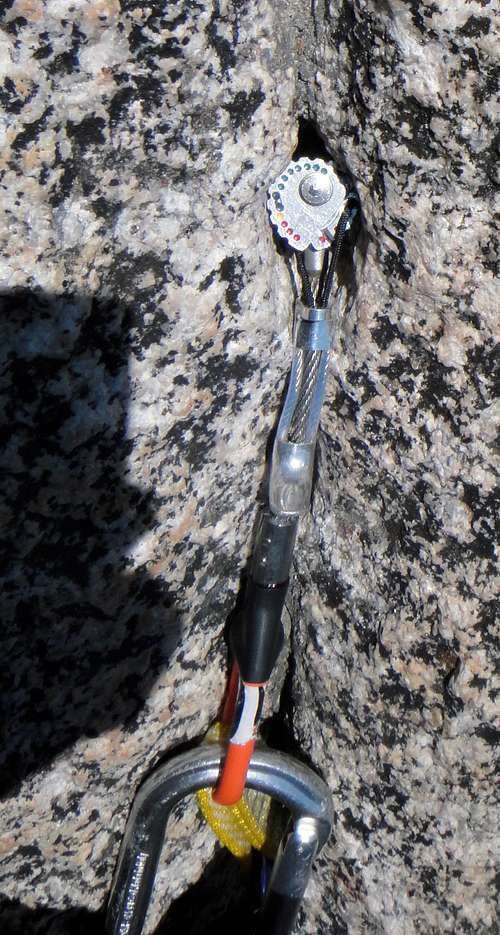
| Wires on P2 Fixed Gear |
|
As I had heard so much about the frightening shoelace strung through a buried pin on this section, I brought along some thin climbing chord to replace the shoelace. I was surprised to find that the pin was so buried that the lace was also buried! It didn’t look much worse than the ratty tatties on the first pitch, so I clipped it, did a little bounce test, and moved on. Next I found a flaring shallow pocket and learned an interesting way to use offset cams. Pretty sweet!
![]() |
| Starting Pitch 2 |
|
![]() |
| Offset Cam Placement in Shallow Flaring Pin Scar |
|
After what seemed like eternity the route finally stopped traversing as I reached the first section of bolt ladder and I started cruising upwards. The ladder wasn’t easy, though, as the bolts were very far apart and I had to step pretty high in my aiders, often tensioning off the lower bolt to reach the next bolt. Say what you might about aid climbing, but it is pretty burly and brutish on the biceps, abdominals, and abductors! A few bolts were missing hangers so I got to try out my wire rivet hangers. These don’t really stay on the bolts once you climb past (even when cinched tight), so I guess they are more like hooks, which you tend to bring along with you. They’re small enough that it worked out well to just leave them on my daisy ‘biners for their occasional use on the pitch.
![]() |
| P2 Piton Ladder |
|
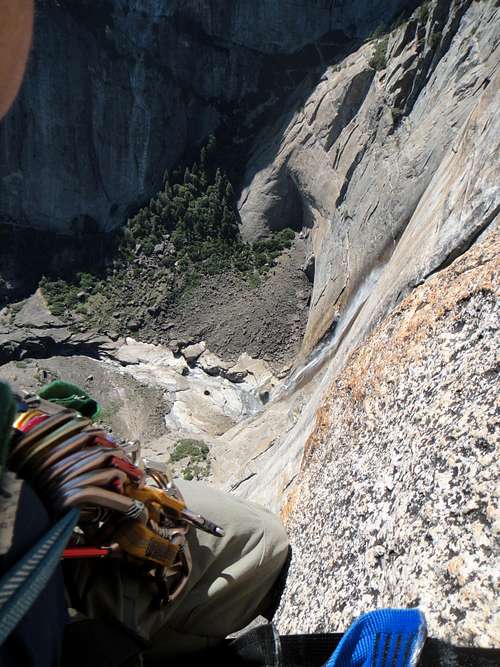
![]() |
| Looking Down the 1200' Drop |
|
The bolt ladder ended at a mantel into an easy corner with a few pitons. Some mixed easy free & aid climbing quickly brought me to the top to the final aid ladder. To save draws I back cleaned every other bolt. After plugging a cam beneath the final roof and entering the final corner, I saw that one bolt was cut off flush with the granite and there were no signs of any potential gear placements. Since it was late in the day and I was in a hurry, I broke out my homemade cheater stick, which worked like a charm, and I barely lost any time bypassing the sheared bolt.
![]() |
| Final Bolt Ladder |
|
![]() |
| Using the Cheater Stick in the Final Corner |
|
The exit from the bolt ladder required some ingenuity for transitioning from aid to free here. You immediately go from standing on a bolt ladder to 5.5 friction climbing the rest of the way to the summit. I felt like I was too likely to fall on the friction slab when reaching back to unclip my last ladder/aider, so I clipped the rope to the bolt with a double-length runner with a knot tied in the middle. I then stood in the upper loop of this runner so that I could unclip my daisy. From there I could step onto the friction and step out of the runner, leaving it to Eddy to clean.
![]() |
| Sawed Off Piton Mashed Into a Hole |
|
![]() |
| Finishing the Bolt Ladder |
|
![]() |
| Transitioning to Friction Slab |
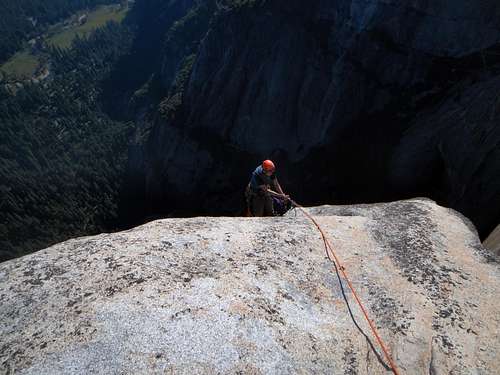
From this last bolt there is no pro until the summit anchors but the climbing is easy and gets easier the farther you go. Before you know it you’re on top! I was pretty nervous on the entire climb, and I did feel almost as if I were back in my early trad days, but in this case all it did was make me focus even harder on what I was doing and tune out the abyss (la la la! I can’t hear you!). I was timid making some moves and did so with an unhappy groan, but most of the gear on the route is pretty solid and I knew that if a piece blew I probably wouldn’t go any further than my last clip-in. Strangely, at every stage of the climbing the scariest part was the anticipation of getting into the ‘scary part.’ Each time, once I started into it I was fine.
![]() |
| Eddy Following P2 |
|
![]() |
| Eddy Nearing the End of P2. See the Fixed Line He is Trailing for the Tyrolean? |
|
![]() |
| Eddy Nearing the End of P2 |
As I waited for Eddy to follow & clean the pitch, I saw someone at Yosemite Point photographing me with a nice DSLR camera.
“If you like this, make sure to stick around!” I shouted. “I think it will be worth your while!” Anders stayed up longer than he had intended, but the show was very worth his while.
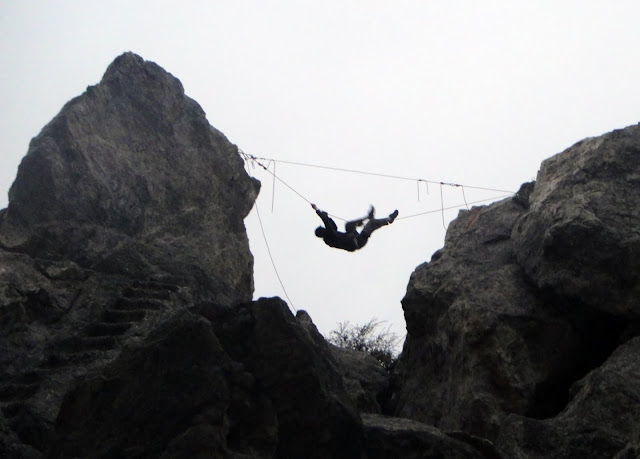
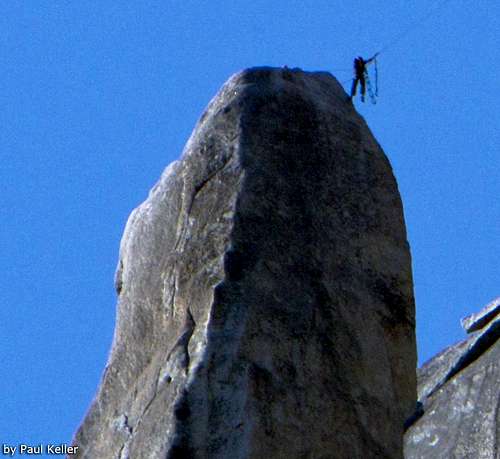
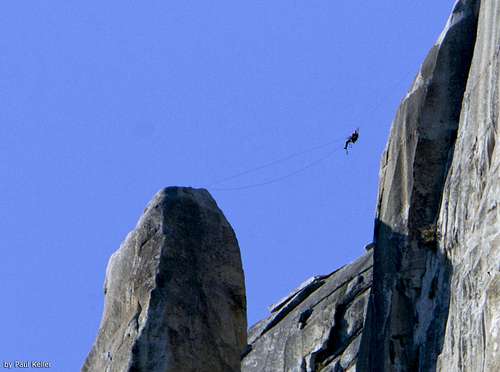
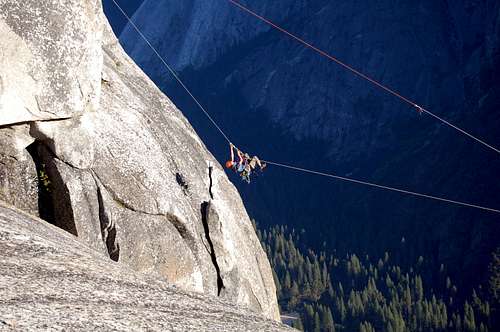
The Tyrolean
The entire time that Eddy was following, he was also trailing our rappel line. It was tied to his harness and he occasionally took in slack as we corkscrewed up the spire. By the time he reached the summit anchor the distance between us and the rim was only 140’ – less than the length of one rope.
We threaded the static line through the anchor and then fixed and hand tightened it. I would jug across first, trailing one of our extra ropes that was joined to the static line on the slack side of the fixed point. Once at the rim, Eddy would unfix the static line to let it slide freely through the pre-threaded anchor. I would take in slack and then fix my carried end to the tree anchor and hand tighten the new system. Eddy could then jug across. Once we were both across, we could release one end and pull the rope through the summit anchors and back to the Rim as if cleaning a horizontal rappel.
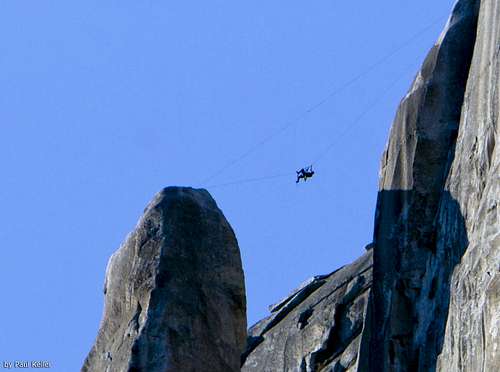
![]() |
| Starting the Tyrolean Back to the Rim |
|
![]() |
| Doing the Tyrolean Back to the Rim |
|
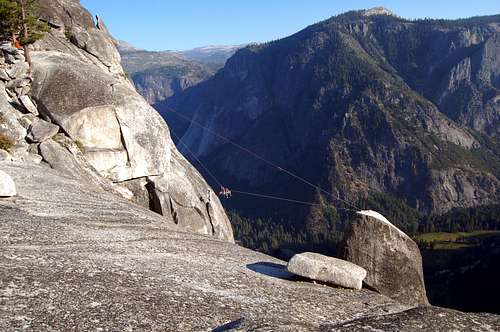
![]() |
| Doing the Tyrolean Back to the Rim |
![]() |
| Doing the Tyrolean Back to the Rim |
Once again the scariest part was starting as you inch your butt off the summit block and gradually let your body swing into balance beneath the rope and over a gigantic void. The first half of the Tyrolean is pretty easy as you’re moving horizontally; your body pulls the rope such that you gain very little elevation until you are much closer to the rim, leaving a very steep incline to jug in the end. Somehow jugging a free-hanging rope that is inclined at 45 degrees is much harder than jugging a vertical free-hanging rope! My biceps burned and I had to take a few rests before dragging myself onto the rim.
![]() |
| Eddy Doing the Tyrolean Back to the Rim |
![]() |
| Eddy Doing the Tyrolean Back to the Rim |
|
![]() |
| Eddy Doing the Tyrolean Back to the Rim |
|
Eddy had a tiring experience doing the Tyrolean as well. Similar to my experiences leading chimneys and offwidths, in this case one nice thing about being first across is that you can enjoy watching the follower suffer while you sit in comfort knowing that you’re already through the struggle >:-) I also couldn’t resist running over to where Anders was crouched down and taking a few shots of my own of Eddy’s crossing.
Pulling the Rope
As we were pulling the rope there was suddenly a lot of friction. Eddy dropped the tail of the rope off the edge just as this was happening, and suddenly the rope completely stuck.
Crap!
We pulled and pulled but the rope wouldn’t budge. This was a very bad situation leaving us with only a few options:
1. Go over on the anchored end of the rope (no way!)
2. Re-climb the route with another party (not feasible)
3. Walk down to the Valley and in shame report our problem to climbers in Camp 4 to see if anyone there is climbing the Spire soon and ask them to retrieve our rope (Bad form. And good luck!)
4. Pull harder (just not too hard).
I broke out a Tibloc and tried pulling with a Z-pulley system. The rope barely moved but I could tell we’d tire ourselves out and I wasn’t sure if pulling was still such a good idea. I broke out another Tibloc and built a C-Pulley system on top of the Z-pulley system to give me a theoretical 6:1 advantage and tried pulling again. This time the rope moved pretty smoothly, although still with some resistance. Fortunately I could tell with the lighter pull that the tension didn’t increase as we pulled harder, so we figured it was safe to pull the rope through (it turns out the rope had somehow twisted at the anchor, forming a Klemheist knot at that end. We basically had to pull the rope through its own Klemheist knot).
[3]
![]() |
| The taught, stubborn, STUCK rope |
It took us an hour of hauling to pull the rope completely free (6:1 advantage means it takes 6 inches of hauling for 1 inch of raise. We got about 3 ft of hauling per ratchet), and at last we could finally start down just as the sun was setting on the horizon.
Although the day was much longer than expected, and not without a few clusters and ‘oopsies’, it was a superb day on the high granite walls of Yosemite. The climb was a big test for my head and not only did I manage to actually enjoy being on an extremely exposed Yosemite super classic, but now I feel confident that I do have what it takes to climb a big wall! I’m looking forward to the coming Spring.
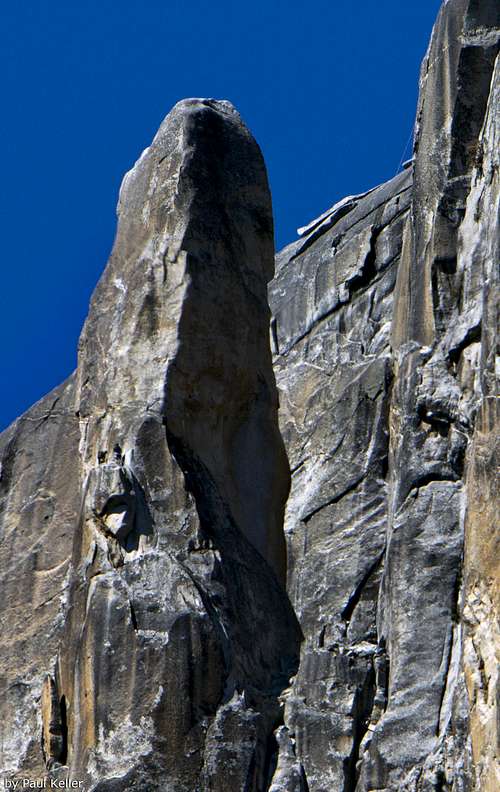
More Lost Arrow Spire Tip Info
Full Set of Photos on Picasa
![]() |
| Route Seen from the South |
|
![]() |
| Route Seen from the West (Camp 4) |
|
Footnotes
[1]
(pronounced ‘Jacob’ and stands for ‘Jesus-H-Christ-On-a-Bicycle’, which is what one would utter when seeing the cliff on their first bike ride up Big Cottonwood Canyon. Whether this was due to it being the first striking quartzite feature in the canyon or the first big hill climb of the long ride, I’m not sure.)
Back
[2]
I think part of this was due to the influence that my friend Tom Bennett had on me. During the brief time I knew him he was very inspirational in helping me to push myself. Since his death I have continued to attempt to embody his philosophy of pushing past one’s comfort zones and fully embracing life.
Back
[3]
I should follow up to double check on how hard hauling was on the rope in terms of exact numbers. Thinking conceptually, I figured it was fine to still climb on.
Since the hauling was reasonably easy with a 6:1 pulley system, and I've found there to be more resistance when hauling a free-hanging climber with a Z-C system (I have done this for practice), the force on the rope shouldn't have been much more than body weight + carabiner friction, which I think is much less than a lead fall? My main concern was sheath damage from the Tiblocs, but the rope sheath was fine and the core felt fine (no lumpy bits). A lot of the resistance seemed to be from the elasticity of the climbing rope. Once we passed the knot and started hauling on the static line, we were really able to haul the rest by hand at that point.
Back Links
Report on Personal Website


Comments
Post a Comment