Intro
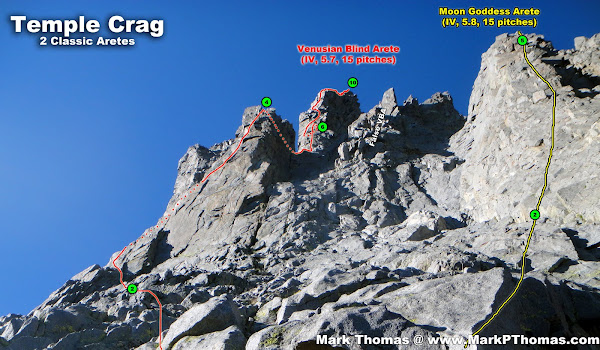
Over Labor Day weekend I climbed Moon Goddess Arete (MGA) & Venusian Blind Arete (VBA) over two days with Chris Terry. The second day was "Labor Day Weekend" rush hour on Temple Crag, with 3 teams on VBA, 1 on MGA, & 3 teams on Sun Ribbon Arete (SRA). Since we could all see and hear each other between the aretes (in fact even better than we could see our rope mate on the ridge!), it was quite a social outing up these long alpine climbs.
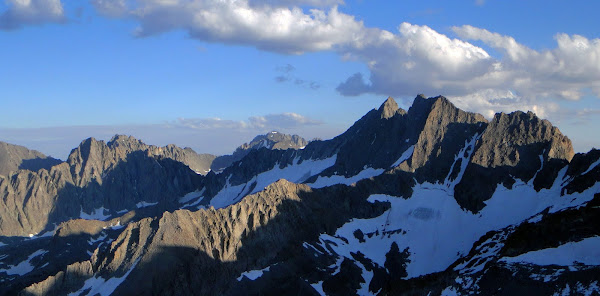
|
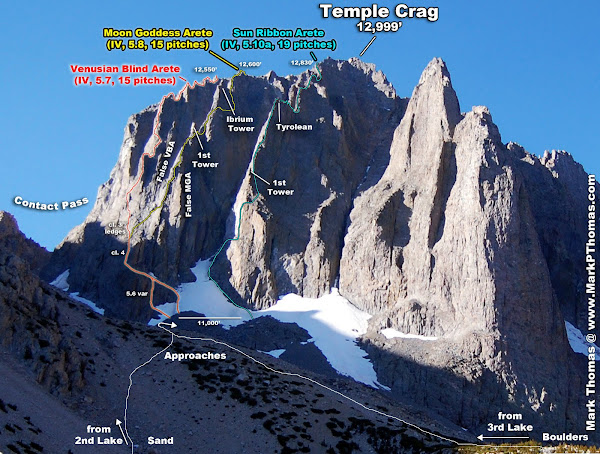
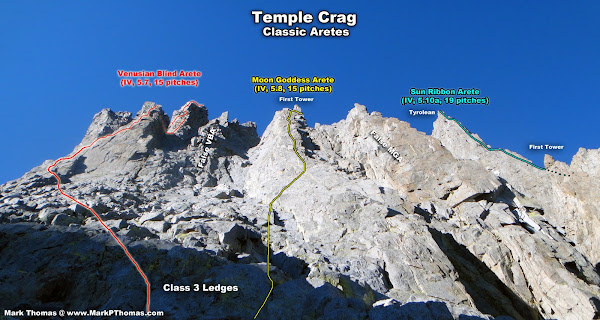
| The 3 classic arete climbs on Temple Crag. Dark Star, which ascends the large buttress on the right, is in a league of its own. |
Note: I labeled "False VBA" & "False MGA" based on others' routefinding problems.
I was supposed to do a different long climbing weekend with my friend Mario, but the weekend before he took a fall on a 5.9R at Tuolumne Meadows, and the resulting stitches left him out of action for the weekend. Fortunately my friend Brian was re-planning his group trip at the last minute and invited me along to Temple Crag. With some last-minute hectic e-mailing, plans were made where Chris & I would head up early to get permits Friday and climb MGA Saturday while the others hiked in, then she & I would climb VBA Sunday while Brian & Peter climbed MBA and Howard & Dominique climbed VGA. Bryan and I planned on climbing SRA together for my third day out. By chance my friends Chris DeWitt & Bryan Bell were also in the area to climb SRA on Sunday.
Moon Goddess Arete (IV, 5.8, 14-15ish pitches)
Friday Night Approach
Chris and I hiked in Friday night and bivvied on some rock slabs a short ways off the trail above 2nd Lake. The only downside to this spot is the inaccessibility to water, but it was comfy for lounging & you couldn't beat the views!
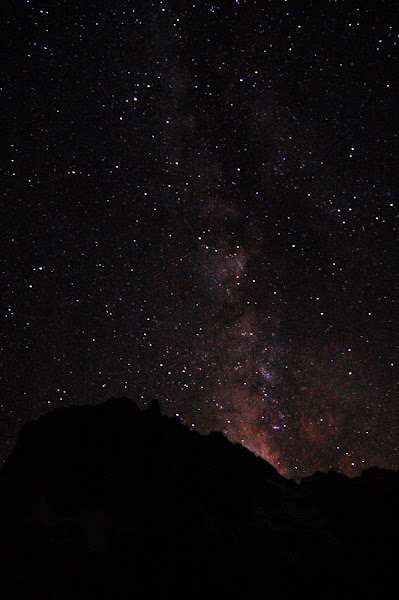
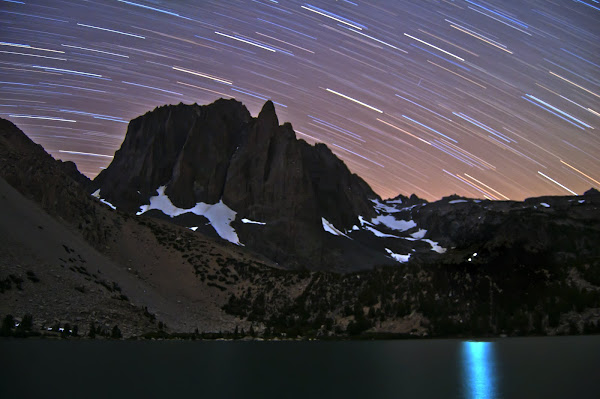
Despite getting in late and the impending alpine start the next day, I stayed up to take some night photos. I took these from my bivy sack, and slept during the longer exposures.
|
| Temple Crag from our bivy above 2nd Lake |
|
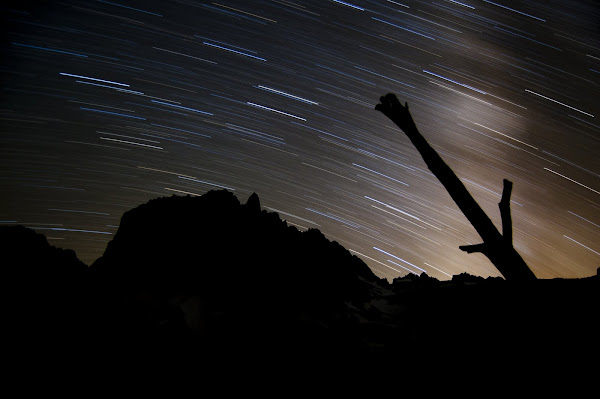
| 30 min exposure of Temple Crag. The coloration of the sky is from the streaking of the Milky Way |
Simul-Climbing
Since my headlamp ran out of its freshly recharged batteries early the previous night (doh!), we waited until first light to head out from camp, and tried the approach from 3rd Lake. We made it to the base of the route just before 7am, but it took us a half hour to navigate the short snowfield, as it was too hard packed & icy to kick steps in with my boots, we both lacked crampons, and between us we only had one tool. I trailed a rope as I climbed the precarious snow slope, yarding up on the tool and resetting it carefully as I stood on thinly kicked in edges in the snow. Once at the top I set up a belay behind a boulder and slid the tool back down to Chris on the line, then belayed her up.
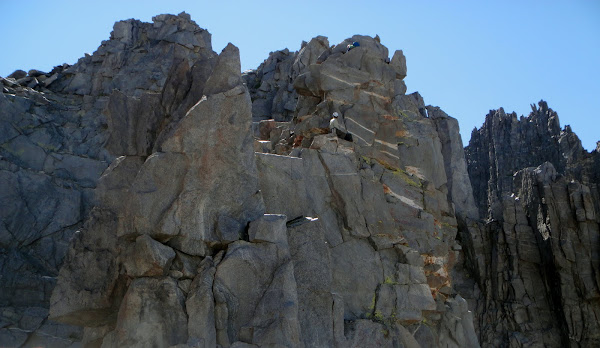
The beginning of the approach ledges was a pile of crud, but the rock quickly got better. After rounding a corner a short and exposed section of class 4 up and right soon gave way to milder class 3 ledges.
|
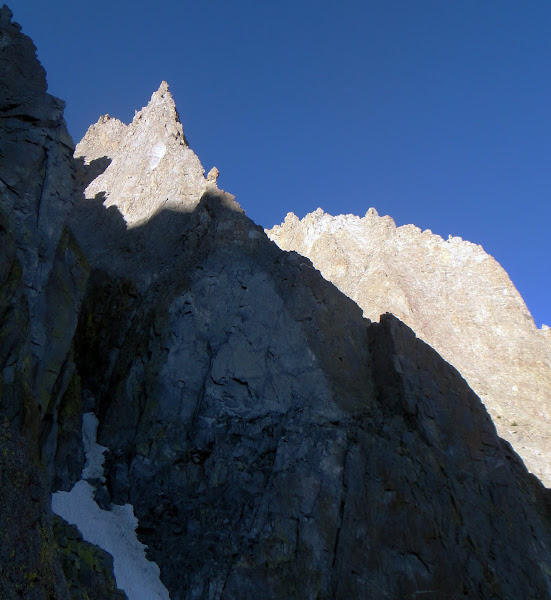
| Sun Ribbon Arete - The white mark, approach ledge & P1 in the corner. The First Tower is jutting out and the high point is where the Tyrolean is done. |
|
| Temple Crag Aretes from the ledges. Climbers often get lost here. Take a close look at the routes from a distance before you get here! Or reference this photo. |
Much of the lower terrain on MGA was pretty easy & clean, so we simul-climbed the first 6 pitches, starting at the ledges at about 7:30 and reaching the First Tower by 9:30.
|
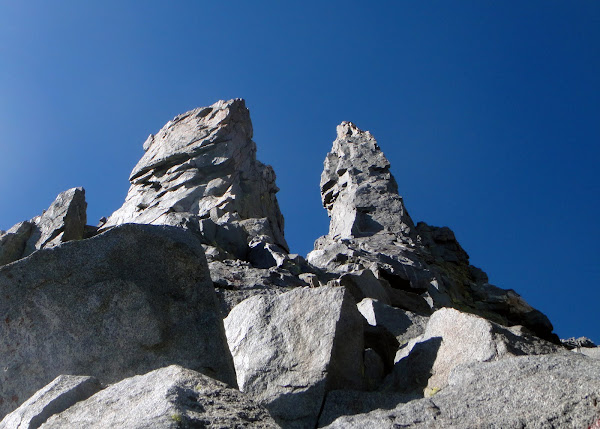
| Nearing the First Tower (left) on the simul-climb. Ibrium Tower looms above. |
|
| Ibrium Tower seen from just before our first belay at the exposed 5.7 traverse around the First Tower. |
The First Tower
Once at the first tower I set up the first belay for the exposed 5.7 traverse pitch around the tower. It required some thinking to plan out the route, but once started it fell together naturally and was over quickly.
|
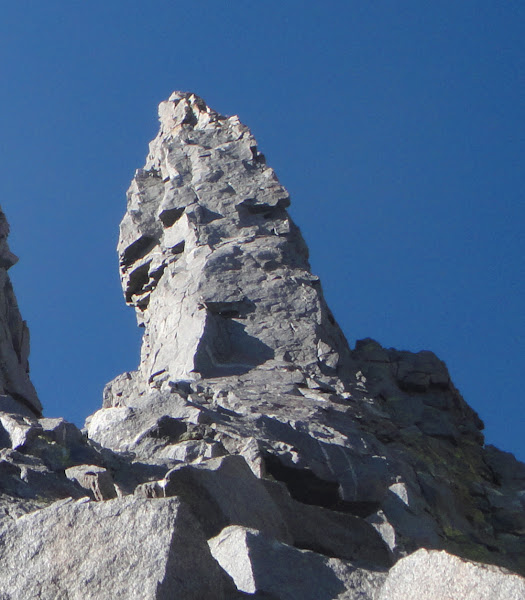
| The exposed 5.7 traverse around the First Tower. Ibrium Tower is next! |

|
| Looking back at Chris near the end of the exposed 5.7 traverse around the First Tower. From here things stay pretty exposed for the rest of the route. |
Since I was climbing on 70m doubles, I went ahead and linked pitches 6 & 7 despite the potential rope drag problems of rounding the corner on the traverse, climbing high, and climbing into and out of the notch between the towers. This worked all right. The notch had a bit of loose rock but nothing too bad by alpine standards.
|
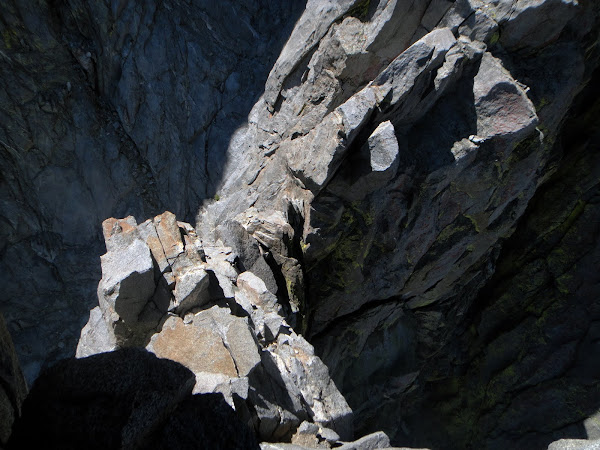
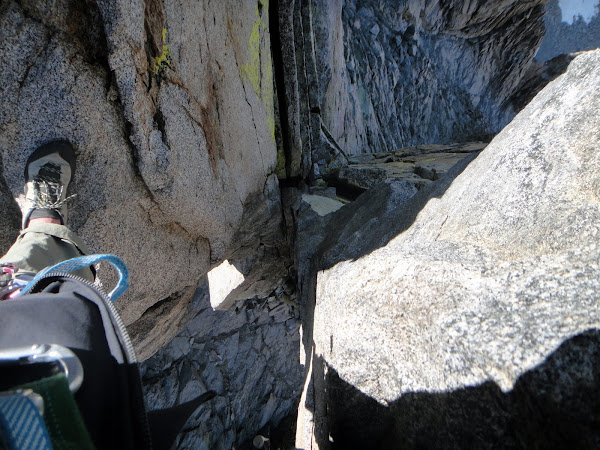
| Downclimbing into the exposed notch. Watch the loose blocks! |
|
| Chris following on the 5.7 traverse of the First Tower. |

|
| Chris finishing the 5.7 traverse of the First Tower. |
Soloist
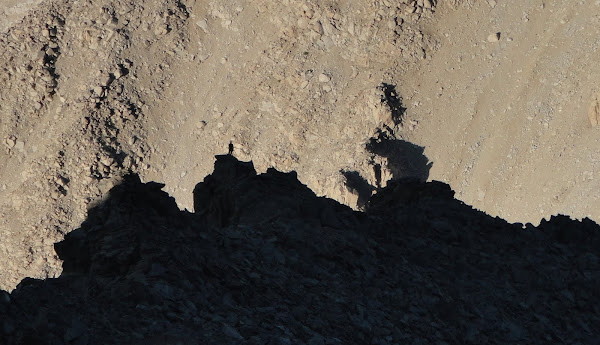
It was about this time that we saw a soloist climbing Sun Ribbon Arete. During the time it took Chris to climb over to me and for us to start the next pitch, the soloist had climbed past us on the next arete.
|
| Soloist just past the First Tower on Sun Ribbon Arete. |
|
| Soloist catching up to our elevation on Sun Ribbon Arete. 3rd Lake is behind. |
|
| Soloist nearing the Tyrolean notch on Sun Ribbon Arete. |
Ibrium Tower
|
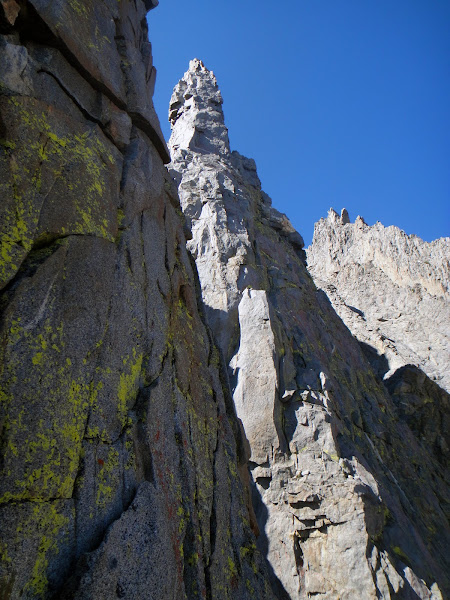
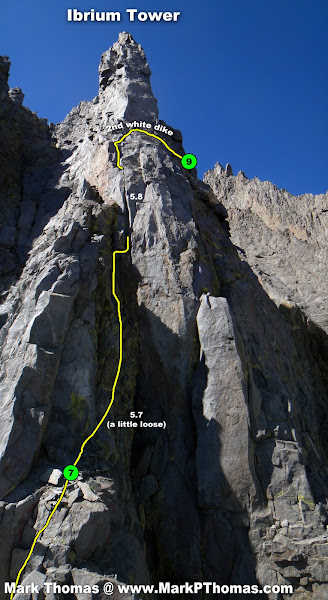
| Ibrium Tower from the notch. Numbers correspond to belays in the SuperTopo topo. I linked these 2 pitches w/ a 70m rope so I'm not as certain where Belay 7 is. |
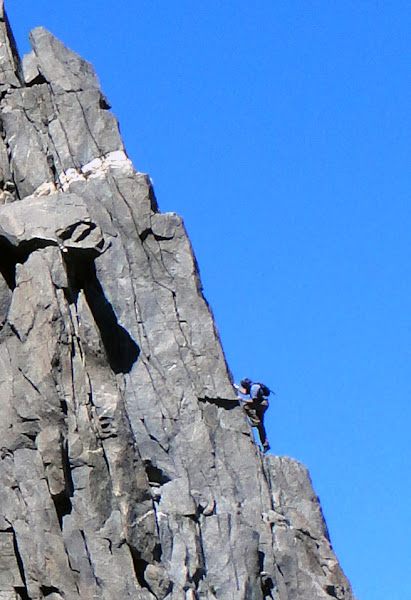
With 70m ropes I linked Pitches 8 & 9 together into one long 230 ft pitch up the Ibrium Tower. The 5.7 'chimney' was more like a corner, and though the rock was a little loose and required a bit of care, it wasn't too bad.
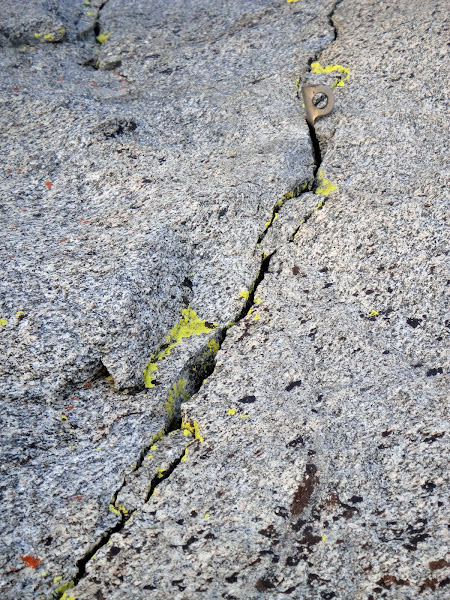
Once at the 5.8 section I came across 4 fixed pieces, so I only needed to place one piece here. The crux was a fun wide off-hands corner that narrowed down to fists at the end.

|
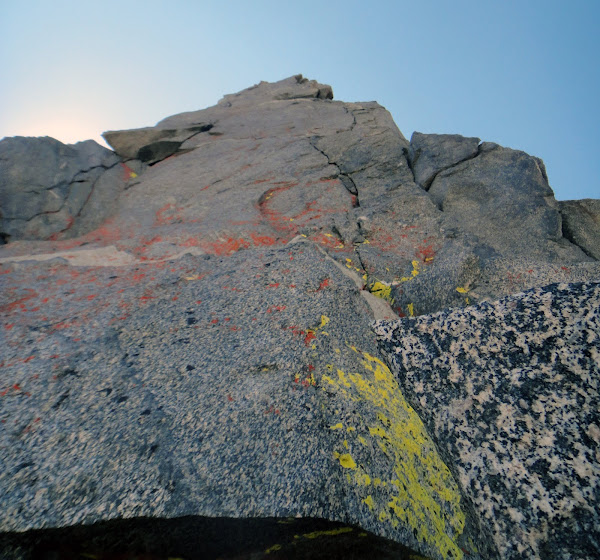
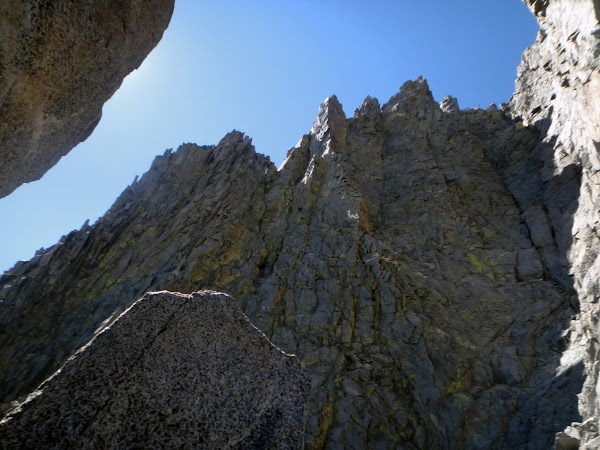
| Upper Ibrium Tower at the first white band. |
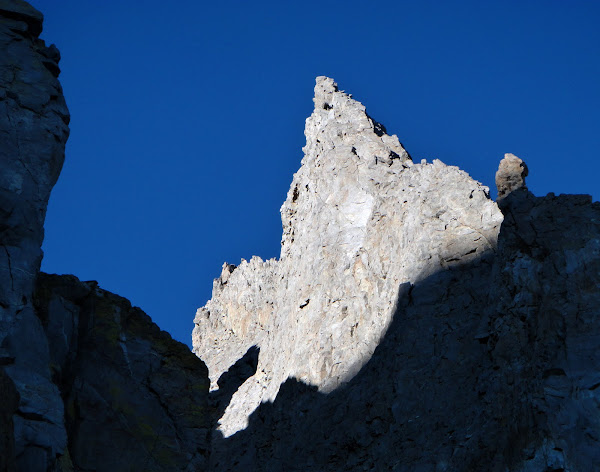
I had originally toyed with the idea of trying the 5.9 direct variation over the Ibrium Tower, as although one report said it had dangerously loose blocks, some other sources claimed that if you climbed a finger crack on the right of the tower, it was clean, fun & perhaps the best climbing on the route. I'm still intimidated by 5.9 in the backcountry, though, and was uncertain exactly where it went, so I stayed on the normal line, which seemed to cut over at the second major white band.
|
| Upper Ibrium Tower from the 2nd white band where you traverse right. I think the clean & good 5.9 variation continues up the cracks from here? |

|
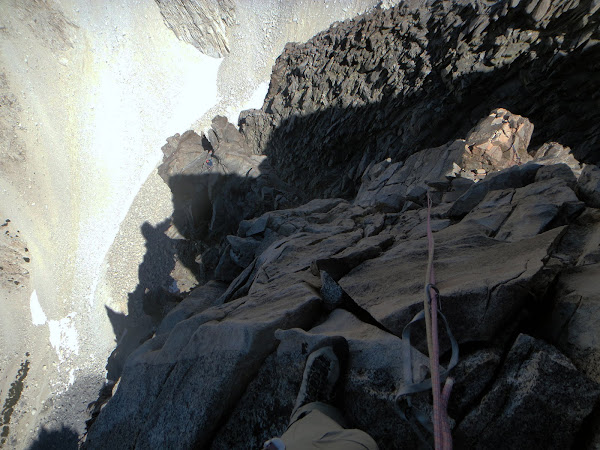
| Looking down the 230 ft linked pitch I did up Ibrium Tower. Can you see Chris belaying a the notch? First Tower is below. |
As I rounded the corner and set up a belay, we heard some other climbers reach the First Tower. Though Chris & I couldn't see or hear each other, I had line of sight to the First Tower and could easily talk with them. The first thing they shouted was:
"What route is this?!"
"This is Moon Goddess Arete!" I replied. I figured they were either so badass that they just picked a line to climb and were just asking as we were there (this has happened to me before), or they meant to be on Venusian Blind. Chris figured the former, and as we never saw them again, we assumed they did the 5.9 over the Ibrium and passed us while we got bogged down in loose rock hell on pitches 10 & 11.
|
| Climbers traversing around the First Tower, seen from Belay 9 (our 3rd belay anchor). |
Crappy Loose Traverse & Chute
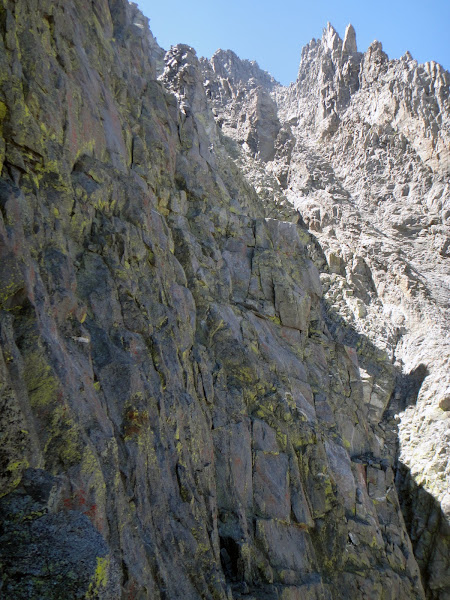
|
| Crappy Ibrium traverse pitch. 'Only' class 3! |
The traverse from here looked pretty improbable for cl. 3, but I could see bail slings above us and some easier ledges a bit lower, which matched the route description.
|
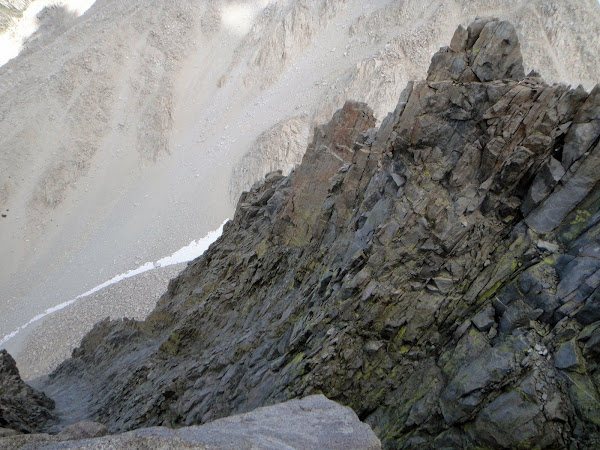
| Looking back on the crappy loose downclimb & traverse before I started heading up into the crappy loose chute. Doubles were helpful for rope drag here. |
The next pitch began with a 20 ft 5th class downclimb to reach the ledges, followed by more cl. 3 downclimbing and traversing. The rock back here was cruddy so I had to climb carefully.
|
| Looking back at Chris beyond the crappy loose Ibrium traverse pitch, where I dropped down a ways, traversed a ways, and climbed back up about 30-40'. |
I ran out a full 230 ft again, climbing partway up the 5.6 wide gully on P11. Looking at the topo, it looked like I could link pitches 11 & 12 as their length was 180 ft in total, I was partway up pitch 11, and I had a 230 ft range.
It turns out this wasn't the case. Maybe it was because I did a lot of wandering back & forth to avoid knocking down loose rocks onto myself or Chris belaying in the chute (beware where your belay for this pitch is set up!), but I ran out of rope at the ledge just below the "steep and sustained 5.7" in the topo. I didn't knock off any rocks myself, but apparently despite my efforts, my rope still dislodged some rocks towards Chris, but fortunately they sailed clear.
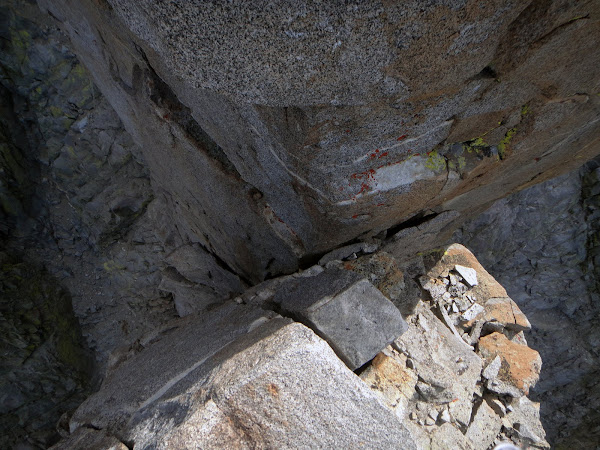
Jenga Challenge
Near the end of the pitch I had a good scare and perhaps quintessential Temple Crag experience. I was pulling up into a groove when I hit my head on a Frisbee-sized rock, knocking it off. I pinched it against the cliffside as it landed on my leg (ouch!).
As I struggled to get in a better jam to steady myself to deal with my latest catch, I almost pulled on a triangular flake the size of a microwave that was detached and leaning against the cliff ready to tip off on my head. I thrust my hand deeper in the corner crack and in the process knocked out a CD-sized rock, caught it in mid-air in my free lower hand, then thrust it back in the crack. It rolled into a deeper section and right back out a lower opening like stubborn quarters in a vending machine, bringing another CD-sized rock with it. This happened several times before I tried other stacking strategies. I piled these in my hand and realized that I was now holding 3 rocks from plummeting onto Chris while in a tenuous stance on a single jam, and my last piece of pro was perhaps 20 ft below.
After an unknown amount of strenuous time I finally got in a piece of pro at my stance, jammed the CD-sized rocks back into the hole from whence they came, and reinserted the largest Jenga piece back into the Temple Crag Puzzle as securely as I could. It still stuck out like a lever & wobbled, but at least I could let go.
Once the rope ran out, I belayed just below a very steep wall with a splitter crack and belayed Chris up. I warned her of the sketchy section and she managed to avoid the loose rock as she came up. Fortunately from here the rock got much better and the steep splitter crack turned out to be fairly easy, as the last two pitches had left me pretty tired :-)
Upper Ridge
The upper ridge had mostly solid rock and a lot of exposed class 4 moves along a knife-edge.
Along this section we saw a team of 3 climbing on VBA, but far below the crest. As far as I could tell, they must have taken what I labeled "False VBA" in the route drawing, as this looked liked a good candidate from the cl. 3 ledges, they were just above where this sub-arete peters out and they seemed to be aiming for the VBA crest.

|
| Upper section of MGA, seen from VBA the following day. Brian is on P13 according to the SuperTopo topo. |
|
| A big, exposed step across. Stretch! |
|
| Cl. 4 ridge traversing. The rocks were mostly solid, and natural running pro was plentiful. |
|
| A nice cl. 4 step on P13 of Moon Goddess Arete (our P6) |
|
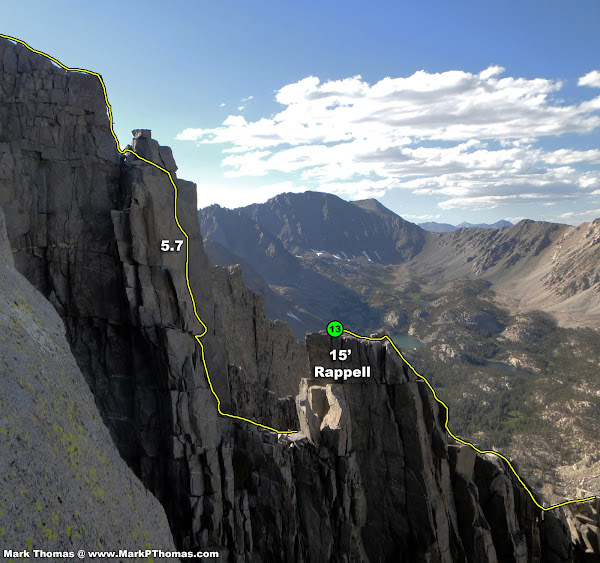
| P13 & P14. Or was it P14 & P15? Whatever. (P6 & P7 for us)There are 2 pitches from the notch to the end of the route, which can be linked w/ a 70m rope (P7 for us). |

|
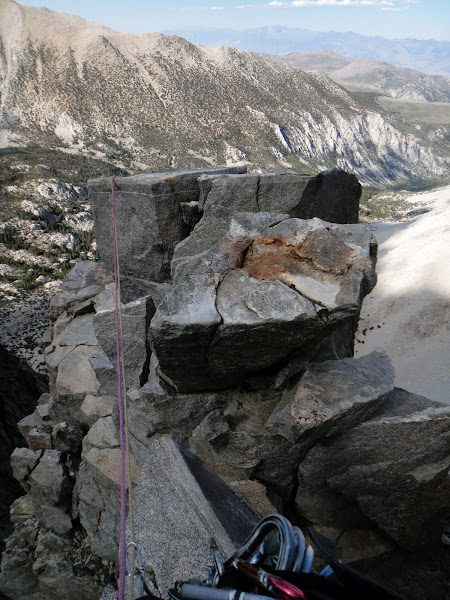
| Looking back at the annoying 15' rappel. It took longer than I had liked, but the downclimb here was a bit steep & difficult here (5.8?) |
|
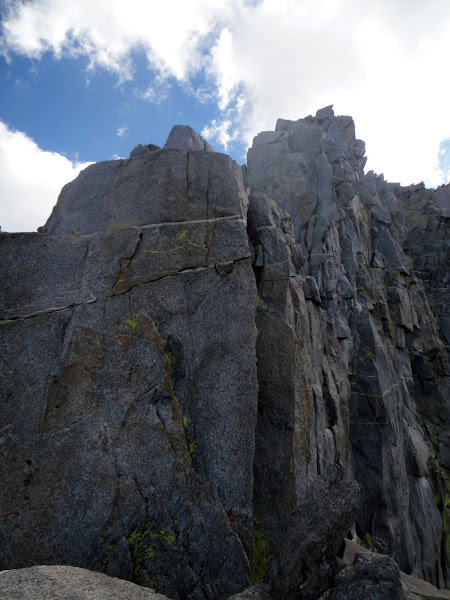
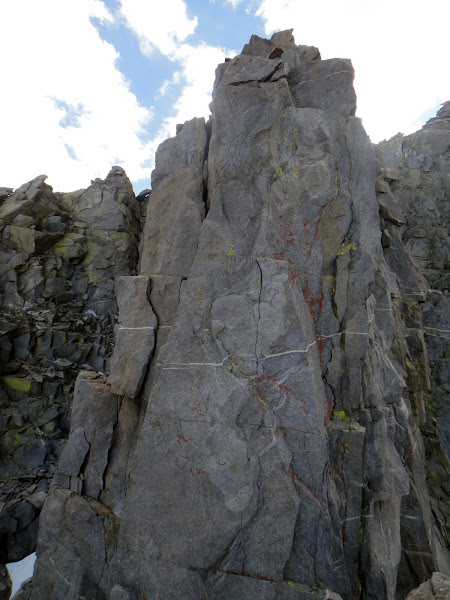
| The 2nd to last pitch on the route (5.7), or our last pitch! See from the rappel. |
Chris has wanted to share leads earlier in the climb but had changed her mind as we reached the loose rock sections. However the final 2 pitches appeared to have better rock, so she led out, linking them into one long final pitch.

|
| Chris leading the final 5.7 pitch. Watch for loose blocks that are tempting to pull & stand on. Good hollow flakes too. |

|
| 5.6 section of the final pitch of Moon Goddess Arete. |
Summit Plateau Views
Unfortunately the loose pitches and a mistake as to which gear of mine was fixed or not on Pitch 8-9 had slowed us up enough that it was near sunset as we topped out. The summit would have to wait for tomorrow!
|
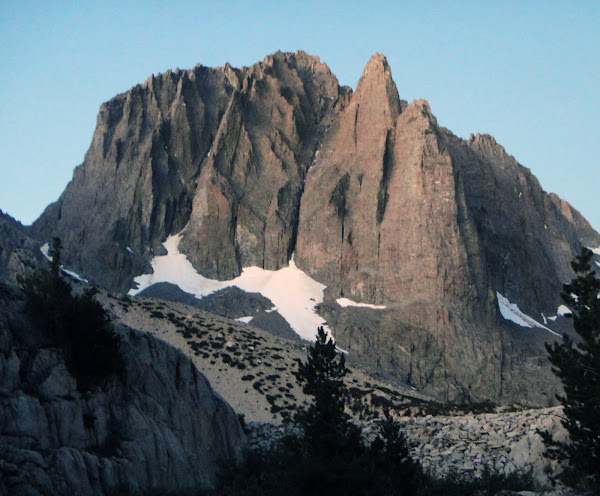
| Tomorrow's objective - Venusian Blind Arete - seen from the end of Moon Goddess Arete. |
|
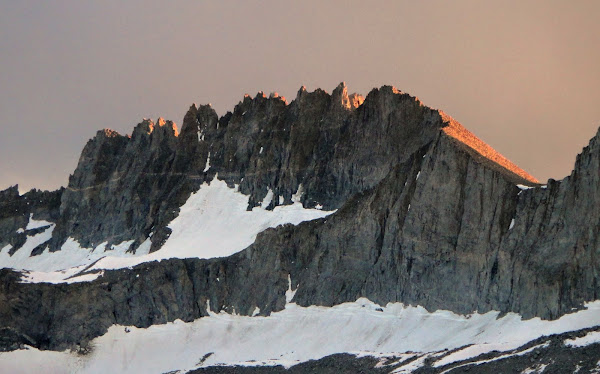
| The Palisade Crest (proper) at sunset from the topout of Moon Goddess Arete. The traverse is awesome and I'd love to go back to finish it! |
|
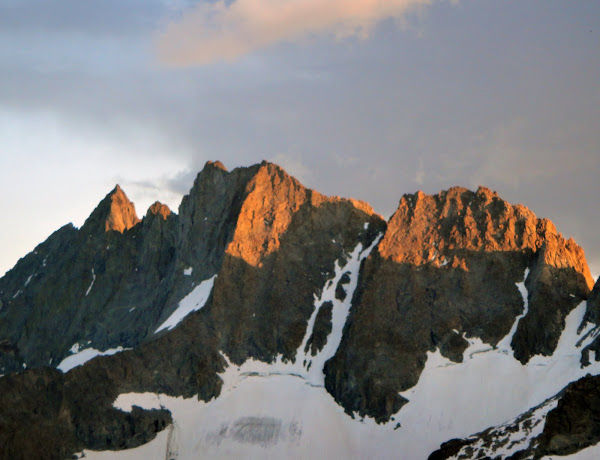
| Middle Palisade, Norman Clyde Pk, & Mt Williams at sunset (left to right). Firebird Ridge looks sweet in sunlit profile. |
Chris and I finished the rappel into Contact Pass just before dark, and made it back down to our stashed gear by 9:30pm. By the time we found the other 4, ate, and were ready to sleep, it was near midnight and we were exhausted.
Venusian Blind Arete (IV, 5.7, 13-14ish pitches)
Approach (Again)
|
| Starting the approach late from 2nd Lake. |
Despite feeling like crud, my legs still worked the next morning, and even with carrying both double ropes and the full rack & slings, I still made it from 2nd Lake to the snowfield in 50 minutes. By then I only felt mildly beat, and I only felt better as I climbed higher this day.
|
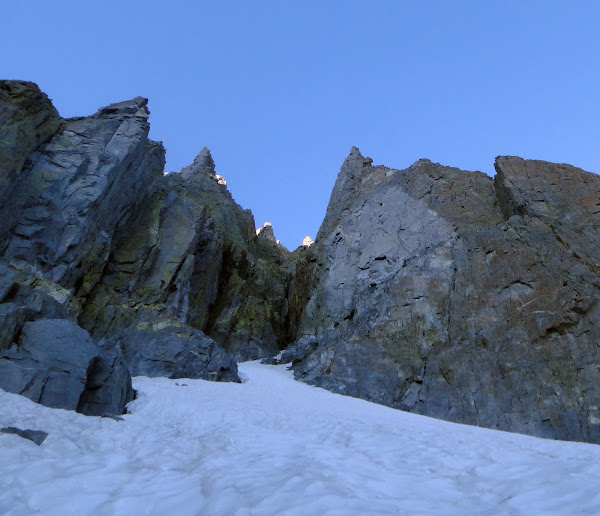
| SRA from the ledges to VBA & MGA. First Tower is on the right & the Tyrolean is done just beyond the highpoint in this photo. |
I had hurried ahead of the group because despite my warning that they should bring axes, they had chosen to ignore this advice, and I knew that the snowfield would not be safely passable without them. I planned to run ahead, rack up, and climb the snowfield as they were still approaching so that I could belay Chris up, & Chris could belay one of them up so that we could be free to run on for our own climb.
1 Ice Axe for 6 People, and Fire in the Hole!
Today looked to be a busy day on the Temple. As I was racking up I saw two climbers nearing the top of the snowfield on the SRA approach, with another two climbers in the moat trying to work their way up to SRA. As far as I could tell they were far enough to the right and the snow apron had enough convexity between our falls lines that I figured I was in a safe zone from rocks they might knock down.
|
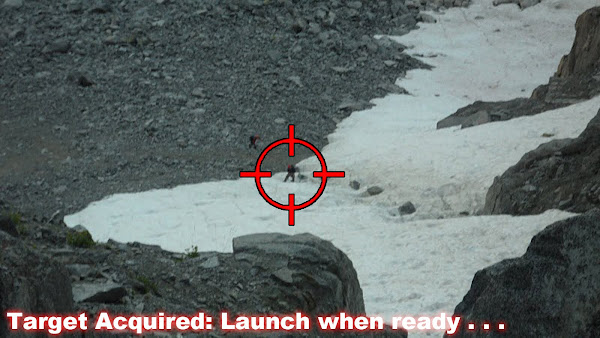
| 2 teams of climbers are ascending to the start of Sun Ribbon Arete. I later learned that 2 of them were my friends Chris DeWitt & Bryan Bell. |
|
| Image capture from Terminator Chris D's view at the approach ledge to SRA. Chris T & I are below starting over to the ledges of VBA & MGA. |
WRONG!
Just as Chris was nearing me and I was tying into the rope, I heard shouting from above
"Rock! Rock! Rock!"
I've learned from climbing in the Canadian Rockies that the best way to deal with rockfall when you are far below is to stand still and watch the rocks. Once they are almost at your level, you should then decide whether to stay put or run like hell to the left or right. This is because the rocks can ricochet at the last minute and if you run too soon you can't see what the rocks are doing and you might actually run into the line of fire.
So I stood and watched. The basketball-sized rock seemed to be falling to the right as expected, but I kept watching. Once it was within about 50 ft of me it started curving my way and then hit a bump, bouncing over to my side of the apron crest and towards the debris chute for the ledges access that I was standing in.
RUUUUN! I sprinted to my right and out of the way, then climbed the snow as quickly as I could to get out of the way of any more potential rockfall.
I found out later that the culprit was my friend Chris D and Bryan B. :-P
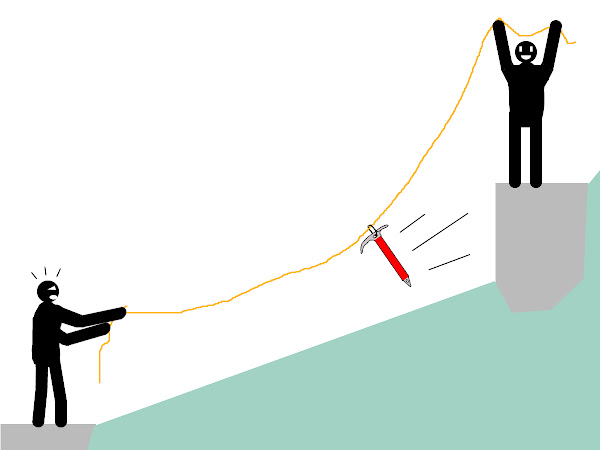
Today I climbed up the debris chute in the snow to the moat beside the ledges to gain them, and this turned out to be much easier and more secure than the direct line I took across the blank snow yesterday. Soon I was on top, I clipped the ax to the rope as before, and sent it down to Chris as in the following illustration before belaying her up.
|
| How to share a single ice ax among multiple climbers |
Once Chris was up the others had arrived, so she belayed contestant #2 up as I started up the ledge to get our ropes ready. She then sent down my ax and passed belay duties off to someone else in the other groups and joined me just as I was ready to go. It was nice to be able to help them past the snow, with Chris and I scarcely losing any time doing so!
|
| VBA & MGA from the approach ledges. Numbers correspond to the belay numbers in the SuperTopo topo. |
Although I was feeling better as we climbed higher, Chris was still dragging from our long day on MGA, so today we decided to simul only to the base of P2 of VBA and then pitch it out from there to the top. It turns out that the route, though technically easier than MGA, was much more exposed & sustained at a higher difficulty throughout, so we would have done very little simul-climbing higher on the route anyways.
As we got ready to belay the first pitch, two other climbers, Jon & Thomas, caught up to us and we offered to let them pass since Chris was uncertain of her speed today. We chatted as we all got ready, and it turned out these two guys were the ones on MGA yesterday! They filled us in on their epic, and now they were back for round 2. For the most part we were able to climb the route slightly offset from them or just behind them, so we had a nice day with more company on the route but no fusterclucks.
Pitch 4
As we climbed higher, Brian & Peter made their way up MGA. We had nice clear views of them and could easily hear each other, so we did a lot of talking and picture taking between the aretes as we climbed.
|
| Brian & Peter on the lower pitches of Moon Goddess Arete. |
|
| Jon & Thomas on P4 of VBA. |
|
| Brian and Peter on Moon Goddess Arete. |
Pitch 6
|
| Jon & Thomas on P6 of VBA. |
It was atop Pitch 6 that two simul-climbers caught up to us, and we let them pass. We eventually caught up to them on pitches 9 & 10 where they chose to pitch it out behind Jon & Tom for the route crux.

|
| P6-P10 of VBA. P7 was one of the best pitches of the route. Complex, varied, and wild! |
|
| Brian and Peter on Moon Goddess Arete. |
Pitch 7
I couldn't have planned this better. It just so happened that the two teams on SRA had combined forces for the Tyrolean and were just setting it up as I was belaying atop Pitch 6. It also just happened to be that I had an excellent view of them over MGA framed by the Ibrium tower to the left and First Tower to the right. I snapped away as Chris arrived and we enjoyed the show of their crossing.
|
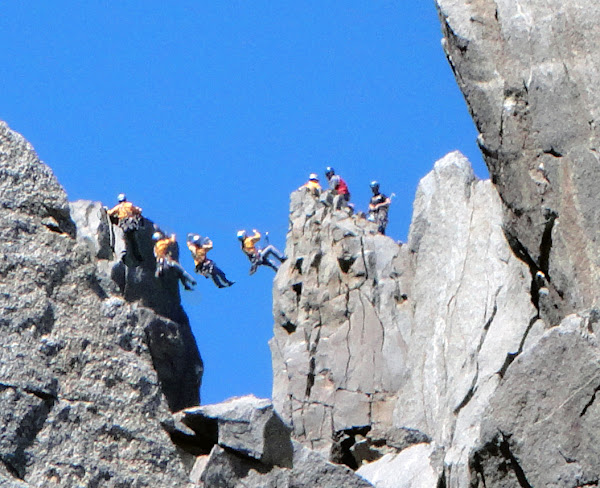
| Tyrolean on SRA seen from VBA through the notch between Ibrium Tower & First Tower on Moon Goddess Arete. Sweet! |
The Tyrolean started off looking elegant until the first climber tried to get off the line. This was fun to watch. Chris D & Bryan B said that they had a much easier time following here after they learned from the poor Guinea Pig. We whooped & hollered back & forth as the show went on.
|
| Tyrolean on SRA seen from VBA through the notch between Ibrium Tower & First Tower on Moon Goddess Arete. Sweet! |
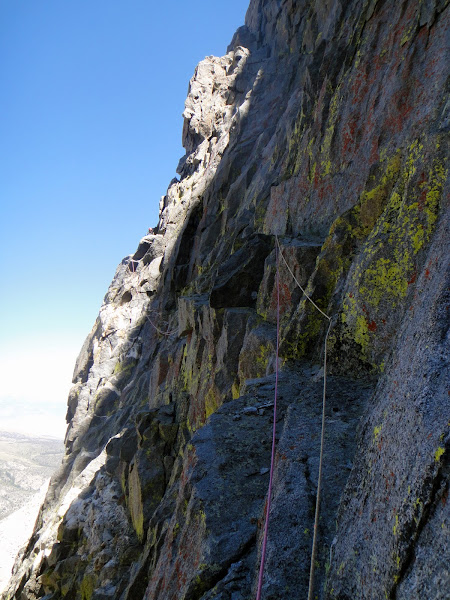
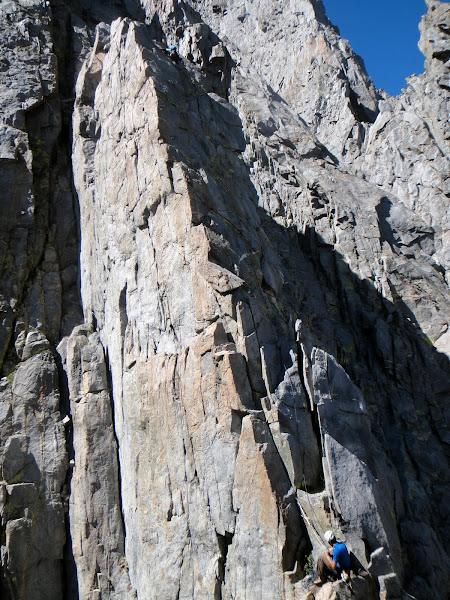
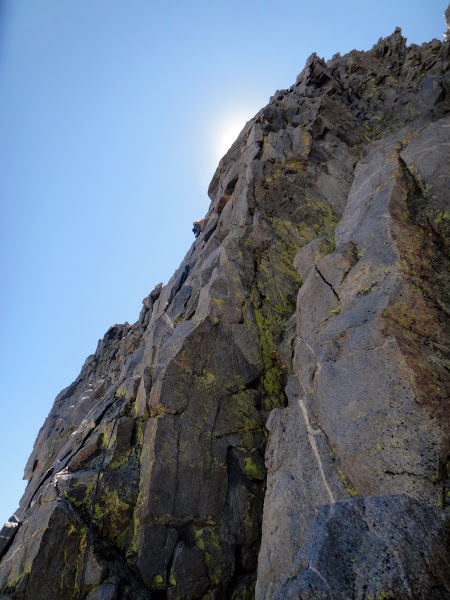
Pitch 7 had wild exposure, and though 'only' 5.6, it required confidence in traversing far out from your pro above big exposure into unknown terrain. I stemmed across a chimney, traversed across a face, climbed a large hollow flake and rounded the corner to bypass a roof. Around the corner the rock turned blank, so I turned up and right and followed some of the best crack climbing on the route. There were a couple of loose rocks here & there, but nothing too bad. With 70m doubles I was able to link pitches 7 & 8 into another stellar 230 ft long climb'fest.
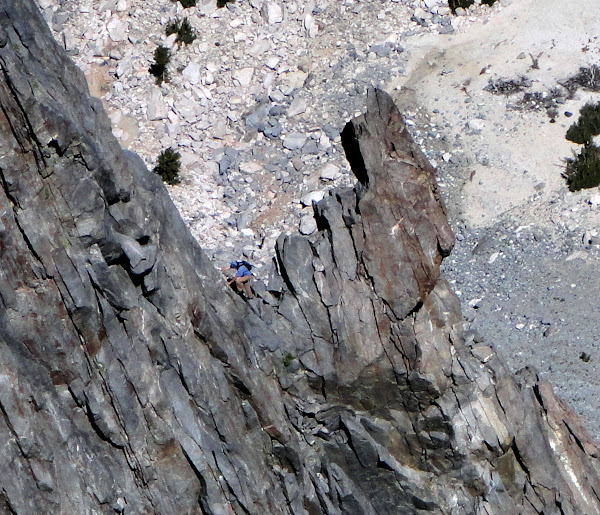
|
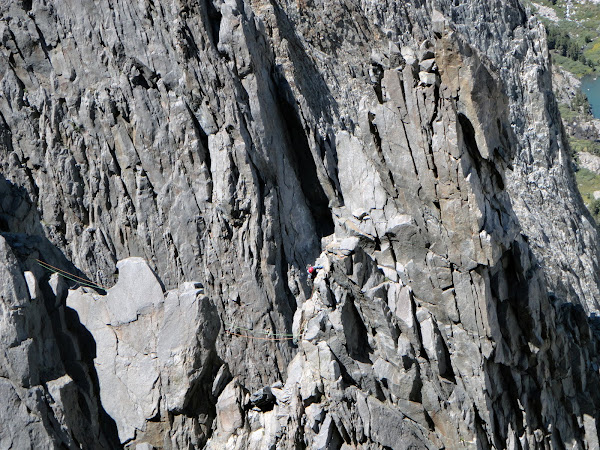
| Simul-climbers disappearing around the corner on the extremely exposed P7 of VBA (5.6). |
Pitch 9 & Pitch 10
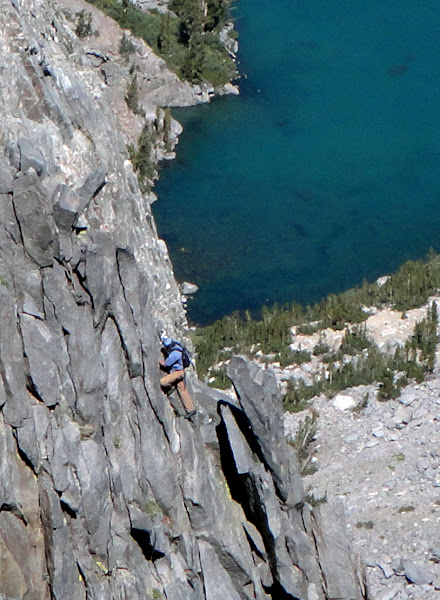
|
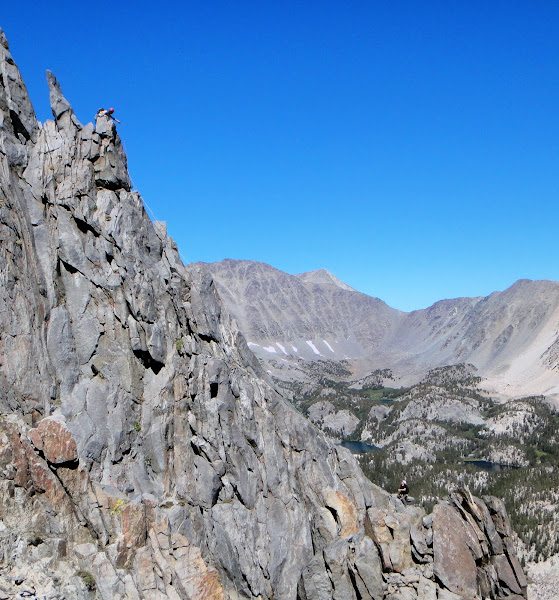
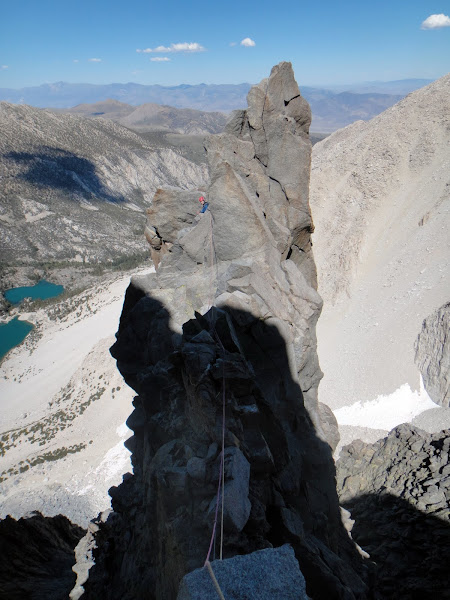
| Simul-climbers on P9 & P10 of VBA, the best 5.7 pitches of the route. |
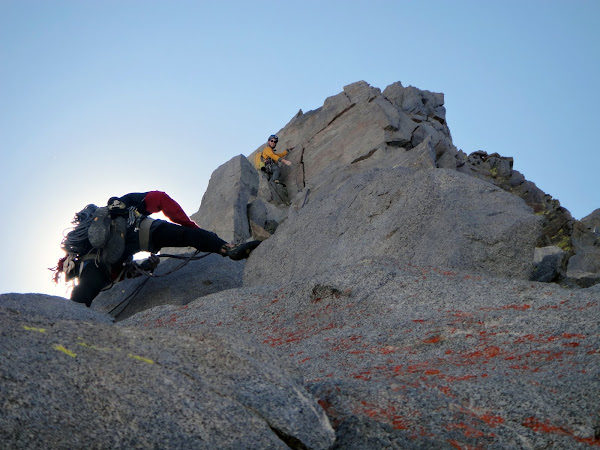
I photographed the simul-climbers as they climbed pitches 9 & 10, which were the unmistakable route crux 5.7 pitches.

|
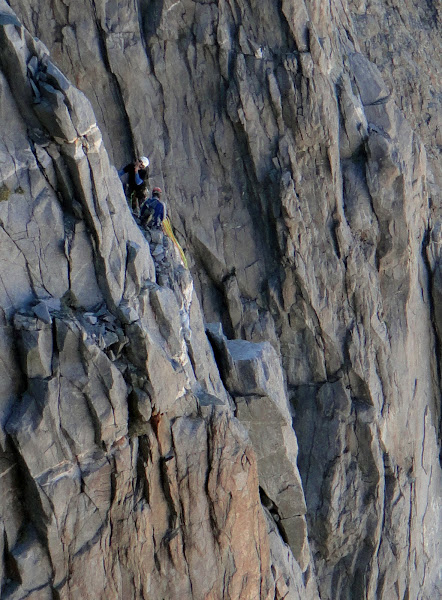
| Pitches 9 & 10 of Venusian Blind Arete. |
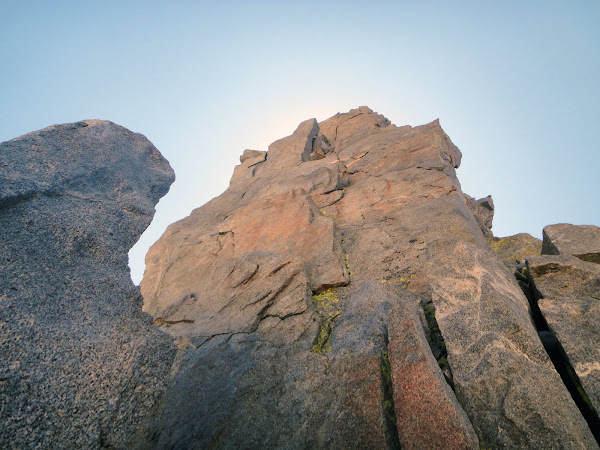
This section was pretty cool to climb on, but never too hard or sustained. Sadly the sweet looking cracks were much harder than 5.7 to climb purely, and were used in combination with blocks, ledges & faceholds to keep it a chill 5.7. Still, it was fun climbing and the rock here was great.
|
| Pitches 9 & 10 of Venusian Blind Arete. |
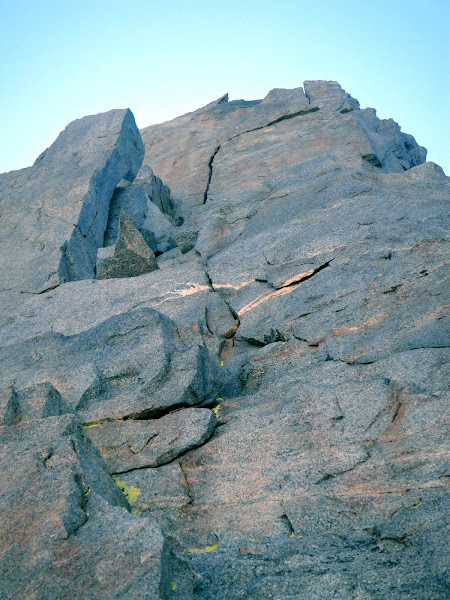
I kept an eye out for the "Diving Board" but I never saw it. I guess it finally dove off?
|
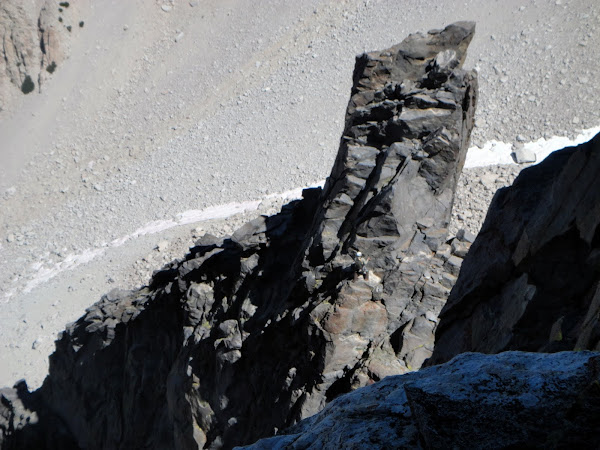
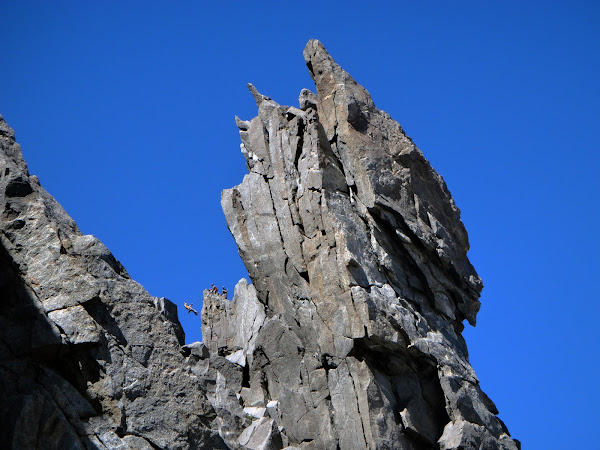
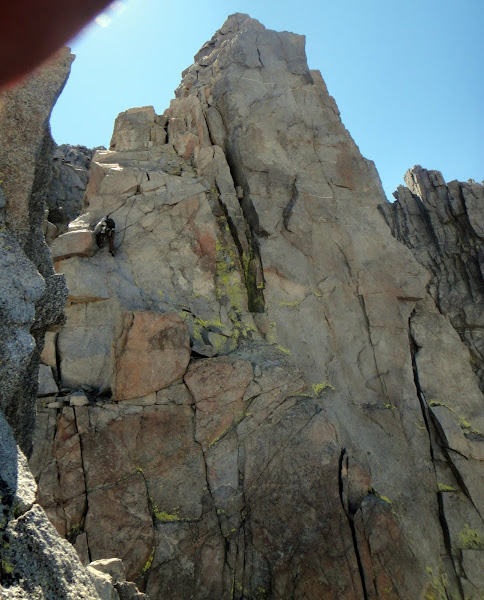
| Pitches 9 & 10 of Venusian Blind Arete. I thought the pointy rock to the left was the Diving Board, but it was pretty small. |
Pitch 11 & Pitch 12
|
| Brian & Peter at notch between the First Tower & Ibrium tower on Moon Goddess Arete. |
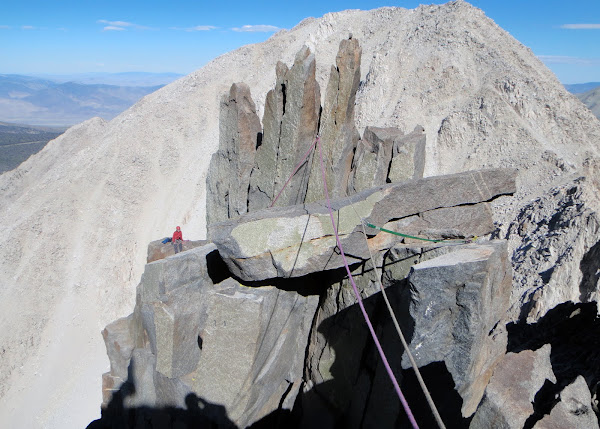
From here the climbing got a bit easier, but the ridge also became more knife-edged and crenelated, making for interesting routefinding & protection strategies. Fun fun!
|
| Looking back on P11 of VBA |
Brian & Peter had been on the Ibrium Tower a long time and looked kind of lost, so Chris shouted out climbing directions to them as I led on for pitch 11. :-)
|
| Brian & Peter on the Ibrium Tower of MGA. |
|
| Thomas & Jon on P12 of VBA, another fun 5.6. |
|
| Weird aluminum piton at the 5.6 slab crux of P12 of VBA |
|
| Looking down the linked P11 & P12 of VBA. Can you see Chris belaying? |
Lucky Pitch 13 & Some Bailing Insights
|
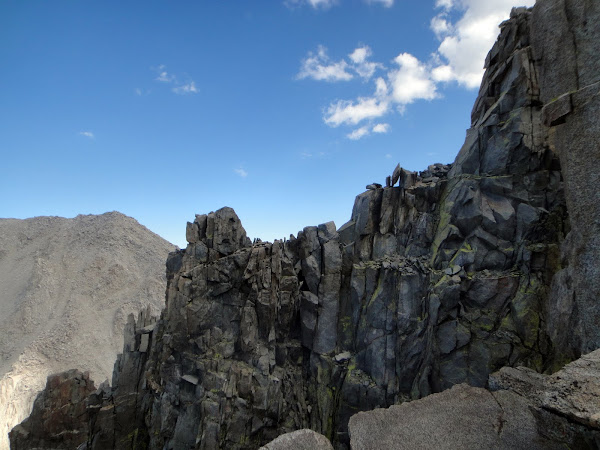
| Upper section of Venusian Blind Arete seen from Moon Goddess Arete the day prior. Lots of up & down! |
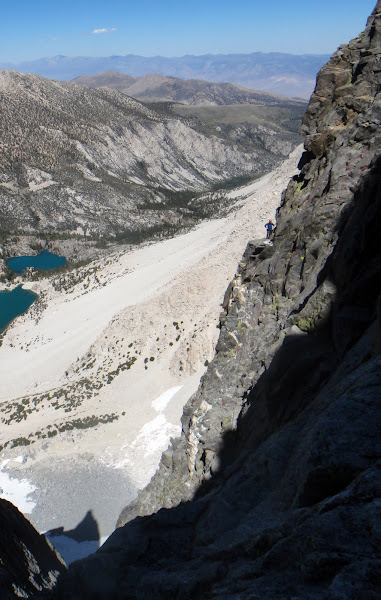
While VBA had excellent rock throughout (loose for crag-standards, but very clean for alpine standards), I admit that the last few pitches require some care. Chris & I reached pitch 13, we heard Jon & Thomas shouting "Rock! Rock! Rock!"
We watched as a watermelon-sized rock bounced off the arete and sailed through the air. And it kept sailing . . . and sailing . . . and sailing . . . and finally landed with a boom in the couloir below, ricocheting off the walls and sending down a whole cascade of rocks, sweeping down the garbage chute.
This really added some salience to just how steep, exposed, and high the aretes were from the neighboring gullies!
It also added some good insights. I thought it strange that the SuperTopo guide, when discussing bailing, talked about rapping into these gullies and then climbing them all the way up to the summit plateau. Since they looked like a house of cards, and still pretty sustained 4th to low 5th class, climbing to the top seemed like a strange way to bail rather than downclimbing & rappelling the gullies.
Now I think that not only is it more dangerous to descend the gullies due to risk of knocking rocks down on each other as one downclimbs & rappels, but since the aretes often have other climbers on them, if anyone knocks a rock down into the chute, you are screwed - and the lower you are in the chute, the more likely you are to be in the way of falling rock. Your exposure to this hazard is decreased by climbing up, and increased by going down.
|
| Upper section of Venusian Blind Arete seen from Moon Goddess Arete the day prior. Lots of up & down! |
It was about this time that Brian & Peter were on the loose pitches of MGR. We heard them and the climbers on SRA shouting as they also knocked a rock down, with similar results. Brian later recounted his fun on these pitches bypassing the Ibrium Tower me, where in one case he casually slung a refrigerator-sized block, thinking it was solid, and then it started wobbling.
My maxim in the mountains, BTW, is that when assessing loose rocks, size does NOT equal stability. Size equals SQUASH potential.
|
| Thomas & Jon on the final pitches of VBA. |
|
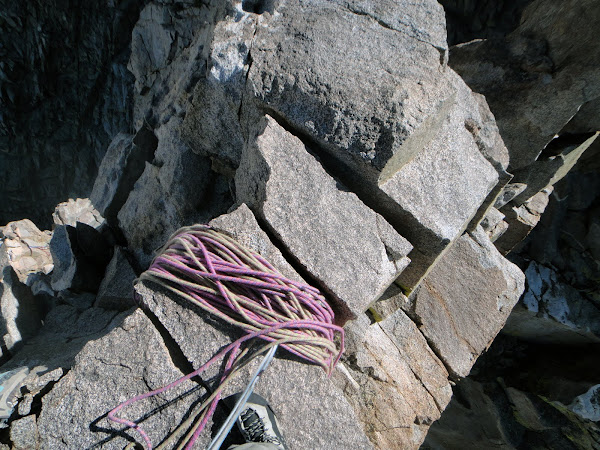
| Natural rope bucket at the belay between P12 & P13, which for us was atop a nice & flat gendarme. I belayed from a standing stance for Chris, and she sat down and draped her legs off as she belayed me out. A nice perch! |
|
| An exposed 4' step across. Stretch! |
|
| Fun pro strategies on P13 - reducing rope drag & protecting the follower on the many ups & downs, twists & turns, & snagging blocks. |
Pitch 14? . 15? . . Final Pitch? Whatever. I lose track, and so does the topo
Climbing gets easier and more convoluted as you climb higher, so pitches are usually determined by rope drag rather than rope length, and you have many options for belaying and climbing, so the topo for the tops of MGA & VBA are pretty vague. There is still a ways to go here, so don't underestimate these pitches!
|
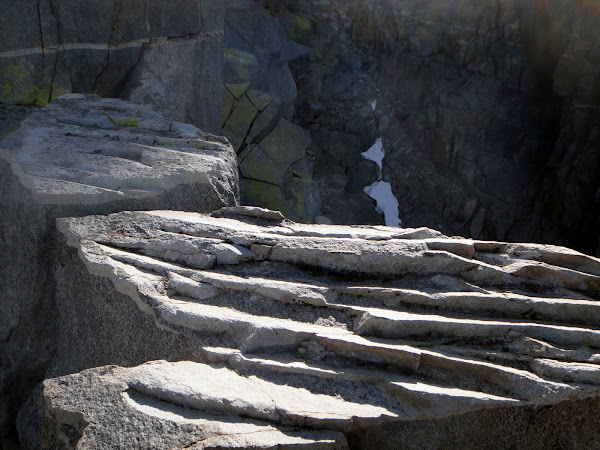
| Strange rock on the final pitch of VBA. A nice quartz sidewalk in the sky! |
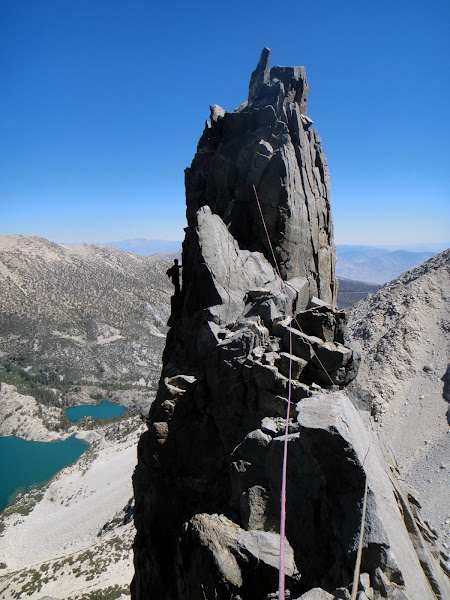
|
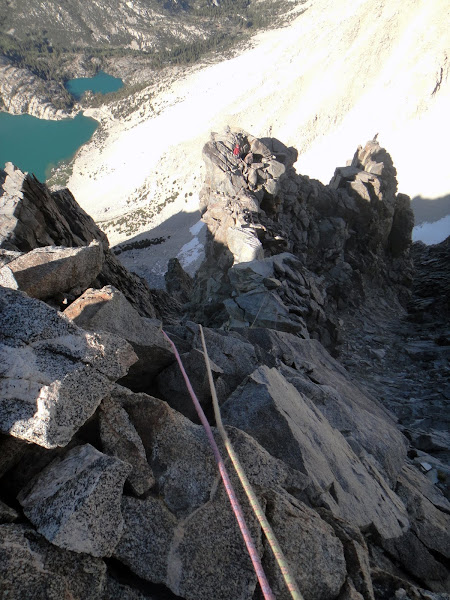
| Looking down Venusian Blind Arete from the top of the route. |
The Summit
The summit is farther away from the routes than a lot of people think. I had been there before via soloing Contact Crack (5.2 OW) from Contact Pass on a day of the Sierra Challenge, so I knew exactly where to go.
|
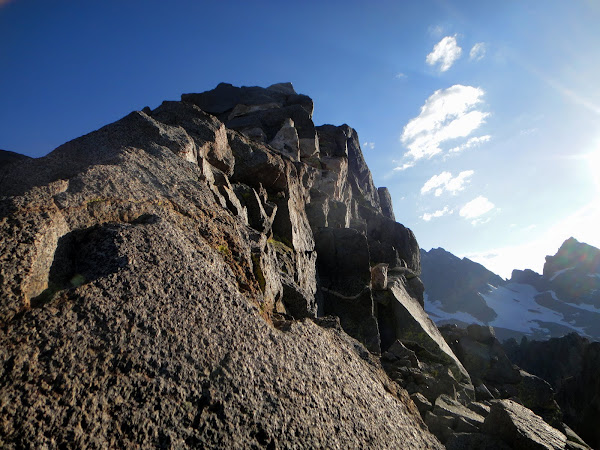
| The final exposed ridge to the summit of Temple Crag. |
Ascend the summit plateau and cut across the mid-height of a rock rib near the top for the easiest line. Don't head up & right too soon as what looks like the top is NOT. Aim to reach the left (south) shoulder of the apparent summit/highpoint after you cross the rib. Cross the shoulder and traverse north (left) & down on a thin class 3 ledge to a corner, and then scramble/squat around a narrow ledge that wraps around the south (left) side of the ridge to a notch in the ridge. Cross the notch and climb a combination of the north (right) side of the crest and on the crest. The exposure is pretty high here, so even though it is only cl. 2-3, you still might want a rope for this part if you don't like exposed soloing. Natural pro suffices to protect this stretch.
|
| Looking W from the summit towards the Palisades. |
The block in the foreground makes for a great stand for summit shots. The ridge to Gayley (foreground) is a loose 5.7. You can see Mt Sill (left), and to the right you can see N Palisade, Starlight Pk, Thunderbolt Pk, & Mt Winchell.
|
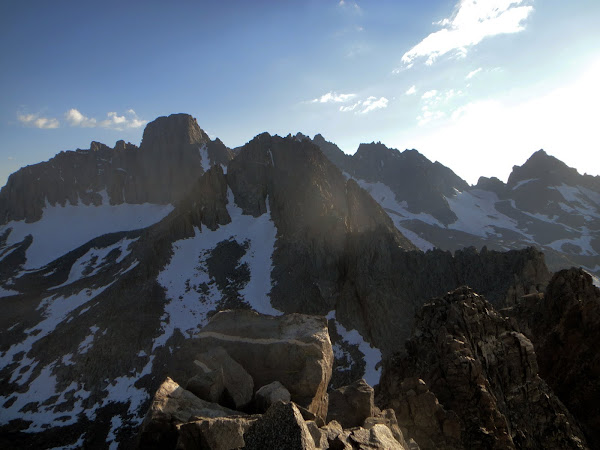
| Looking at the central & southern Palisades from the summit. From left to right on the skyline you have The Thumb, Ed Lane Pk, Split Mtn, Middle Palisade, Norman Clyde Pk, & Mt Williams. |
The others topped out pretty late, and since Chris and I weren't that far ahead of them, we reconvened near the scramble to the rappels to help show them the way down. Another long descent in the dark followed.
|
| Peter topping out on Moon Goddess Arete. Venusian Blind Arete tops out on the next bump camera right. |
By the time we got back to camp (11:30pm. Doh!), I still felt surprisingly good and ready for SRA for Day 3. Brian, however, felt that he had had enough for the weekend on MGA, so alas SRA will have to wait for another day (combined with a traverse to Galey & maybe Palisade Traverse? Anyone? :-D). With an easy hike out waiting for us the following day, we enjoyed the remaining bottled beer I packed in, and I set up shop on the shore of 2nd Lake with my camera, book, and flask of Jameson for some nighttime fun.
|
| Temple Crag from the shore of 2nd Lake. Sky color was from feint star streaks & the streaking Milky Way Galaxy. The light on 2nd Lake was from the headlamps of the climbers descending above 3rd Lake. |
Final Thoughts, Strategies, etc.
The Approach
2nd Lake has much more scenic views than 3rd Lake. Camping on the far side can make the approach times similar, though it is hard to reach water.
From 2nd Lake, stay high and to the left when ascending (easier to climb up on the larger blocks), but when descending drop into the middle of the chute (easier to descend by scree skiing scree & sand).
For the 3rd Lake approach, the final bouldery bit between the slopes & trail SUCKS and I have yet to find a nice way to go over it after 3 times through it, even when staying with cairns. There are many large boulders to clamber over, trees & bushes to negotiate, and lots of little crests & valleys to skirt around or go up & down in. This is annoying with a heavy pack at the end of the day, and much harder to navigate in the dark than the 2nd Lake approach. It does keep sand out of your shoes, though.
The Snowfield
This freezes good & hard at night and didn't really have any suncups to help with climbing. An ice ax and crampons would be a good idea. Even though it adds weight, it might save you 20 minutes. At least for me, I doubt I'd be 20 minutes slower on the route having them with me.
The lower ledge w/ the 5.6 might be a good way to minimize snow, but the time it takes to rope up and then get through the easier terrain above probably voids any time savings.
When climbing to the upper ledge, go left and up the debris chute & climb the moat if you only have an ax. This is much easier to climb without crampons than taking a straight line across the snow.
Moon Goddess Arete
It is very reasonable to simul-climb the first 5.75 pitches to a belay just before the 5.7 traverse. With the rack listed in SuperTopo and keeping 2 pieces between us with all 70m out, I easily covered this terrain without needing to get gear back from my second.
With 70m doubles, if you include the simul-climbing as one pitch, we did the route in 6 long pitches & one 15' rappel.
I disagree with the distances for pitches 10-12 and especially 11-12. You might not want to attempt to link Pitch 11 & 12 with a 60m rope unless you are already a good ways up the 20' wide 5.6 gully after the traverse.
A #3 & #4 4CU were handy for the route.
A leader fatality w/ belayer injury has occurred on the pitches bypassing the Ibrium Tower. Take care on this section!
Overall the route was great, with a striking line and commanding position. However, I felt that the loose rock on Pitches 10-12 greatly reduced the fun & quality of the route. Perhaps if the 5.9 crack variation is taken, it is better? Because of this I'd say the route is 3-4 stars and should not be attempted until you have gained 'alpine sense' for climbing with dangerously loose rock.
Venusian Blind Arete
Rack listed in SuperTopo was fine. The rock was very solid for the most part and the climbing very fun! I don't buy the complaint that the rock on this route is loose. For an alpine climb it is solid and easily climbed on/around. A 5-star route! This route & Corrugation Corner are by far my favorite 5.7 climbs so far.
With 70m doubles and considering our simul-climb to the top of Pitch 2 as one pitch, we did the route in 7-8 pitches.
VBA vs. MGA
MGA is technically harder and takes a more dramatic line. However, I liked it less. Pitches 10-12 were pretty unpleasant, and much of the climbing & belays are on the side of the ridge & in the shade. It is still very worth doing, but if I had to choose, I'd choose VBA.
The route on VBA stayed on the crest a lot more and most of the route & belays were in the sun. Although it is rated easier, I'd say the climbing was more sustained and made for a overall harder route technically, though not as serious as MGA. It had a lot of interesting pitches and belay spots and the rock was never all that loose.
General
If you were to bail, it is likely safer to climb up the chutes beside the aretes than to descend them. However, for now there is a nice series of new rappel slings & anchors from the base of Ibrium Tower on MGA all the way down to the ledges if you choose to bail that way.
Don't underestimate how long the descent takes. The rappel anchors are a ways down off the edge of the summit plateau and would be a little tricky to find in the dark, so make sure you do this part in daylight if at all possible.
Descending below Contact Pass, after descending the first headwall, skirt to the far right (east) to find a good snowfield to boot-glissade down. This snow was not high angle and was soft for us on the descent. It basically took us back to the comfy blocks & bivy below the three aretes. This is much better than the talus to descend!
Photo Links
2011-09-02to03 - Temple Crag (Moon Goddess Arete) (IV, 5.8)
2011-09-04to05 - Temple Crag (Venusian Blind Arete) (IV, 5.7) Links


Comments
Post a Comment