
|
|
Route |
|---|---|
|
|
48.40830°N / 120.7969°W |
|
|
Mountaineering |
|
|
Summer, Fall |
|
|
One to two days |
|
|
Routefinding, steep snow |
|
|
III |
|
|
Overview
Here we have a route that has probably been done before but for which no information could be found: the Sandalee Glacier Route. If you’ve wanted to climb this mountain and do not wish to do the standard, long, dry, possibly boring trail route from the Stehekin River valley, then this route is for you.The trail route goes up McGregor’s west side and involves 6,300 ft of gain (from High Bridge Camp). If you are in the area (i.e., the south or west sides of the peak), then the trail route is the logical way to go. However, if you want to see what really makes this mountain a mountain, then the north side glacier route will be your choice.
The glacier route, which starts from the South Fork Bridge Creek Trail northeast of the summit, has a lot of character. Under foot, you’ll get to experience a long approach on trail, some open cross-country woods, a creek crossing, some high brush walls, boulder fields and talus, forest sidehilling, low brush, more talus, streambed scrambling, slabs, névé (mellow and steep), some possible ice, glacier research probes, and a final walk on the west ridge on a trail with unnecessary orange arrows marking the way.
To be sure, McGregor is a large mountain. This is obvious when viewing it from many Cascade angles. But, up close while on its north side, you see that it has much more character than expected. The massif trends East-West. From the 6,320-ft saddle on its east end, the mountain stretches over three miles and includes several sub-summits. On the north side of this crest there are fully six basins. The Sandalee Glacier occupies at least three of these basins (depending on how you interpret the map). In these basins, the glacier is separated (i.e., they do not connect).
Technically, a climb of McGregor from this side is easy. There is opportunity to get oneself in steep and/or slabby terrain, so a scramble rope might be a good gear choice. The one thing I will say is if it is or has been raining or is forecast to rain, this climb is a lot less fun. There is a lot of hip and knee-high brush that will soak you. Either that or wear rain pants.
Trivia: Sandalee is Native American and means "roan" as in roan horse. {Thanks goes to Dr. Roper for this info. Man, I've got to get me a copy of this Chinook jargon book so I can stop asking him these pesky questions.}
Approach
From the Bridge Creek Trailhead (c. 4600 ft) off of Highway 20 just east of Rainy Pass, descend the trail for 1,400 vertical feet over about six miles to the junction with the South Fork Bridge Creek Trail. You’ll know you’re near the junction when a view of Bowan Mountain materializes. This junction is marked as the trail to Rainbow Lake. Descend to the creek. The foot log across Bridge Creek has fallen down so you have to make a rock-hopping ford. This is possible (in July) a couple of hundred feet downstream of the creek side camp.Take the South Fork trail for about two miles to Dan’s Camp (so marked) at roughly 3,900 ft. The camp features a pit toilet and a bear wire for hanging food but you’ll need your own twine to use it. There is space for three or four tents. Note that this camp is within North Cascades National Park so you will need a permit to camp there. There is camping in the cross-country zone a little farther up valley but it does get progressively brushier. All in all, I would say Dan’s Camp is a good place to camp. Allow 3-4 hours to get to here.
With extra time in the day you could take a stroll up to the 6,300-ft pass west of Bowan Mountain. The trail climbs from Dan’s Camp to the pass in another 2+ miles.
Here are some pictures from near that pass:


Route to Basin
Walk up the trail for several hundred yards (but not too far), passing the park boundary sign shortly after leaving camp. When it seems convenient, leave the trail and make a diagonal descent to the creek through mostly open forest. Closer to the creek you will run into more windfall and ankle brush. When you hit the creek, parallel it on its east side until you arrive at a small 100’x100’ clearing (grasses and gravelly) between the woods and a wall of alder (a walder) defending the creek. In this clearing close to the alder is a park service boundary marker sticking maybe a foot out of the ground. About 30 feet to the left (south) of this marker is a relatively easy path through the walder to what, at the moment, is an assortment of logs on which you can cross the creek. Map of the location of the clearing.
Once across the creek, diagonal up and left (southwest) through woods until you can see a rectangular boulder slope up and to the right. Climb onto this boulder slope at its north end where the walder ends. Scramble over the big rocks SW without gaining elevation for the first 100 yards then begin climbing up and right to cut off the corner of the hillside higher up where forest abuts slabs and cliff.

Round the corner at approx. 4,600 ft and continue into the valley draining the glacier, staying at roughly that elevation in open woods. Eventually the woods will end and it will be necessary to drop 40-100 feet to the valley bottom. If you’ve worked it out right you will now be only a short distance from the open basin beyond. Continue the rest of the way through ankle brush in the trees. It will be advisable to cross the 12-ft-wide slow-moving creek just before the woods end.

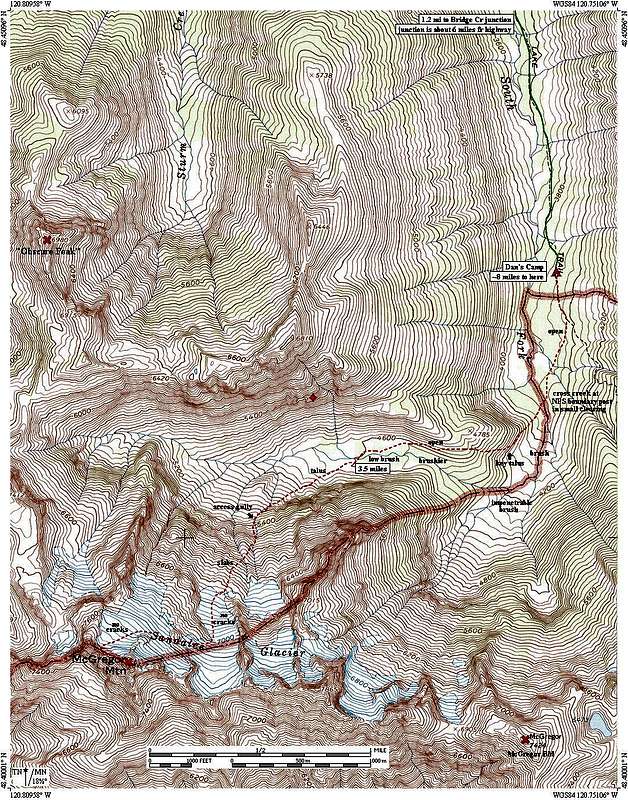
Route up Glacier
From the end of the trees in the basin, take to the undulating talus slopes on the left (south). Climb diagonally up on this talus for roughly a half-mile until the south-side cliffs end at a large stream draining from on high. Just before getting to this stream near the base of the cliffs there is a short push through a gap in the alder. The large stream is on the other side.
Climb up this stream or on the morainal rib on its right to where talus transitions to steep slabs and cliff. Cross to the east side of the stream to get to easier access gullies. Above the first cliff is a flattish area. Straight ahead of you is a weakness in the next slabby cliff. Climb through this weakness (Class 3 but wet for two moves) then jog rightward (westward) on undulating slabs for a few hundred feet to get underneath the middle of the three glacier sections (see the map). Most of the slabs through here are easy, fun walking.


Next scramble through a depression/notch in the slabs to arrive at the bottom of a snow accumulation zone. This is the lowest extremity of the middle glacier section. A wall will trend down on the right (west) side. The top of this wall diminishes and blends into the glacier. Out to the left away from the wall the glacier tends to have hairline cracks and will be icier. Walk then boot up the névé toward the rock wall. You will pass a glacier research probe sticking out of the névé. The snow slope pitches up at the upper end of the wall and will probably require use of an ice axe and/crampons.
Where the wall ends go right (west) and cross an intermediate snow slope (30-degree sidehilling at worst). There is another research probe in this area. Gain a hundred feet to mount a minor rib and continue across the next slope to underneath the buttress that terminates the upper north rib of the summit. This buttress’ base is at 7,760 ft and is obvious on the map.
Once around this buttress climb up and right (southwest) to the notch just west of the summit. Continue along the crest eastward to the summit, which features a small radio tower with solar panels. The final climb up the crest uses a trail.
Time = 5-6 hours up from Dan’s Camp; 3-4 hours to get back to camp
Distance = 3.5 miles from camp
Gain = 4,200 feet

Essential Gear
Ice axeCrampons
Rain pants if the brush is wet
Permit for camping (even in the Lake Chelan National Recreation Area)
Long Island iced teas for camp
Optional: scramble rope (you’ll only need it if you mess up the routefinding)