
|
|
Route |
|---|---|
|
|
36.27156°N / 115.6946°W |
|
|
Scrambling |
|
|
Spring |
|
|
A long day |
|
|
tiring |
|
|
Class 3 |
|
|
Overview
The Devil's Thumb Shortcut branches off the North Loop Trail and ascends quickly and directly to Charleston Peak. This route is used to avoid heavy snow in late spring, or just to cut off the heavily switchbacked portion of the North Loop Trail. However, the route is tricky, and many people simply give up or are turned back by the seeming difficulty of the first few moves. I hope this page gives adequate instructions and warnings for this exhilarating alternative to the trail plod.
WARNING: Do NOT take this route for descent, unless you have ascended the route before. Be very careful on this route in snowy conditions. Occasionally the route sprouts fixed lines, when people get stuck on the descent. In snowy conditions, this a really tough climb (e.g. mixed, technical).
NOTE: This route does not climb the actual tower, which is technical. The tower base is simply where the route starts.
Figures 01 and 02 show the route as one approaches from the NNE on the North Loop Trail.
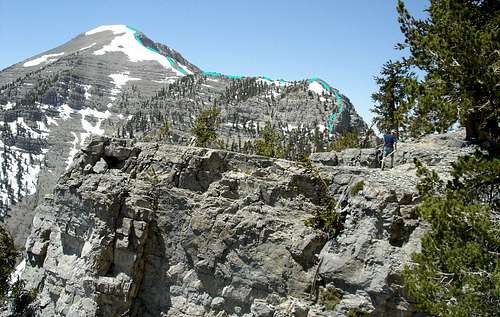 Fig 01 |
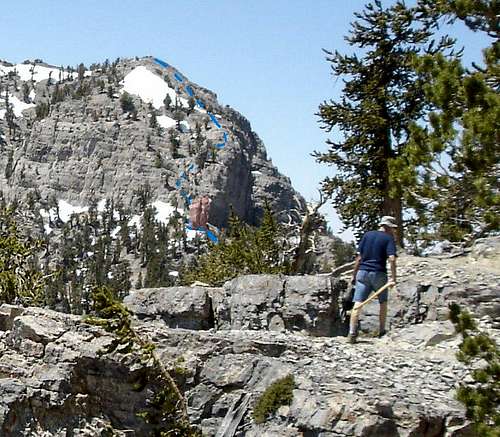 Fig 02-- thumb highlighted in pink |
Getting There
Follow the instructions for reaching the Trail Canyon Trailhead. From the trailhead, take Trail Canyon ~2 miles north to the junction with the North Loop Trail. At the junction, take the North Loop Trail ~4.5 miles west to Devil's Thumb.
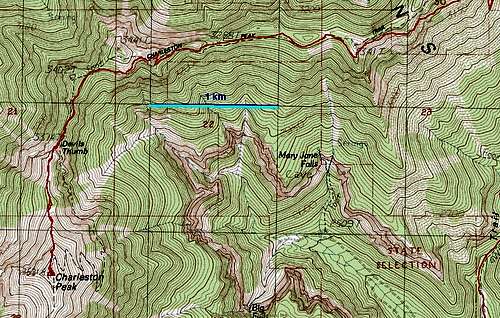 Fig 00: Map to Devil's Thumb Shortcut
Route Description
The Devil’s Thumb Shortcut (DTS) to Charleston Peak is popular with Las Vegas locals, especially during the late spring. In this time period, the South Loop Trail (SLT) is often very snowy for the first 5 miles, and the North Loop Trail (NLT) is also snow-covered for the last 2.5 miles. While the snow on the SLT is mainly a post-holing inconvenience, the snow on the upper parts of the NLT may be quite frightening. South of Devil’s Thumb, the NLT skirts the east side of the peak, on very steep slopes that tend to be covered with hard-pack in late spring; some of these slopes are at 50-60 degrees and have phenomenal exposure.
By taking the DTS, one can often avoid the steep snowy slopes on the NLT. In addition, the shortcut can have benefits later in the year, particularly if one wishes to do the "three-peak hike", crossing over Mummy Mountain, Charleston, and Griffith Peak in one day (20 miles, over 6000’ total elevation gain).
A price must be paid to take the DTS. What might normally be a class 1 walk-up becomes a class 3-4 scramble. Since the route is unofficial and unmarked, potential hikers should be aware of the dangers and have good route-finding skills. There are no cairns to guide the way, but the correct route can often be discerned from obvious foot wear on the talus. However, the tricky part of the route is short, perhaps only 200 yards.
Once you reach the top of the ridge above Devil’s Thumb, the rest of the path to the peak is obvious (provided you are not in a whiteout). If you are uncomfortable on class 4 rock, don’t take this route. If the route is snowy or icy, weigh your options very carefully. At all times of year, the looseness of the limestone may be a big surprise for those expecting Sierra granite.
To take this route, begin at the traditional Trail Canyon trailhead at the west end of Kyle Canyon. Take the Trail Canyon path ~2 miles north to the junction with the NLT. Take the NLT west about 4.5 miles. The DTS begins where the USGS 1:24000 map indicates "Devil’s Thumb" (Figure 00). The GPS coordinatess, relative to WGS84, are: 36.280940, -115.694797. At this point, as one looks south, there is a tower of rock, perhaps 30-40’ high, which is the "Devil’s Thumb". Behind (south of) the tower, there is a steep rise to a ridge 250’ above. The official NLT heads to the east of the tower, and in snowy conditions, quickly becomes perilous.
 Fig A |
 Fig B |
 Fig BC |
To take the DTS, go south of the tower, either on the east or west side, and aim for this small gap in the cliff band (Figure A). Figure B illustrates the view north from the top of this gap. This small gap is class 3 (nominally 4), but there is substantial exposure off to the west. In 2005, some of the traditional footholds broke off, and the branch at the bottom of the gap is now gone, so the gap is rather featureless. There are some very good handholds at the top of the gap, but the reach is tough for short people-- it's at least 7' (Figure BC). However, there is a good tree anchor at the top of the gap (Figure C), and a 40’ piece of webbing can be doubled over the tree, and passed through the gap, providing extra holds on ascent, and psychological security on descent. When I descend this route alone, I find 20' of webbing (looped over the tree) is adequate.
 Fig C |
 Fig D |
 Fig E |
After ascending through the gap, one enters a very steep south-trending chute. The rock in this chute is phenomenally loose, so care should be taken to protect downhill members in large parties. After climbing to the top of the chute (perhaps 30’), head ~10' to the right and uphill over rock, climb over a notch, drop several feet, and delicately traverse an east-facing slope to the bottom of the second crux – a wall that faces east (Figure D). There are two traditional ways up this wall; on the north is a class 4 section that is much easier on ascent than descent, and a few feet to the south is a class 3 section in over more textured rock, culminating in a sturdy stump (Figure E).
 Fig F |
 Fig G |
 Fig H |
Once at the top of the wall, make your way west up to the right of the pinnacle (Figure F), and thence cut south (Figure G) over steep but good rock to the top of the ridge. Upon topping the ridge, the route to Charleston becomes obvious: follow the height of land up the ridge. In late spring, the west side of the mountain is burned free of snow, while the east side—over the traditional NLT – often has deep drifts and very steep snowy terrain (Figure H).
When you descend, the "second crux" is most easily negotiated on the south side, dropping around the stump. I’ve down-climbed the class 4 part of the wall, but that downclimb requires patience to find the best hand- and foot-holds, the latter being hidden from view. The "first" crux, in view of the Thumb, is easily protected with the 40’ strap, which can be pulled free once you have descended.
On the way back down the NLT, look for the legendary Charleston Butt Trees (Figures I, J). These trees are reputed to be likenesses of Ninhursag’s buttocks, and are revered by local Sumerians.
 Fig I. Butt Tree |
 Fig J. Butt Tree |
History: I think Hikin' Dave was perhaps the first to recognize the path up the gap in the cliff bands. Other variations of the route have been in use for years, and NN has gone up this path more times than you can shake a stick.
Essential Gear
A 40' webbing strap and carabiner are useful, especially if the route is wet or icy.
External Links
Another trip up Devil's Thumb Shortcut
Anya's route pictures -- better than mine