Introduction
To me, the discussion of climbing gear is dominated by numbers. It is a quantitative topic composed of facts, figures, and specs. How much does a piece of gear weigh? How strong is it? What is the range of protection? Etcetera, etcetera. Of course, then there are the less tangible aspects of different designs that are hard to compare. All of these considerations must be brought together when deciding strategically what gear we should purchase with our limited funds, or haul up with our practical limitations outside.
And yet, all of these quantitative strategies must be brought to a far less quantifiable world. Equipment rarely breaks. It is usually the quality of the placement or the rock that fails. One rarely knows exactly what sizes are needed or how much redundancy they should have in their rack. For those that really care, there are many details to keep track of, and a lot of uncertainty.
While I’m often pretty meticulous in planning for climbs, I have difficulty working with these stale, lifeless numbers. I need to give meaning to them - meaning that gear catalogues never seem to provide. So that is why I made the following figures for this article. Frankly, saying that a #3 Camalot or its equivalent should be brought to a climb means nothing to me. I need a way to make these numbers more intuitive and more tangible.
Relating Yourself to the Rock
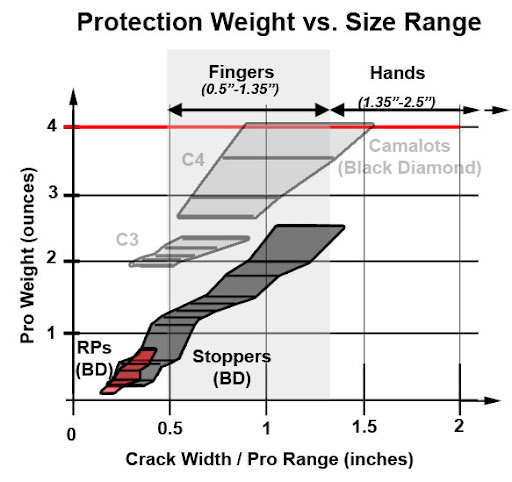
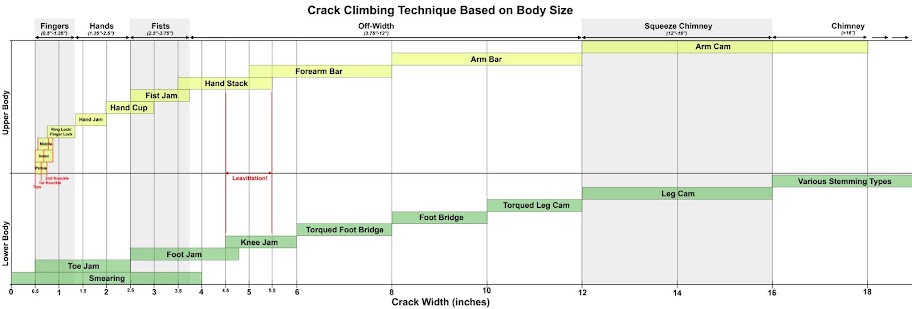
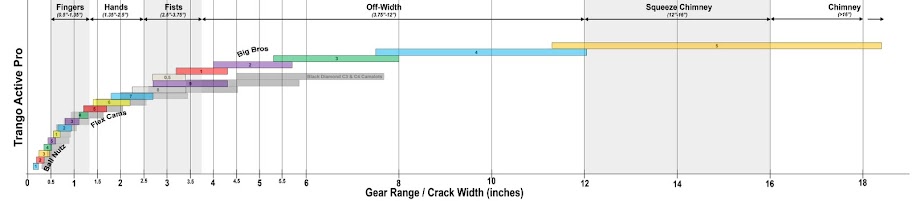
First off, a lot of the cracks you place pro in are also used for ascending the rock. In the simpler case to consider, you might be on a crack climb. The topo will call out the width of the crack, which as a number might be hard to fully understand, but it is very important information. It tells you both the type of gear needed to protect the section and also the type of climbing to expect.
Figure 1 shows the various types of moves that work on a crack of a given size, based off of my own body measurements. Where there is overlap but one technique is probably preferred, I made the cutoff on the extreme end of the preferred technique. Later on I’ll also consider the larger sizes.
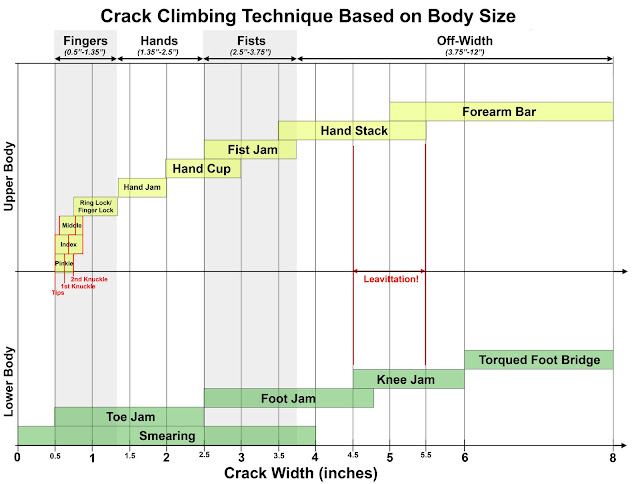 |
| Figure 1 |
Relating Gear to the Rock
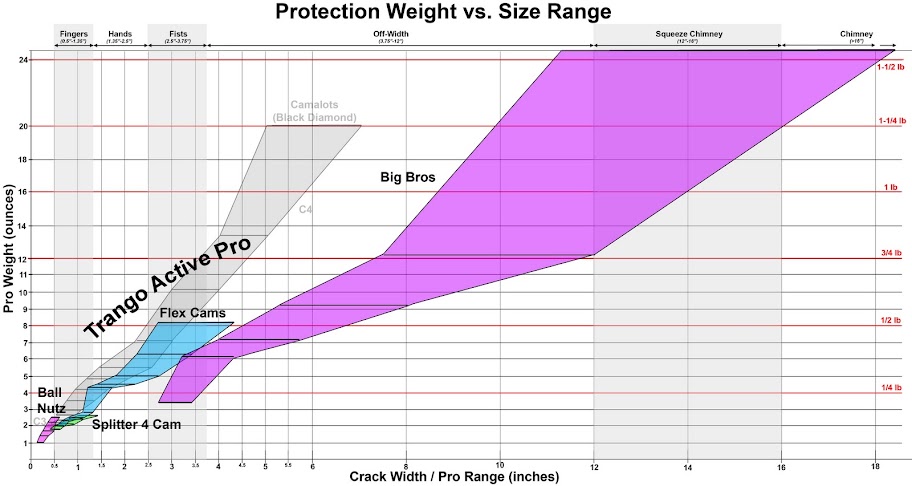
In the following sections I look at active pro and passive pro. I’ve organized the charts by gear manufacturer, first showing the range & distribution of ranges covered in the various sizes, and next by showing the weight of the gear in relation to the protection size covered.
To aid in comparing between manufacturers, in most of the charts I underlay the size & weight distributions of Black Diamond gear as a common benchmark. I chose BD because it seems to be the most popular manufacturer and because they have the largest range of SLCD sizes available. The size charts should help you visualize the range distribution and overlap of a given piece of pro, and the amount of redundancy between cam models of the same manufacturer. The weight graphs can help in visualized what I’ll call “weight efficiency”, which relates the price paid in the weight of a piece of pro to achieve a given range of protection.
Active Pro
In this section I compare various types of active pro - mostly Spring Loaded Camming Units (SLCDs), but also Ball Nutz & Big Bros. Ranges are those provided by the manufacturers and might not necessarily be those that are appropriate for the gear, which I discuss in the last section of the article. One benefit of using active pro versus passive pro is that the protection range is a continuum between the maximum and minimum sizes, so you can expect a piece of pro to protect anything within that size range that the rock geometry will allow based on how the pro works.
For those not familiar with SLCDs, some of the basic differences to consider are the number of camming heads, the number of stems in the cam, and whether or not the pivot points of the cam heads are aligned or offset.
Regarding camming heads, the standard cams have 4 camming heads and the tri-cam units (TCUs) have have 3 camming heads, and therefore a narrower profile. Since TCUs have fewer heads, they exert higher stresses on the rocks since there is less bearing area to hold the cam in, but the narrower profile allows placements in narrower pockets or flares.
A basic consideration for stems is that single stems have less material in the cam and are more flexible. This means that the stem bends better over edges and that the cam is less likely to walk (move) as the rope tugs on the pro. Double stems can be nice in that you can more easily pull the trigger to contract the cam heads for placement (try doing it with one finger on a single stem!).
Most cams have all of the camming heads rotate off of one axis, but for some specialized cams, and a prominent feature in Black Diamond’s cams, the cam heads on one side rotate around a different axle & axis than the heads on the other side of the stem. This allows for a greater protection range for the cam and allows the cam to function safely as a chock/wedge/nut when the heads are fully extended.
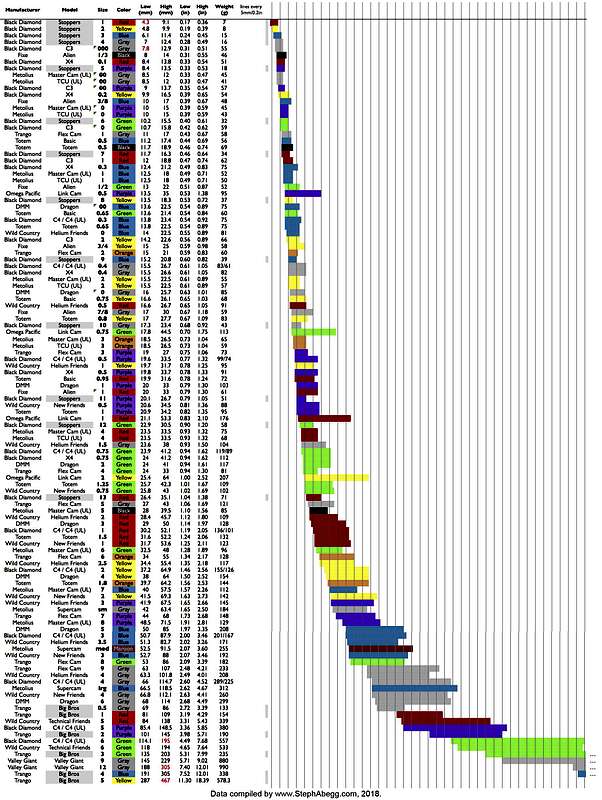
Black Diamond
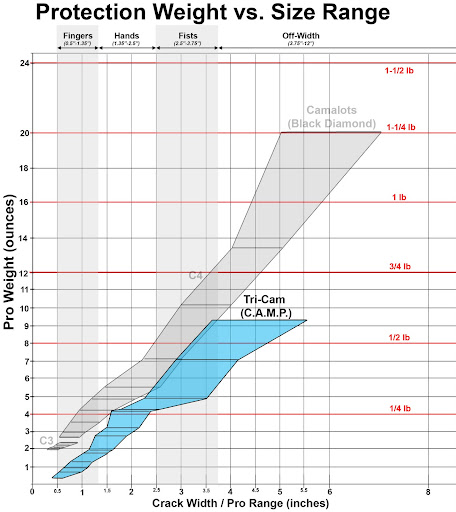
Figure 2 shows the ranges for the various Black Diamond Camalot SLCDs. The C3s are tri-cam units. All Black Diamond SLCDs have single stems and offset cam axes. In general you can see that there is a lot of overlap in protection ranges between sizes. Also, the larger the cam size, the greater the protection range. The greatest overlap in ranges is biased towards the smaller protection sizes.
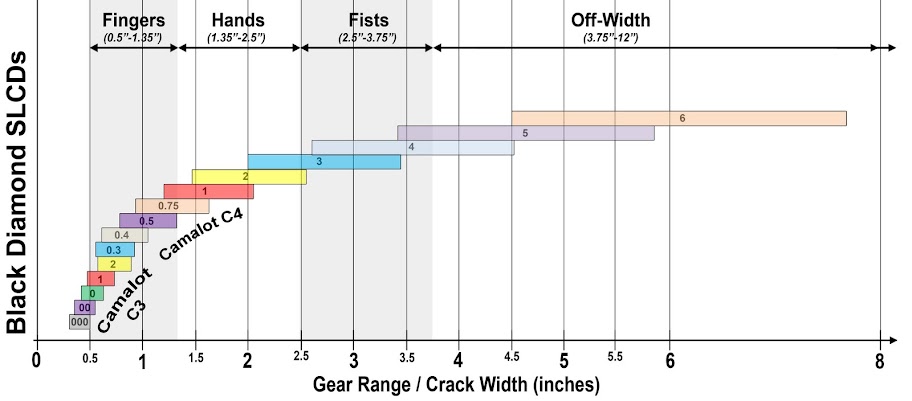 |
| Figure 2 |
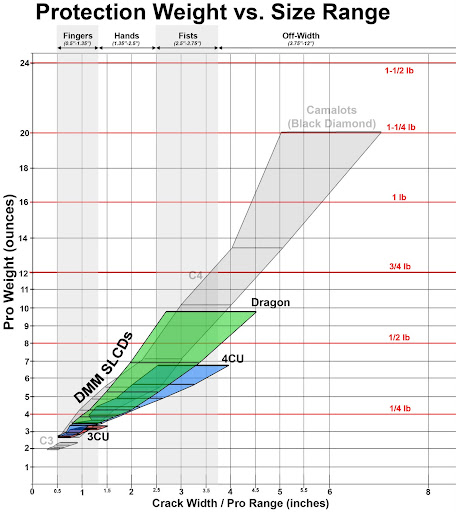
Figure 3 shows the weight efficiency for Black Diamond SLCDs. It’s obvious that by eliminating the 4th camming head for the C3s, the C3 Camalots are a lot lighter for the same protection range.
(The mid-size C4s in this graph are shown with my hand-measured protection size range so that part of the graph is shaped a little differently due to the higher protection end being truncated. I could take the time to change this to be more consistent, but I feel the basic idea gets across either way).
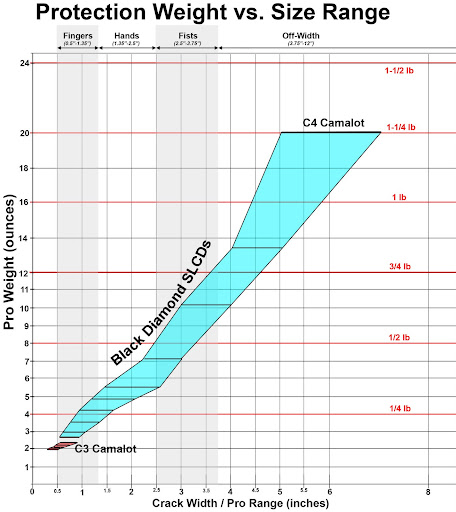 |
| Figure 3 |
DMM
Figure 4 shows the ranges for the various DMM SLCDs. 3CUs are TCUs. The 3CU & 4CU Cams are double-stem cams with the heads aligned on a single axis. The Dragon Cams have a single stem and the cam head axes are offset. As can be seen here, there is more redundancy in protection sizes between the 3CU and 4CUs, while in the Black Diamond cams the 3CUs protected to a smaller size overall and only redundant in the largest 3CU size. The effect of the offset cam head axes of the Dragon cams is apparent with the larger protection range, which is similar to the Black Diamond cams of the same size.
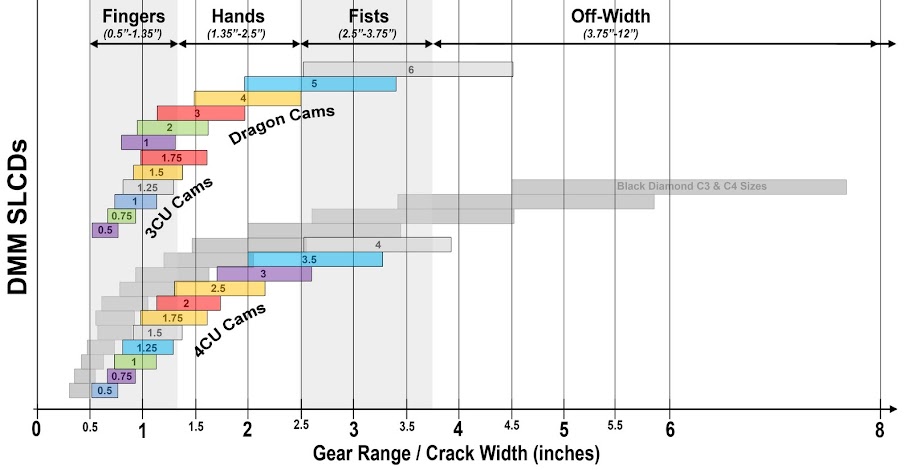 |
| Figure 4 |
Figure 5 shows the weight efficiency for DMM SLCDs. Surprisingly, the 3CUs aren’t really any lighter than the 4CUs, so choosing one over the other should not take weight differences into account. The 4CU line is obviously lighter than the Black Diamond cams – especially in the larger sizes. The Dragon Cams are more similar to the Black Diamond cams in weight. It appears that although some weight is reduced by having only one stem, much more weight is added by the addition of two camming axes.
 |
| Figure 5 |
Metolius
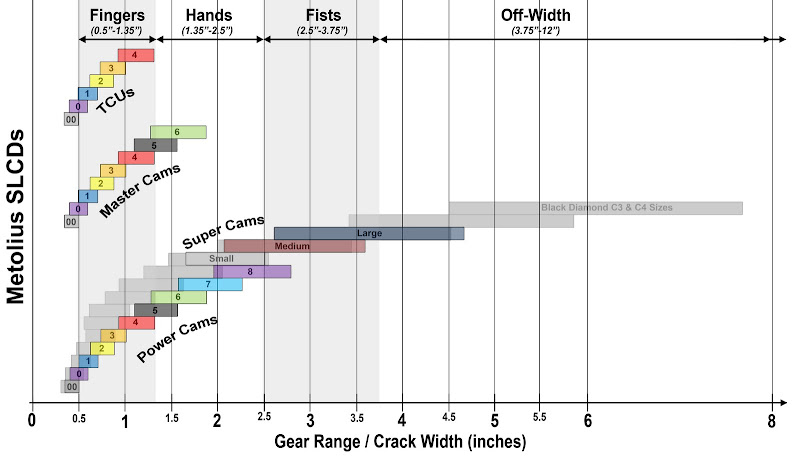
Figure 6 shows the ranges for the various Metolius SLCDs. The TCUS are, well, TCUs, and are identical in protection ranges to the other SLCDs. Master Cams have a single stem and are identical to Power Cams in the protection ranges, although the 4 cam head arrangement is built to be narrower. The TCUs, Power Cams, and Super Cams have a double-stem build. Super Cams have a unique arrangement to give them a greater protection range – differently sized camming heads, with the smaller head rotating a full 180 degrees when fully contracted. The greater range provided by this is small on the smaller size, but larger in the larger sizes.
In general, compared to the Black Diamond series, Metolius has more types of cams and less overlap of protection sizes between pieces – especially in the smaller range. There is also more redundancy between cam types, so you’re choosing one over the other more for other features than the protection range unless you are getting the expanded range of the Super Cams.
 |
| Figure 6 |
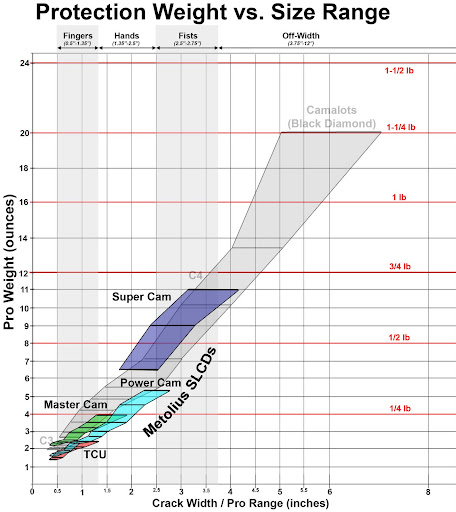
Figure 7 shows the weight efficiency for Metolius SLCDs. Here the TCUs are slightly lighter than the Power Cams, but the difference is smaller than the TCUs of the Black Diamond cams. For some reason the Master Cams still weigh the most even though the only obvious design change is the elimination of one of the stems. Overall the main line of Metolius Cams is far lighter than the Black Diamond Cams. However, the Super Cams are significantly heavier than the C4s and overlapping protections sizes of the Power Cams. A great weight cost was added for the expanded range, and it is greater for this method than the offset cam head axis.
(The Power Cams & Super Cams in this graph are shown with my hand-measured protection size range so those parts of the graph are shaped a little differently due to the higher protection end being truncated. I could take the time to change this to be more consistent, but I feel the basic idea gets across either way).
 |
| Figure 7 |
Trango
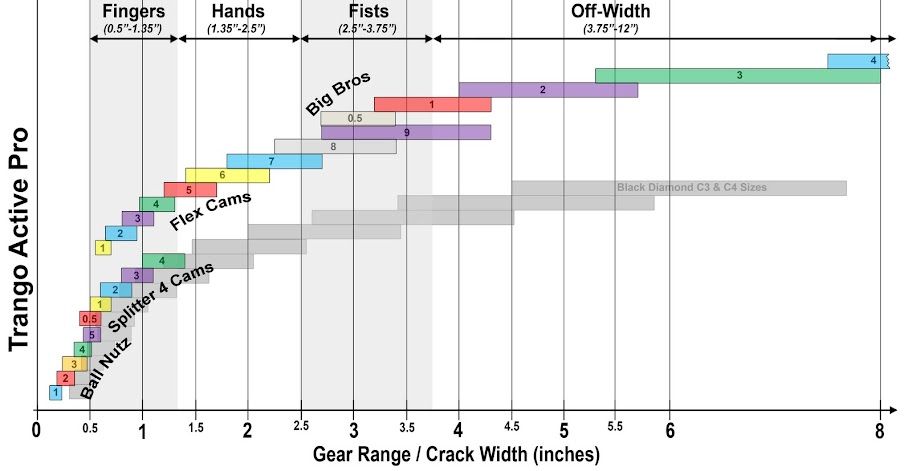
Figure 8 shows the ranges for the various Trango active pro. All cams are single stem. Splitter 4 Cams have the opposing cam lobes occupy the same plane of rotation, so the 4 cam lobe head is narrower like a TCU without compromising holding power. All cams are single stem with an aligned cam head axis. The Splitter 4 Cam sizes are mostly redundant with the Flex Cams, and both series have less overlap in protection ranges between sizes than Black Diamond, but not as great as Metolius. One surprising thing to note is that the protection range is really large despite any obvious change in the cam head axis alignment or any other obvious difference in cam form. Perhaps it has to do with the choice of spiral shape for the cam lobe outside edge?
 |
| Figure 8 |
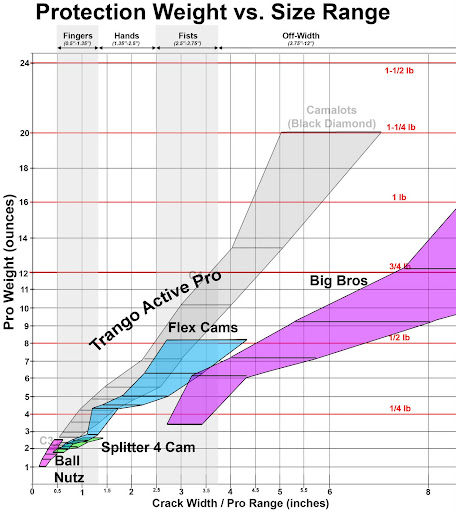
Ball Nutz are more specialized pro and work similar to a nut (and are only manufactured by Trango & C.A.M.P.). They are Trango’s answer to smaller protection sizes and fill the niche of pro that works in flaring cracks that spit out cams & nuts. The size range also includes smaller sizes, allowing an active protection option in cracks too small for TCUs, including parallel cracks that will not take nuts. Big Bros are specialized pro on the large end and cover the super wide ranges (and only manufactured by Trango), which is discussed in a later section. They are basically spring-loaded tubes with a beveled end and offset attachment to encourage both wedging and camming actions.
Figure 9 shows the weight efficiency for Trango active pro. The Splitter 4 Cams are lighter than the Flex Cams, but only slightly so. However, both cam lines are significantly lighter than the 3Cs & 4Cs. Flex cams seem to be the clear winner among manufacturers in regards to expansion range offered versus the weight cost for that protection range.
 |
| Figure 9 |
Ball Nutz, while protecting a smaller size, are obviously not as efficient from a weight perspective, and Splitter 4 Cams are lighter for the same protection range. Big Bros are the clear winner in terms of weight efficiency. They blow the SLCDs out of the water! However, there are other costs in terms of performance not shown here.
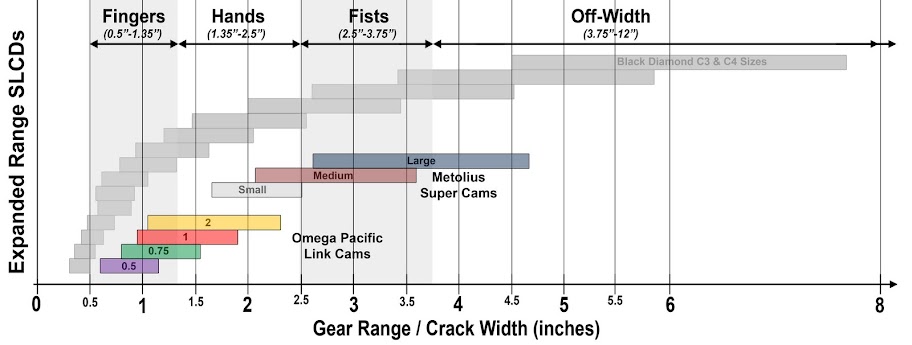
Expanded Range SLCDs (Omega Pacific & Metolius)
Figure 10 shows the ranges for the Omega Pacific Link Cams and the Metolius Super Cams. Both SLCDs are advertised specifically for the greater range they provide versus the ordinary SLCD. It is apparent that Link Cams offer a wide protection range only in the smaller sizes, while Super Cams only provide it in the larger sizes. So if you want a full set of expanded range cams, you’d better stock up on both. The Link Cams have much greater overlap in sizes than the Super Cams, and the relative increase in protection range provided is much greater. Finally, the Link Cam sizes differ most in their maximum protection width and are for the most part pretty similar on the smallest protection size.
 |
| Figure 10 |
In general, the Super Cams don’t offer much of an expanded range as compared to the C4s – especially on the small size. The same can be said about the 0.5 & 0.75 Link Cams.
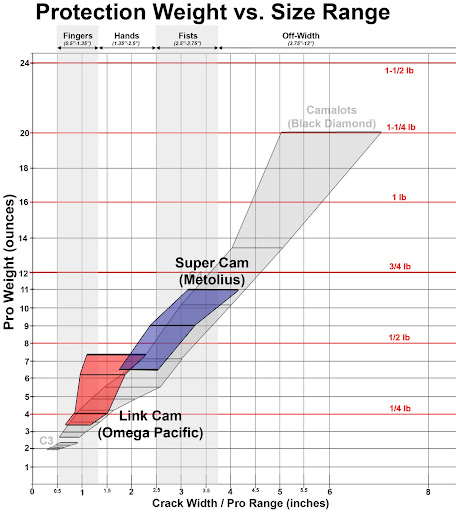
Figure 11 shows the weight efficiency for Link Cams and Super Cams. It is apparent from this graph that there is a greater cost in weight for the expanded range SLCDs. However, the smallest 2 sizes of the Link Cams are about the same weight as the C4s, although their “expanded” protection range is also about the same.
 |
| Figure 11 |
My conclusion from this comparison with the weight and protection range criteria – only buy the size 1 & 2 Link Cams, and then just go with the DMM 4CUs or the Trango Flex Cams. It appears that the innovative design of the Super Cam is a bust and doesn’t provide much real gain in overall performance versus other cams from Metolius and other manufacturers.
Passive Pro
In this section passive pro such as nuts, hexes, & tri-cams are compared in a similar way as the active pro in the previous section. One thing to consider about passive pro that does not come across in the graphs is that the protection sizes are more discrete, so a given size range is likely to only protect the largest and smallest size, and little in between. It is trickier to nail down exactly what the protection sizes actually are since it depends on which way the complex geometry of the pieces is used (I counted 7 discrete ways for hexcentrics, with some continuum protection possible in the 3 camming modes!). For simplicity here, I just show the size listed by the manufacturers, which mostly relates to the measurements of the geometry of the pro, such as width and depth for nuts.
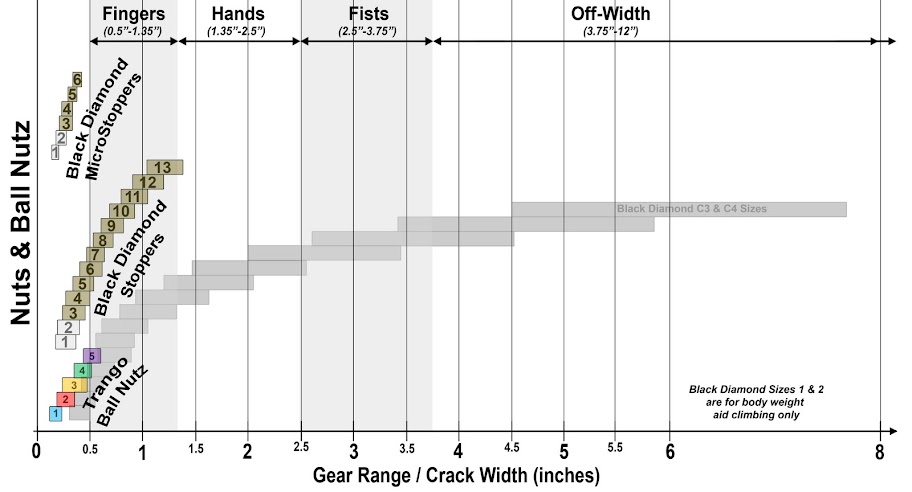
Nuts & Ball Nutz
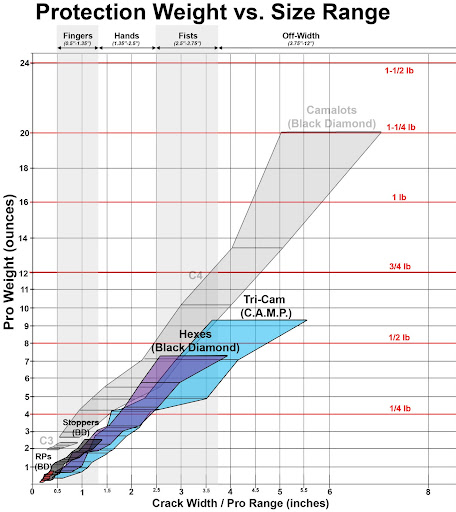
Nuts can be divided into two categories: micro nuts (RPs) and regular nuts. Sometimes called wedges, chocks, and stoppers, these pieces work almost purely through wedging action in the rock. Micro stoppers tend to protect the smallest sizes and are usually made of a softer metal to encourage bonding/fusing with the rock surface to hold them into place (e.g. copper heads). They also have narrower profiles to make it easier to make placements in smaller cracks, though at the cost of less variation in protection sizes. Black Diamond’s MicroStoppers have more of a box shape to them that allows different types of placements.
As seen in Figure 12, nuts are used as protection only in the very small sizes. There is also a lot more overlap in ranges as compared to SLCDs, probably as a result of the more discrete protection dimensions actually available in between the maximum & minimum sizes. Note that the smallest 2 sizes are weak enough to be rated only for body weight and are not appropriate for lead falls. An interesting comparison here is that Ball Nutz active pro protect to sizes as thin as the narrowest nut, but theoretically they are all able to hold a lead climbing fall.
 |
| Figure 12 |
Figure 13 shows the weight efficiency of the nuts. They are hands down much more efficient than any cam, which most of us climbers are well aware of. This nicely illustrates that weight efficiency isn’t the only criteria one should use for gear, since cams are so much more versatile and convenient to place. However, if you’re on a route where nuts work as well as cams, you’re better off leaving the smaller cams at home – especially on routes where weight matters such as aid climbing and alpine climbing. Surprisingly, the RPs don’t protect that much smaller of a size than the regular nuts, and aren’t any lighter.
 |
| Figure 13 |
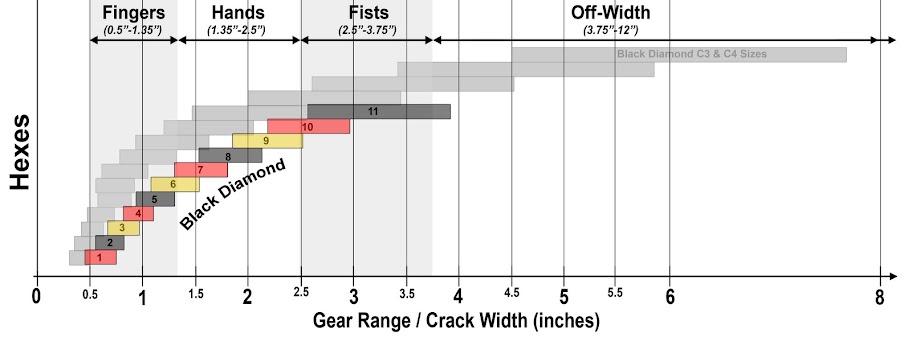
Hexcentrics
Hexcentrics (usually just called hexes), can work both as nuts and as camming devices. This is one answer to parallel cracks for passive pro. As seen in Figure 14, hexes have similar protection ranges and overlap to SLCDs and also protect much wider than nuts.
 |
| Figure 14 |
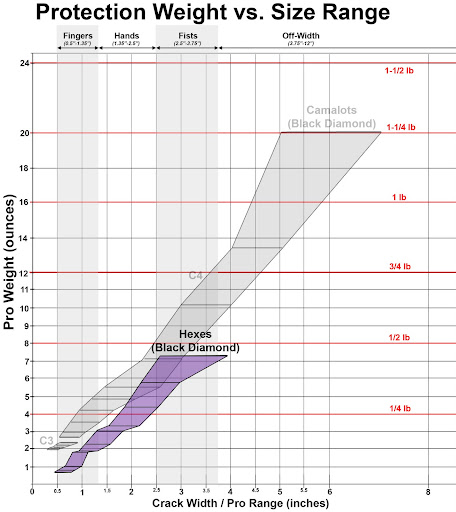
Similar to nuts, Figure 15 shows that hexes have much better weight efficiency than SLCDs as well. So, similar to nuts, hexes are a nice replacement for SLCDs on climbs where weight is important and one can expect to make pro placements from easier stances or have more options for placements. They also make nice music as they clang around on your harness.
 |
| Figure 15 |
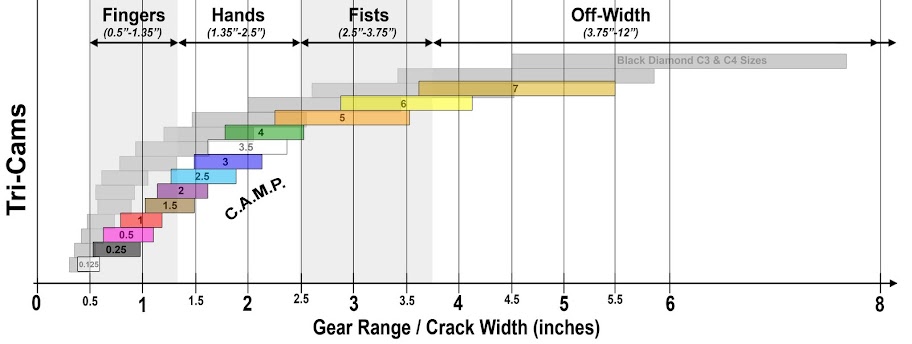
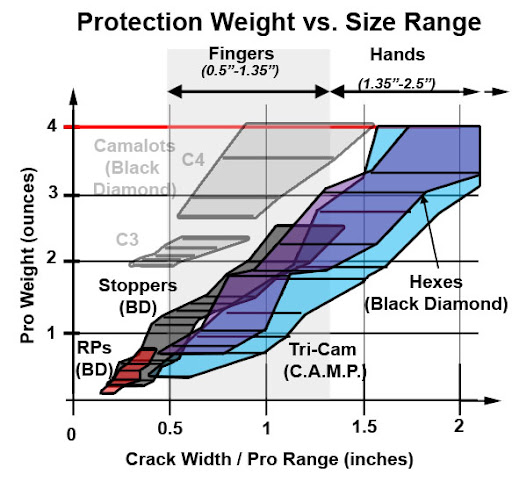
Tri-Cams
Tri-Cams are similar to hexes in that they protect through camming and also have a wedging mode. While the wedging mode is more limited, the camming mode is actually continuous, like active pro, making them much more ideal for passive pro camming placements. The tether attached to them also bends nicely over edges, making them more ideal than SLCDs for placements where the stem would be pulled across a corner, such as in horizontal cracks.
 |
| Figure 16 |
Figure 16 shows that C.A.M.P. Tri-Cams have slightly less overlap in protection ranges than hexes but protect to a wider size. They can cover nearly the entire protection range of the Black Diamond SLCDs. Similar to other passive pro, Figure 17 shows that Tri-Cams are much more weight efficient than SLCDs. They occupy a nice niche of functional and weight efficiency differences between hexes and SLCDs.
 |
| Figure 17 |
Comparisons
Figure 18 shows all types of passive pro compared by weight efficiency. Overall Tri-Camps are the most efficient across the entire range, while nuts can protect the smallest sizes.
 |
| Figure 18 |
The Small Sizes
Speaking of the smallest sizes, because there are so many types of pro that protect here, and it is harder to compare them on the larger scale size, I’ll look specifically at them here.
Figure 19 shows the weight efficiency of all of the passive pro variations. Similar to the earlier comparison, nuts are the least efficient but protect in the smallest ranges, and Tri-Cams are the most efficient and can protect a continuum of sizes. Hexes fall somewhere in between.
 |
| Figure 19 |
Figure 20 shows the weight efficiency of all of the active pro variations and nuts for comparison. Basically, nuts are the lightest option for the ultra-small sizes. Metolius TCUs are the way to go for efficiency in SLCDs, while Black Diamond’s 3CUs are the least efficient of the bunch. Ball Nutz are heavier than either nut or SLCD option for the same protection size (unless it is compared to the 3CUs).
 |
| Figure 20 |
The Ultra-Wide
For those that like the wide stuff, Figure 21 shows the various types of moves that work on a crack of a given size, based off of my own body measurements, for crack all the way to chimney size. Where there is overlap but one technique is probably preferred, I made the cutoff on the extreme end of the preferred technique.
 |
| Figure 21 |
Trango
Tango is the only manufacturer that makes active pro that protects from the smallest to the largest sizes. No other manufacturer of active pro comes close – especially on the larger protection sizes made available by the Big Bros (Figure 22). So if you want to protect the wider off-widths to smaller chimneys, Big Bros are the only way to go.
 |
| Figure 22 |
It is also interesting to look at Figure 23, which shows the weight efficiency of the entire line of Trango active pro. It protects smaller than Black Diamond and is more efficient across all protection sizes. The Big Bros are by far the most weight efficient design for pro.
 |
| Figure 23 |
Appendix
Basically, other things that people might want to consider that didn’t quite fit the overall flow of the article.
Advertized vs. Actual Protection Ranges for Pro
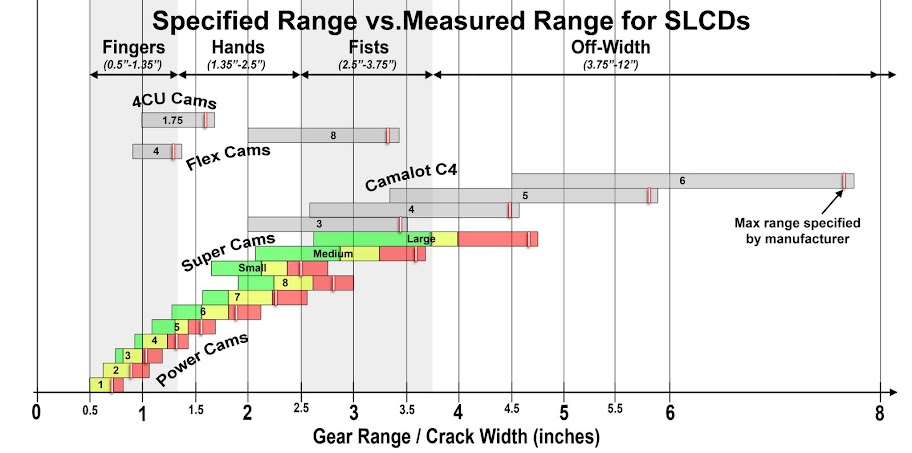
This final section looks specifically at SLCDs, comparing the protection size listed by the manufacturer with the actual usable protection sizes and maximum geometries that I measured off of my own cams. How wide is usable for a cam? For an easy comparison, I started with Metolius since they use a color-coded system on the cam heads to categorize the safety of cam size placements. Since they have some amount of liability in stating what is a good (green), adequate (yellow) and questionable (red) range, this is easy to measure with confidence that some thought and engineering considerations are behind the classifications. I also compared my other cams just considering the maximum geometry compared to the manufacturer’s stated range.
In Figure 24 there are some interesting findings. For most of the cams, the stated maximum range is near the actual maximum geometry, so as a rule of thumb, remember that the range you see in the catalogues is not the actual range you’ll be using! Metolius cams are the exception, with the maximum range for the smaller cams being at about the transition between the adequate and questionable range. However, as the cams get larger, the stated range gets deeper into the questionable range – especially with the expanded range cams. Perhaps this is an indication of an advertising-influenced bias?
 |
| Figure 24 |
One other size consideration to note is that I found the minimum stated size to be about the same as the dimension for a fully contracted cam, so you should also expect the smallest available placement from a cam to be a bit larger than that stated by any of the manufacturers if you’re taking care to avoid over-camming.
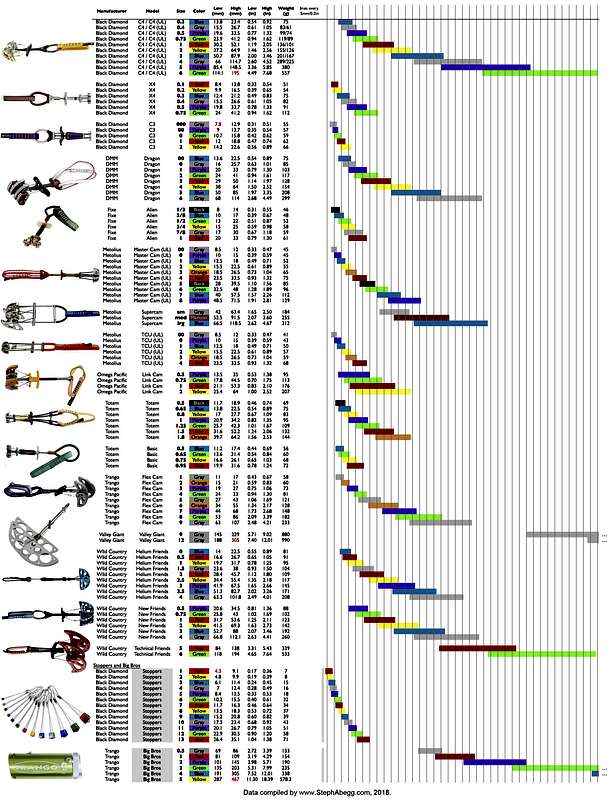
Types of Pro Compared
The following are all of the types of pro considered in this article.
Links
Report on Personal Website


Comments
Post a Comment