
-
 277881 Hits
-
 99.61% Score
-
 121 Votes
|
|
Route |
|---|---|
|
|
36.57860°N / 118.293°W |
|
|
Hiking, Mountaineering, Skiing |
|
|
Spring, Summer, Fall, Winter |
|
|
Half a day |
|
|
Class 3 |
|
|
Grade 3 |
|
|
III |
|
|
Overview
The Mountaineer's Route is one of the most popular ways to climb Mount Whitney (second only to the main trail), and the usual descent route for East face technical climbs. It is more direct than the main trail, and less crowded. Unfortunately, the Forest Service has recently decided to require day permits for the North Fork, and lump them together in the same quota as the main trail. That means you're stuck with either the Lottery or gambling on getting an open slot when you show up at the permit office. Overnight permits haven't changed, thankfully.
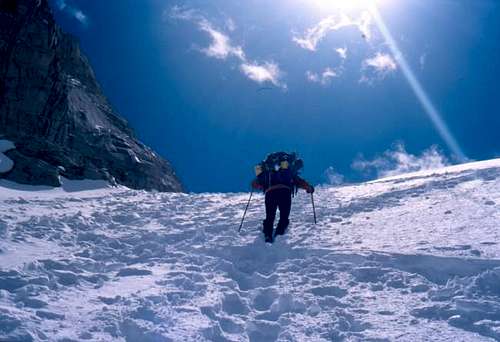
The Mountaineer's Route is climbed year-round. The majority of winter and early spring attempts on the peak use this route. While fast hikers can easily do the route in ten hours or less in warm summer conditions, parties usually take at least two days in winter, and often more. Snow conditions are the primary limiting factor in how fast you can go.
 After the snow melts the Mountaineer's Route is basically a long hike followed by 1,500 feet of grovelling up a steep, loose gully, and then another 500 feet of class three scrambling. Easy. So why do so many people get into trouble on this route? Poor planning, inadequate gear and clothing, weather, inexperience, altitude, bad judgement--the usual suspects.
Snow can make the route much more pleasant, as long as it isn't too soft. But the upper gully just below the summit plateau is steep enough that unless you are quick in applying a self-arrest, there is little chance of stopping. Ice often forms in the upper gully, and the downclimbing can be tricky for the inexperienced. Even though the terrain isn't technically difficult, the effects of altitude can impair your judgement and coordination, increasing the chances of a mishap. For the vast majority of people, climbing the Mountaineer's Route is a memorable and enjoyable outing. But every year there are some close calls, and occasionally a fatal accident. Bring your camera and some common sense, and have a good time!
Approach
Preface
Mount Whitney draws people from all over the country, and all over the world. While the approach to the Mountaineer's Route isn't particularly difficult, if there isn't anyone in the party who knows the way, route finding (especially at the Ebersbacher Ledges) can be challenging. Thus, I have chosen to describe the approach in considerably more detail than most hiking routes on SummitPost.
Summer Approach
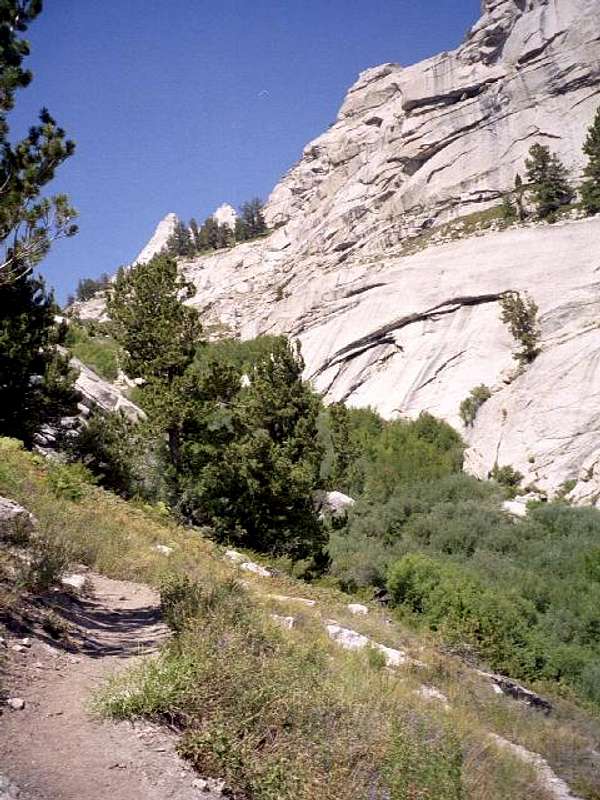
The Ebersbacher Ledges ascend a third class chute leading to the lone tree on the cliff at far center right. |
From Whitney Portal start on the main Mount Whitney trail. Cross Carillon creek, and continue on the trail to the second stream crossing, the North Fork of Lone Pine Creek. A well-established use trail leads up the wooded slope to a willow-choked valley.
The trail crosses the stream at the bottom of the valley, tunnelling through dense aspen, and then winding its way above the willows on the south side of the valley. As the valley narrows and steepens the trail will cut through the willows, cross the stream, and run along the base of the cliffs on the north side. You're looking for a third class chute that leads up to the famed Ebersbacher Ledges, which will be your salvation from the willows. A large boulder reminiscent of the Matterhorn marks the chute.
Clamber up the chute past a large pine tree and follow a system of ledges east until it is possible to step up and turn back up canyon on the sandy, pine-covered ledge above. Traverse the ledges until their end, where a use trail switchbacks steeply up the last couple hundred feet to Lower Boyscout Lake (actually more like a meadow). There are many paths along the upper ledges. The most expedient stays low, but has tremendous exposure--there are plenty of places to fall and die. The safer path stays high.
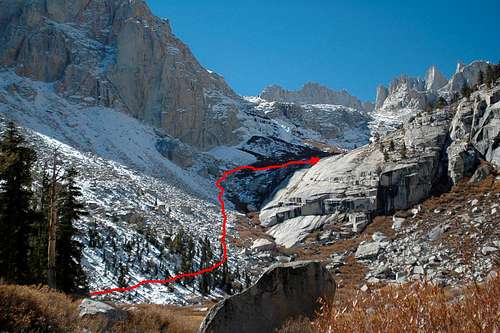
The standard route from Lower Boyscout Lake to Upper Boyscout Lake is shown approximately by the red line. Note: due to the fresh snow on the talus, we used the alternate slab route on this day. |
From Lower Boyscout Lake there are two ways to go. The standard route follows a use trail that crosses the stream near where the trail emerges from the willows, and countours around the south side of the meadow/lake, and eventually winds its way up talus and large blocks towards the obvious low-angle slabs west of the lake. The shortest path stays right and below a huge boulder. A couple hundred feet past the boulder you will find a passage through the willows that guard the entrance to the slabs. After emerging from the willows head up and left across low angle slabs. Sometimes there are ducks marking what some people believe to be the best route through the steps and willow above the slabs. Sometimes not. It isn't too hard to find a way. Once past the willows you will soon arrive at Upper Boyscout Lake.
An alternative that spares one the questionable pleasure of the scree, talues and boulder hopping of the standard route stays right (north) of the meadow/lake and ascends the prominent slab. Aim for an obvious chute right of the slabs and clamber up a short distance until it is possible to begin working your way left and up towards a crack/ledge that cross diagonally up towards a small pine tree. Continue past the tree and contour up through trees to the upper part of the slabs on the standard route. If you go too high after crossing the third class slab you will wind up in deep sand. See this photo for an overview of the slab route.
If the standard route is covered in a thin layer of snow, there is a real risk of injury due to postholing into deep pockets between rocks, or just slipping. The northern route will most likely be free of snow, and is also more direct. But be forewarned: it is every bit as exposed as it looks. If you are not comfortable on exposed third class slabs, then don't try it.
If you're doing the East Buttress as a day climb then you'll blow by Upper Boyscout Lake, but if you're doing it with one or more nights on the hill, Upper Boyscout Lake is a reasonable place to camp. Although it adds well over an hour to your approach the next morning, it has the advantage of being at lower altitude, which can help with acclimatization. It's also a good staging area for multiple climbs, such at Mount Russel's East Ridge, Mount Carillon, and Thor Peak.
From near the outlet of Upper Boyscout Lake the trail heads south, climbing steeply through slabs and talus near the right side of the upper valley. Eventually the trail turns west and slogs over seemingly endless moraines. High on the cliffs above to the right you will see evidence of water. Just past this is a gully system that offers a path through this final barrier to reaching Iceberg Lake, the usual camp spot for eastern Whitney climbs.
Winter/Spring Approach
The winter/spring approach follows the same basic path as the summer route, with a few exceptions. First of all, it is quite possible that your approach will begin somewhere on the road leading up to Whitney Portal. Although the road is technically closed, all that means is the county places a sign in the middle of the road. It is routinely ignored. However, driving above that point carries two risks: any kind of vehicle problem will be much harder to deal with; and second, avalanches and rockfall are common in the winter and spring. Don't park beneath chutes or tall road cuts, and be aware that the way out may be blocked when you return to your car. You could also get snowed in. If you wind up leaving a car up there til spring, you won't be the first.
Once enough snow has fallen to cover the willows below Lower Boyscout Lake, it is no longer necessary to use the Ebersbacher Ledges, nor does it make sense to attempt the northern slab alternate above Lower Boyscout Lake. Take care, though, on the way up to Lower Boyscout Lake. As the snow melts it is possible to break through and take a bad fall into the buried willows and/or stream bed. Even if you are unhurt, it may be difficult to extricate yourself.
Most people use snowshoes when a significant part of the approach is covered in snow. Skis are another option. Whether you will find good ski conditions is another matter. I've heard one Sierra guide opine that the ski conditions in the North Fork are usually crappy.
Almost the entire approach is in avalanche terrain. The route is threatened by both south-facing and north-facing slopes, meaning that one side of the route may have spring conditions, and the other winter conditions. Check the avy forecast put out by the Eastern Sierra Avalanche Center, carry appropriate gear, and be careful.
How Long Will it Take?
Dayhikers in great shape can easily reach Iceberg Lake in three hours or less. If you're not as hard core, or just enjoy taking your time, 4-6 hours is more reasonable. If carrying a heavy pack, add a couple more hours. This trail can get hot in the spring and summer, so getting an early start can help you stay more comfortable. There is plenty of water along the way, so there is no need to carry more than you will drink in the next hour or so.
Winter is a different story. With solid snow and the road passable to Whitney Portal, it is quite feasible to dayhike the Mountaineer's Route. On the other hand, a lower starting point and lots of soft snow can turn the approach into a two or three day adventure.
Route Description
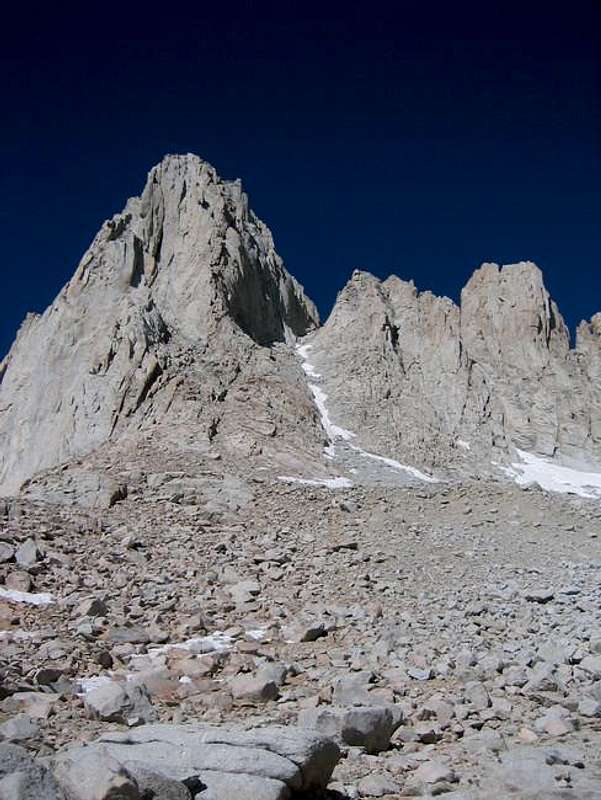
The lower part of the Mountaineer's route in late summer. The route follows the obvious chute. The patchy snow is probably avoidable, but might indicate the need for crampons and ice axe in the upper chute. |
From Iceberg Lake ascend the obvious gully to the west, leading to a deep notch in Whitney's north ridge. When dry, the gully is class 2, with copious loose rock and sand. Snow may linger well into the summer, which makes the going easier, but may necessitate the use of ice axe and crampons.
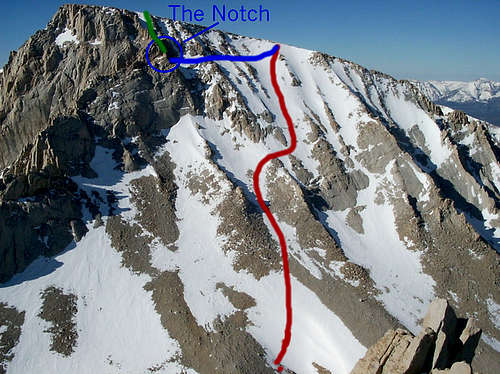
The upper part of the Mountaineer's route on May 29, 2005. The standard route is marked in green. The traverse alternative in blue. The red line shows a path from Mt. Russell. |
Once at the notch, there are two basic options: traverse west over steep, exposed third class until you reach easier ground, or head up the steep gully immediately west of the notch. The options are more or less equal in terms of technical difficulty and exposure, and both can be quite dangerous under snowy or icy conditions. There have been at least two fatalities in this area in the last couple years. Exercise caution!
Either option will deposit you on the summit plateau. Walk east until you reach the summit.
Descend the way you came. It is a good idea to make a mental note of where you popped up on the summit plateau, as it all looks the same from above. If there is snow in the upper gully, I'd recommend not glissading even if the snow is soft. You may hit a buried patch of water ice, rock, or slab that will send you out of control. At least one person has died doing this in recent years. Glissading won't save you much time here. There are plenty of safer places to glissade lower down.
Essential Gear
A helmet is strongly advised, as the gullies contain lots of loose rock. Crampons and ice axe are needed until all the snow melts. If you are not confident on exposed third class terrain, a rope, harness, some slings, and a few pieces of rock pro will allow you to protect the last 500 vertical feet of the climb.
5-4-06 20248
Nigel Tufnel - Aug 6, 2007 2:56 pm - Hasn't voted
PermitsYou now need a permit for even a day trip on Mountaineer's Route/N fork of Lone Pine. I called the InterAgency office the day before my trip and they left it in a lockbox for me to pick up that night. I think the final gully to the summit is 4th class. At the beginning of it if you fell you'd take the big ride. To me that is 4th class.
alex - Sep 19, 2007 10:22 pm - Hasn't voted
Yep!While a permit is indeed now required, there is not a quota for day hikers. The folks in the Bishop office, postulated, to my girlfriend and I, that issuing the permits without a quota was being used to determine a quota at some point in the future.
GerryS - Dec 1, 2007 7:06 pm - Hasn't voted
The Aspen are actually AlderSmall correction: under the Approach section you actually tunnel through dense Alder - I believe Green Alder. 'Tunnelling' is a great description though.
Igooooor - Jul 25, 2019 7:20 pm - Voted 10/10
As of 2019 there are NO MORE IN PERSON PERMITS!That's right, have to do everything through this link now. I repeat, no more in person permits, this includes same day. Have to go online in front of them and check for it via this link. They are nice and will check for you but you still have to have your own connection and book via this link. https://www.recreation.gov/permits/233260 Did I mention no more in person permits? :)