-
 21323 Hits
-
 87.63% Score
-
 25 Votes
|
|
Mountain/Rock |
|---|---|
|
|
48.54910°N / 120.8562°W |
|
|
8215 ft / 2504 m |
|
|
Overview
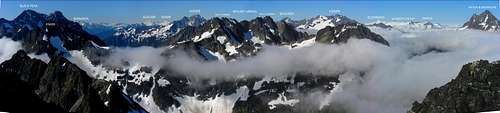
Arriva and surrounding peaks - click for detail!
The origin of the name “Arriva” is unknown, as is the meaning of the word. “Arriba” in Spanish translates to “upwards” or “above, overhead”, so it is easy to imagine someone misheard and/or misspelled the name and it stuck. A colleague of Hispanic descent tells me that in some Mexican dialects “arriva” may have a dual meaning of “we go” and “we have arrived”. This seems poetically appropriate for a mountain in the wilderness. Arriva is actually a long, broken ridge, with a high east summit, a series of jagged points, and the true summit at the west end. The east summit and some of the points can be seen from Easy Pass, the true west summit is hidden behind Arches peak from that vantage point.
The west summit sits in a unique position, jutting out westward thousands of feet above a split in the Fisher Creek drainages, providing a prow-like very high-up airy feeling, and a great view of surrounding major summits of the North Cascades such as Black, Mesahchie, Logan, and Goode, with more distant views of Glacier Peak, Dome Peak, Mt. Buckner, Sahale Peak, Boston Peak, and Jack Mountain, to name just a few.
It is unknown how often this mountain sees climbers, but due to its remoteness, the fact that it just misses being on the hundred highest list, and relatively tricky access, probably not often. In an effort to find out, I placed a summit register there in 2006; in 2011 it was gone. The custom cover photo I made, the pages, even the white PVC screw cap tube was gone… who would steal a summit register? Maybe the wind, which must be fierce here during the winter, given the west-facing funnel the Fisher Creek valley points right at it. *As of August 5, 2013, a new summit register has been placed… I’ll be back to check on it in a few years.
Arriva is a good choice for anyone seeking a climb with more of an uncrowded wilderness feel to it. The trip includes very scenic on and off-trail travel without being an overwhelming brush-crash, followed by a challenging scramble with maybe just a little bit of ropework. And any excuse to camp at the Silent Lakes is a good excuse.
**I have encountered some confusion with folks asking who wrote this, since there are two authors listed. The original entry was made by Bob Bolton, although he had minimal info on it since he had not climbed the mountain, had just made an exploration of the area. With Mr. Bolton’s generous blessing, he allowed me to take it over in 2011, and I have written nearly all of the info contained here. So blame me (relic), not Bob Bolton, for any errors, misinformation, exaggerations or underestimates of difficulties.**
Getting There (The drive)
Drive the North Cascades Highway, state route 20, 21.5 miles east from Colonial Creek Campground or 6.2 miles west from Rainy Pass to the Easy Pass Trailhead. Ample parking and restroom facilities.Approach
Walk the trail to Easy Pass, and behold one of the best on-trail views anywhere in the North Cascades National Park. Descend to the valley bottom on well-maintained trail. At the sign pointing west to the Fisher camp, instead of following the main trail, turn left (east). There is actually a boot-built trail going that way at first, but after about ten minutes of walking it disappears at a brushy pile of trees blown down by avalanches. There is a small clearing right on the bank of the creek here, in August 2013 a burn spot from a campfire marks the spot, that thorough ground scorching should last a few years. This is a good place to then cross the creek and open marshy meadow to the south side of the valley; head straight across to the nearby talus slope to find drier ground, and then continue east. Once across, you’ll want to turn around and make a mental note of the spot, so on the return trip you’ll get across the marsh with the least boot soaking. In earlier season, often until mid-summer, snow bridges the creek and covers the marsh, eliminating this obstacle.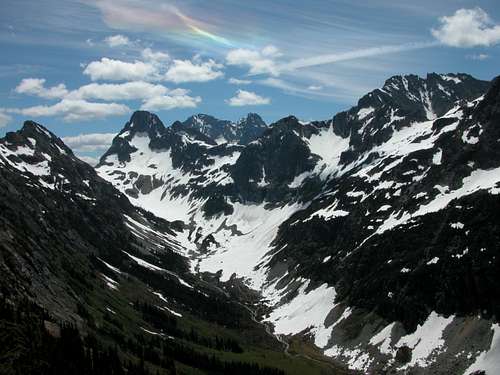
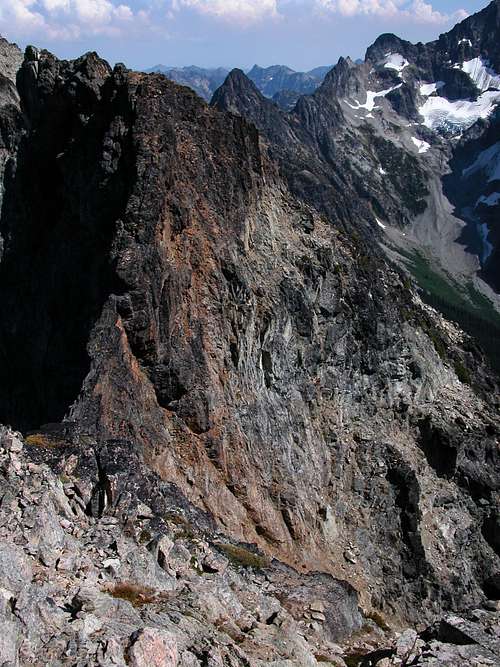
Fisher Creek valley
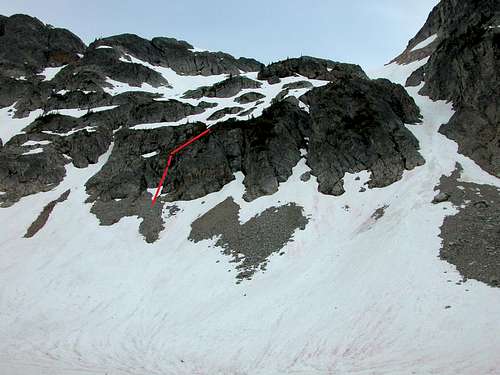
The "wall" bewteen Fisher Creek and Silent Lakes
At the head of the valley turn right and climb up the 1000 foot wall to the Silent Lakes. There is an obvious straight and continuous snow couloir (steeper than it looks, and melts out in the lower portion in late season into a loose rock bowling alley) or one can zig-zag up broken cliffs, snow, and heather to the left of that (follow the red line). Ice axe and crampons likely needed either way. Plan on a full day to reach the lakes. If you run late on time, there are also a couple of great camp spots at the head of the Fisher Creek valley before climbing the wall, Arriva could reasonably be climbed in a day from a base camp here. One of these tent sites is in the line of larch trees and boulders to the left, the other someone recently excavated on the shelf right next to the waterfall.
The standard route
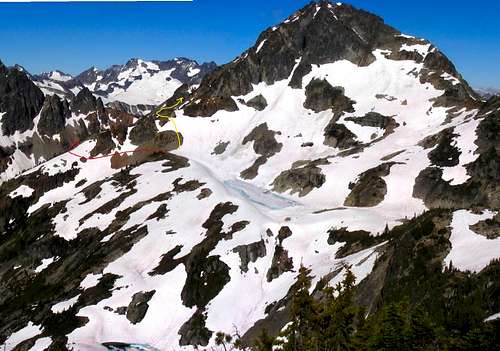
Route starts - Red line standard, yellow line to east summit
Almost all parties ascend Arriva by leaving the upper Silent Lake area and going around the southeast corner, traversing lowthrough two broad basins on the south side. Rise and fall between about 7000 down to as low as 6600 to get around steeper rock buttresses in the first basin. Upon gaining the divide between basin one and two at about 7000 feet, look upwards to plan your travel.
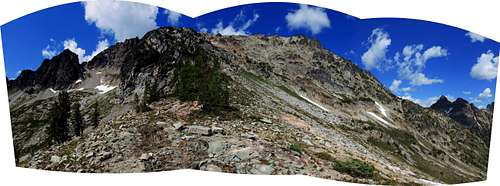
On the divide between the two south side basins, up to the left is the high notch/ridge you are aiming for.
You are aiming for the notch in the far ridgeline just below 7800 feet.
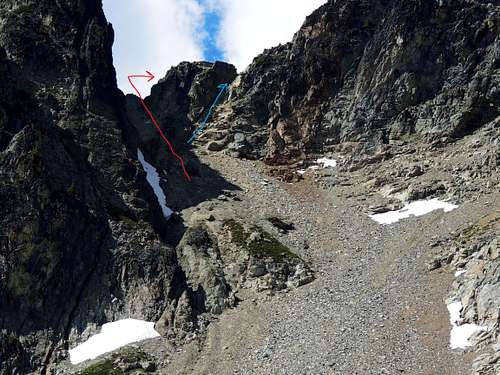
Red line class 3, blue line class 4
Climb through this notch, then on the other side turn hard right as soon as possible and find the dirt, grass, and loose rock ravine that heads steeply uphill between vertical rock, like an inviting corridor.
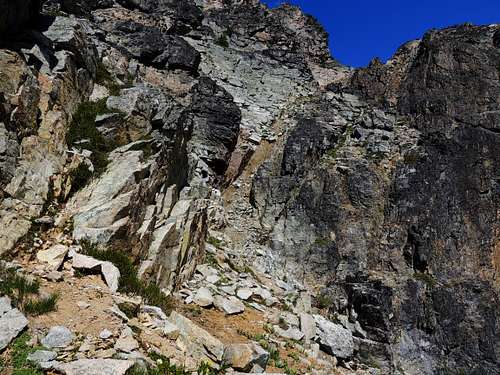
This class 3 ravine cuts right through the south ridge, providing a convenient corridor to ascend right up to the ridgetop.
Follow this uphill as it travels back through the ridgeline from the west side to the east side. In one spot it opens out to the east, requiring an exposed few feet across a grit covered ledge, but with caution can be crossed, and the corridor resumes, quite visible and obvious, right on the other side. If you encounter anything exceeding class 3, you are off route. This corridor takes one right to the ridgetop, just below the summit, then turning west another gift of geology provides an amazing continuous ledge all the way acrossthe south face, which leads to the southwest corner and an easy scramble up.
Ridgetop traverse route
This is the original first ascent route, a traverse of the ridge from east to west, but it requires a rope in just one spot unless you are comfortable with exposed down-climbing on crumbly rock.First ascend from the upper lake to the ridgeline above. This start is illustrated with the yellow line in the above section, photo “Route starts”, and in this section with a close-up photo “Route start to east summit”. Click on either for more explanation.
Route start to east summit just above the lake
This involves ascending straight up to the ridge line a couple hundred feet – will be on snow in early summer, broken rock and dirt later season – then turning uphill on the crest of the corner until cliffs block easy scrambling. Turn left, west, into a south facing amphitheater of easy class 3 climbing and pick your way to the ridge top.

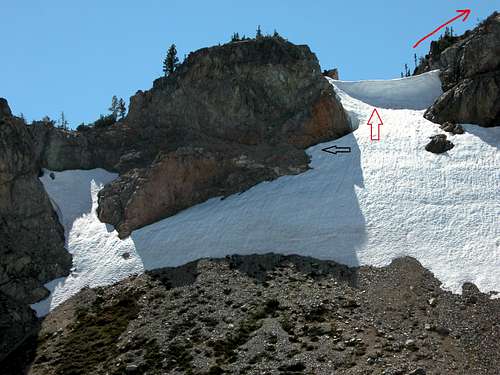
The key ledge & snowbridge

Looking back at the ledge & snowbridge
If you end up where I did the first time, when you are almost at the ridge top you will come up against vertical rock, but a convenient ledge goes west and connects with an apparent snowbridge, really a wedge, filling the gap beyond the ledge. Climb easily beyond that, then up around the corner and arrive on the east summit. Note the refrigerator-size pedestal rock right on the summit; this formation can actually be seen from Easy Pass with binos or telephoto. Then follow the ridge top westbound and enjoy a privileged and spectacular walk in the sky, with interesting solid-rock sidewalk sections next to vertical drop-offs. However, a deep cleft two-thirds of the way keeps it from being simple; for most people, a rope would be needed here. The rest of the traverse joins the standard route and does not require rope for skilled scramblers, so one can leave the rappel rope in place to allow easier re-ascent of the cleft on the return trip.
The cleft
A reading of the Beckey guide suggests that this notch stymied Beckey, as he claims a first ascent of the east summit, leaving the first ascent of the true west summit to be claimed 26 years later by the famous foursome of the Meulemens/Fireys. Beckey would never pass up a first ascent unless something significant stopped him, would he? (Feel free to correct me, Fred, if I misinterpreted something).
Camping
Camping is permitted in North Cascade National Park subject to the backcountry permit mentioned under Red Tape. Also there are numerous Forest Service and commercial camping facilities both east and west of the area. |  |
Mountain Conditions
For up-to-date mountain conditions, contact the National Park as follows:MAY - SEPTEMBER
North Cascades National Park
Wilderness Information Center
7280 Ranger Station Road
Marblemount, WA 98267
(360) 873-4500 ext. 39
OCTOBER - APRIL
North Cascades National Park
2105 State Route 20
Sedro-Woolley, WA 98284
(360) 856-5700
When To Climb
This area is best entered from mid-July through October.Red Tape
A camping permit is required for overnight stays in the backcountry of North Cascades National Park. Click here for complete information about the permit system, and to find where to obtain a permit. Note that the permit must be obtained at a park visitor center during open hours.In addition, all trails and some picnic areas and campsites in the National Forests require a regional pass costing $5/day or $30/year. Golden Age and Golden Access Passport holders may purchase the above pass at a 50% discount. The Golden Eagle Passport will not apply to the Regional Northwest Forest Pass. You can get them at any Pacific Northwest forest service office or ranger station, or it can also be purchased online from the Washington Trails Association. Click here for more information about the Northwest Forest Pass.
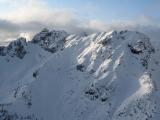
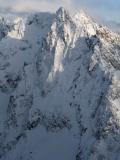
More Arriva Photos
Click on the thumbnails for more winter aerial photos of Arriva by John Scurlock.