
-
 24311 Hits
-
 84.27% Score
-
 18 Votes
|
|
Route |
|---|---|
|
|
37.36810°N / 118.767°W |
|
|
Trad Climbing |
|
|
Spring, Summer, Fall, Winter |
|
|
Half a day |
|
|
5.8 (YDS) |
|
|
6 |
|
|
III |
|
|
Approach
From the Mosquito Flats trailhead follow the Little Lakes trail to the south end of Long Lake. From here you have two options for getting to Dade Lake, the most common camp spot for parties taking more than one day to do the route.The first option is to make a right turn down a use trail that crosses the stream at the south end of the lake and then winds its way up to Treasure Lakes. Skirt the lakes on the east side and then scramble up steepening talus (and sometimes snow) to Dade Lake. JD offers another option for the Treasure Lakes approach:
"If you go up to Treasure Lakes the best option is not boulder hopping around the lakes. The easiest way is to head left from the outlet of the first Treasure Lake and follow a climber's path up to the rounded plateau left of the Lakes. Gentle hiking leads one to the start of the talus in front of Dade Lake."
I have not personally done this approach, but it sounds good.
Another option is to continue up the trail towards Mono Pass to a side trail that leads to Gem Lakes. A use trail heads up into talus (it disappears once the talus starts in earnest) above the largest of the Gem Lakes. Follow the drainage up and then right (west) to Dade Lake. I personally prefer this option because the talus scramble is not as loose as the Treasure Lakes option, and you skip the miserable boulder hop around the biggest Treasure Lake. YMMV.
Pass Dade Lake on the east and wander up slabs and talus to the toe of the obvious arete.
Route Description
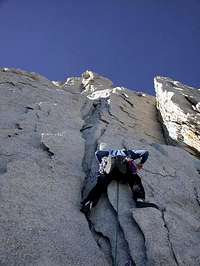 Starting the first pitch
|
Pitch 0 | Gain the lower right hand side of the arete. Climb up and left over steepening ground, eventually traversing (a couple moves of 5.6) to a large ledge. Many parties climb this unroped. There are other options for gaining the large ledge, but I do not have any specific information on them.
|
| Pitch 1 | Climb a crack (5.7) just left of a large left-facing dihedral to a belay ledge at the base of a right-trending trough. | |
| Pitch 2 | Climb up the trough until it is possible to head up a series of steep flakes (5.7). You eventually reach a large flake below a short, steep headwall split by a narrow crack. This is not as hard as it looks. Standing on the flake you should be able to reach some jugs and then haul yourself up. A large belay ledge is a short distance above. | |
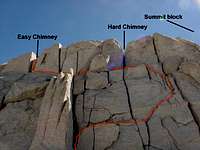
| Pitches 3 & 4 | Wander up through mostly class 4 and easy class five terrain to a small belay ledge on the left side of the arete, just below and left of a large tower. Note: the standard route is well to the left of the arete proper at this point. Traverse left below the tower until progress is blocked by a headwall. The belay is in a blocky area just below a system of flakes, cracks, and a chimney/offwidth that leads up and slightly right behind the tower. | |
| Pitch 5 | Climb up flakes and an offwidth (5.8), then continue up easier ground to a large belay ledge around a corner on the left. The off width section can be stemmed, which seems easier than 5.8. Alternatively, one can climb the tower directly (5.10) to the aforementioned ledge. Check this photo. | |
| Pitch 6 | Climb up and right a short distance to a keyhole. Tunnel through the keyhole (the fun part is what to do when emerging from this head first!) and traverse under a wall (~class 4) to a convenient belay spot. | |
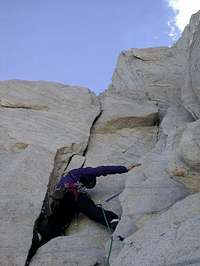
| The rest of the climb | Congratulations, you are now about halfway up the arete! What follows is one of the classic Sierra ridge scrambles. It's mostly class 4, with some class 3 and easy class 5 thrown in for fun. There are many ways to go. Many parties will either solo this part, or simulclimb.Whatever your approach, gain the ridge as soon as possible and follow it until progress is blocked by the summit headwall. Traverse right on ledges about 100' to a notch about 100' below the summit. From here, there are also many options, ranging from class 4 to hard class 5, depending on route selection. A popular way to go is to head up the left side of the summit block to a short squeeze chimney. From the top of the chimney scramble to the summit block. |

 Classic ridge climbing on the upper ridge |
 The traverse near the top of the route |
 One option on the final headwall |
Descent
Descend via Ulrich's Route. Downclimb or rappel the west side of the summit area (about 100') and follow a series of ledges down to a gentle sandy area. A notch on the right is Cox Col. When the snow is all melted away you will be able to follow a well-worn path to the correct notch. Scramble down a steep, loose chute to easier ground, and make your way back down the canyon and return to the trailhead the way you came.Essential Gear
This route protects very well. Carry cams to 3" and some nuts. If you like to place lots of pro, doubling up on cams in the 0.75-2" range might give you more options. The scrambling on pitches 3, 4, and above the keyhole can meander, so a few long slings will come in handy.Later in the season the snowfield at the toe of the arete can be quite hard, especially before the sun hits it. Crampons may be needed. Earlier in the season there may be quite a bit of snow on the approach. Travelling early in the day will help on the way up, but by midday the snow will be mush, especially on the descent from Cox col. If you don't want to carry snowshoes (and few do), be prepared for a bit of postholing.
Bring a camera! This is an incredibly photogenic route.
5-1-06 1539